E-commerce Store With ChatPion :
Introduction
“Ecommerce store” is a special feature of ChatPion , the world’s best marketing software. With the feature, you can create a virtual store that will open not only inside messenger but also on the browser. Just after creating your store, it will provide two QR codes-- Messenger QR code and browser QR code. Just as your customers QR code, straightway, your virtual store opens inside your messenger or on browser. Because of the QR codes, the customer can directly enter your store.
With ChatPion Ecommerce feature, you can create both Ecommerce store & Restaurant food ordering system . Restaurant food order can be set both for home delivery or inside restaurant for counter or table wise delivery . All option are available to create your desire option for your both Ecommerce store or Restaurant.
Before going into details , you may check the live demo


In this blog, I will show you how to create Ecommerce store for inside messenger and on browsers with ChatPion
Creating store:
First, you have to create a store on the interface of the Ecommerce store and add products to the store. Then you have to make some settings so that your virtual store works properly.
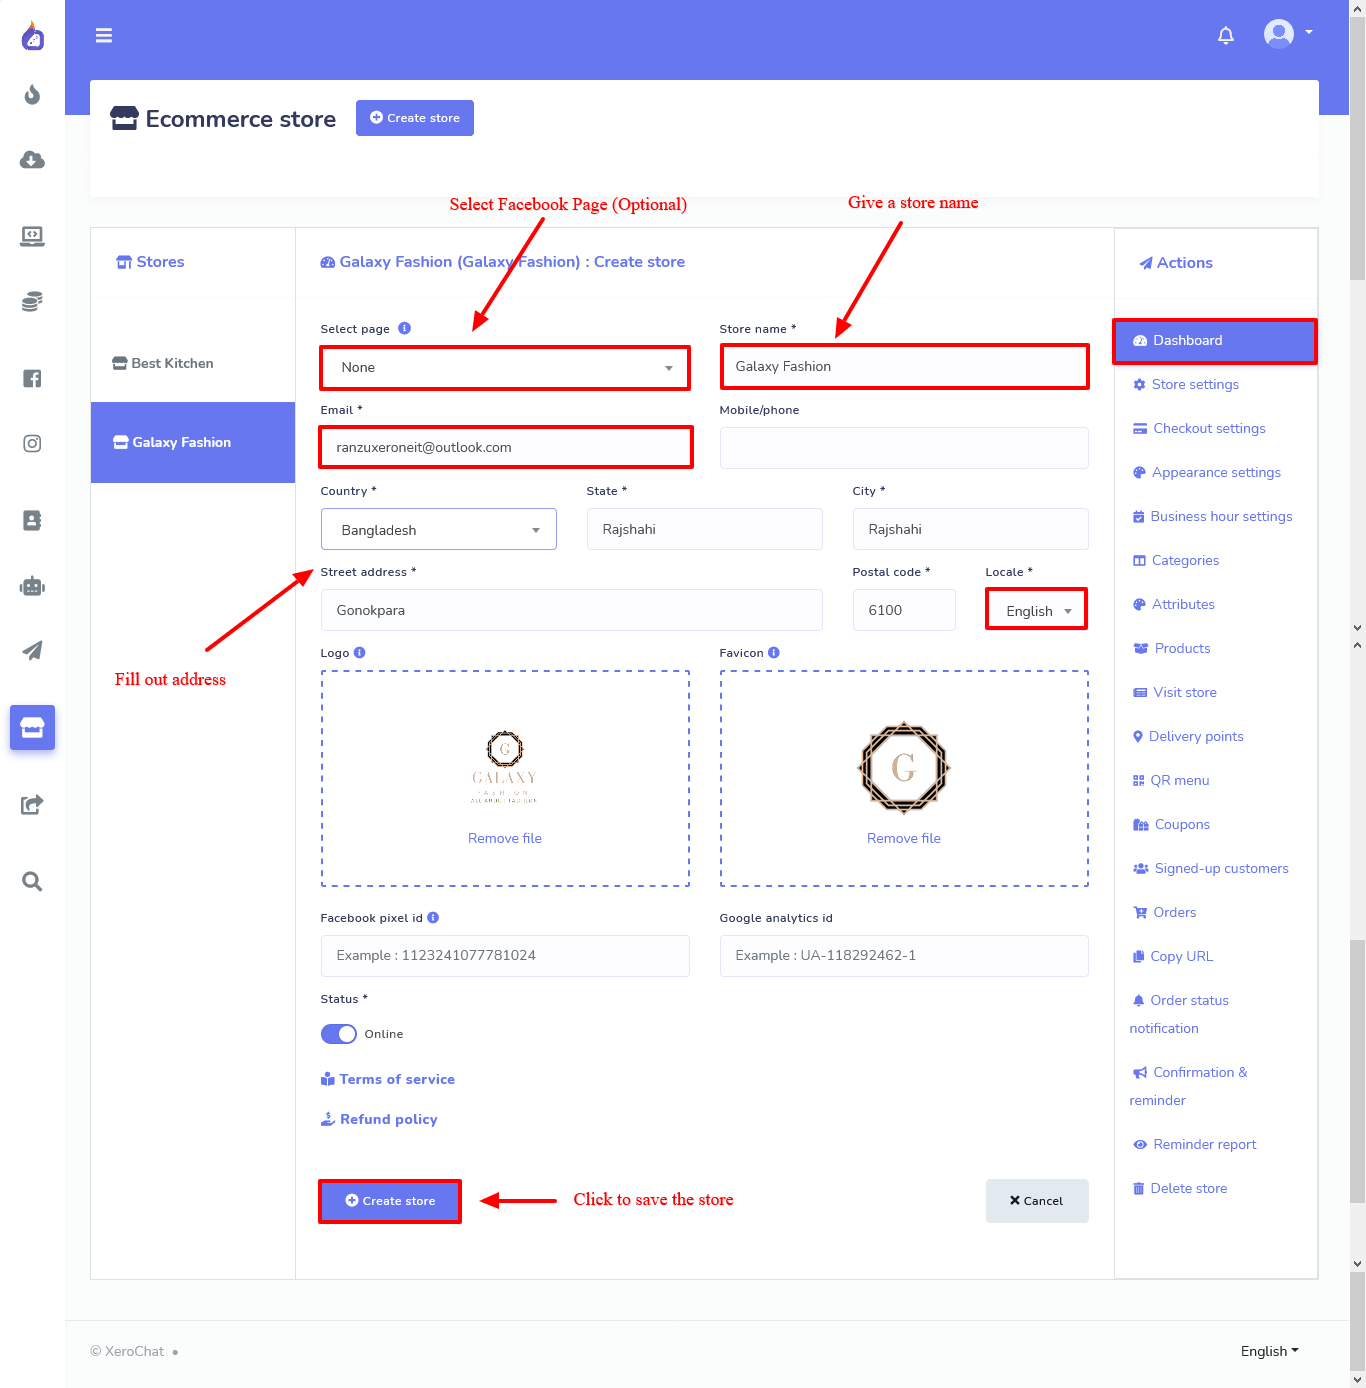
First, go to the left panel of the ChatPion Dashboard > click on the Ecommerce store.
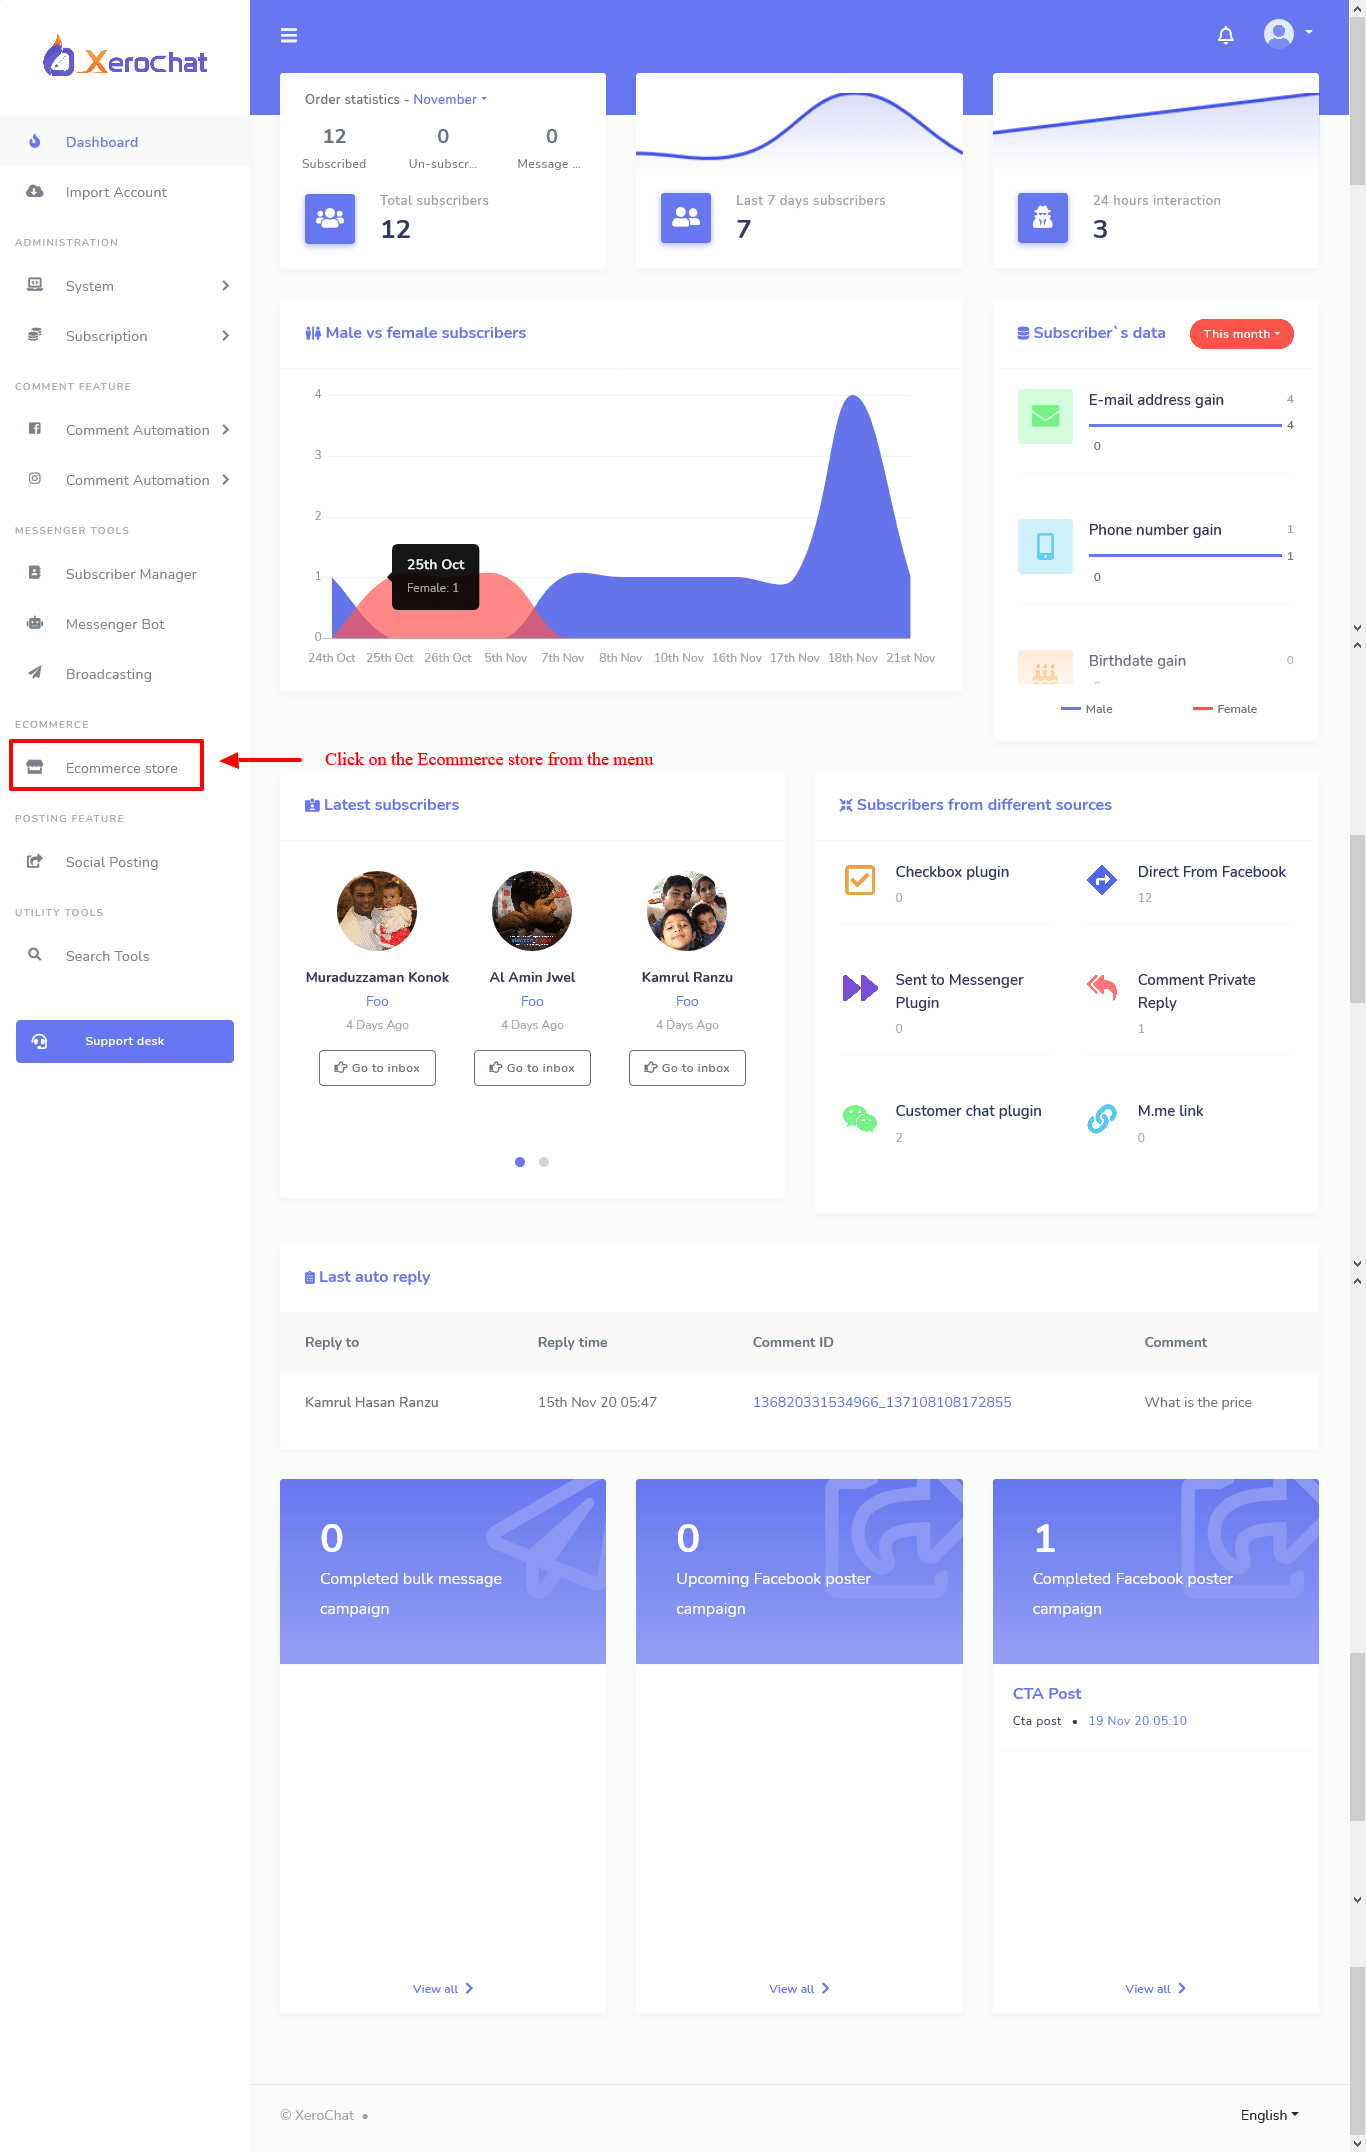
Just as you click on the Ecommerce store button, the interface of the Ecommerce store will appear with a Create store button at the top of the page.
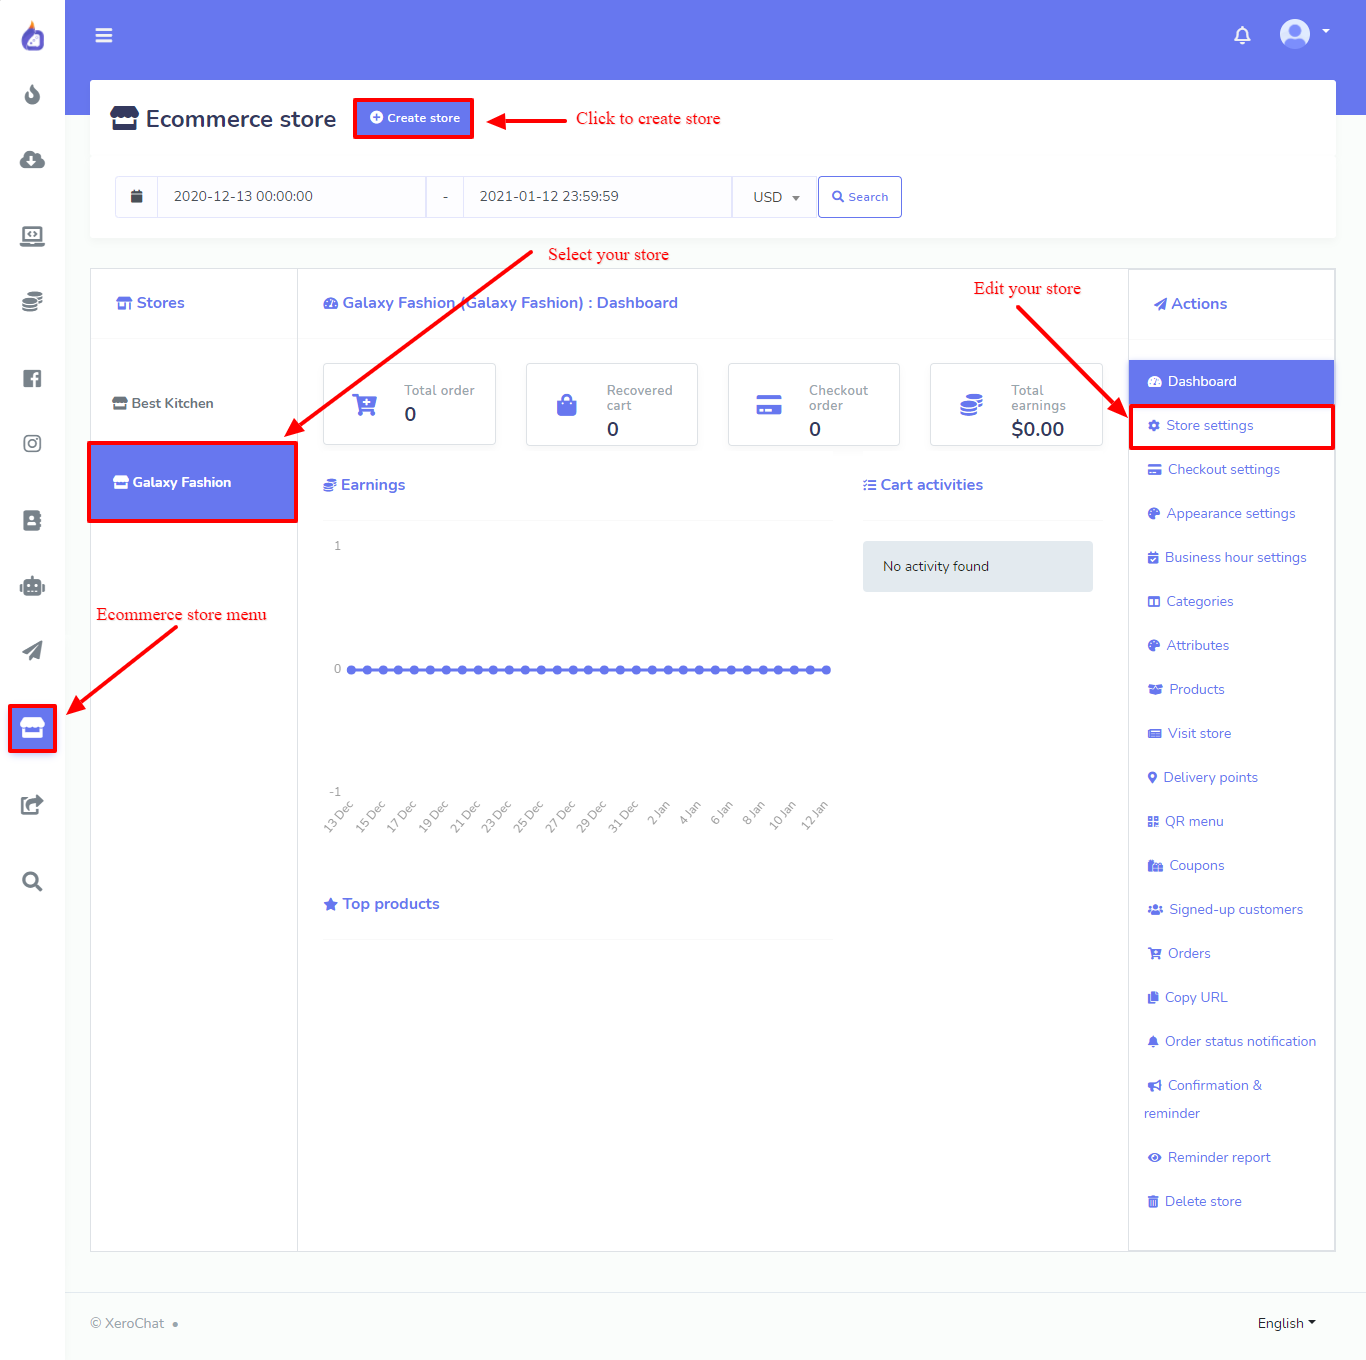
To create store, click on the Create store button> fill-out the form-- selecting a Facebook Page, providing some initial information about your store, writing down the Terms of service and refund policy, and uploading the logo and favicon.
In the form, there is a special box called local. Just as you click on the box, a drop-down menu of some languages will be shown-- select a language from here. Your ecommerce store will open in the language you select. For example, if you select English, your Ecommerce store will appear to your customers in English.
When you have completed filling out the form click on the create store button.
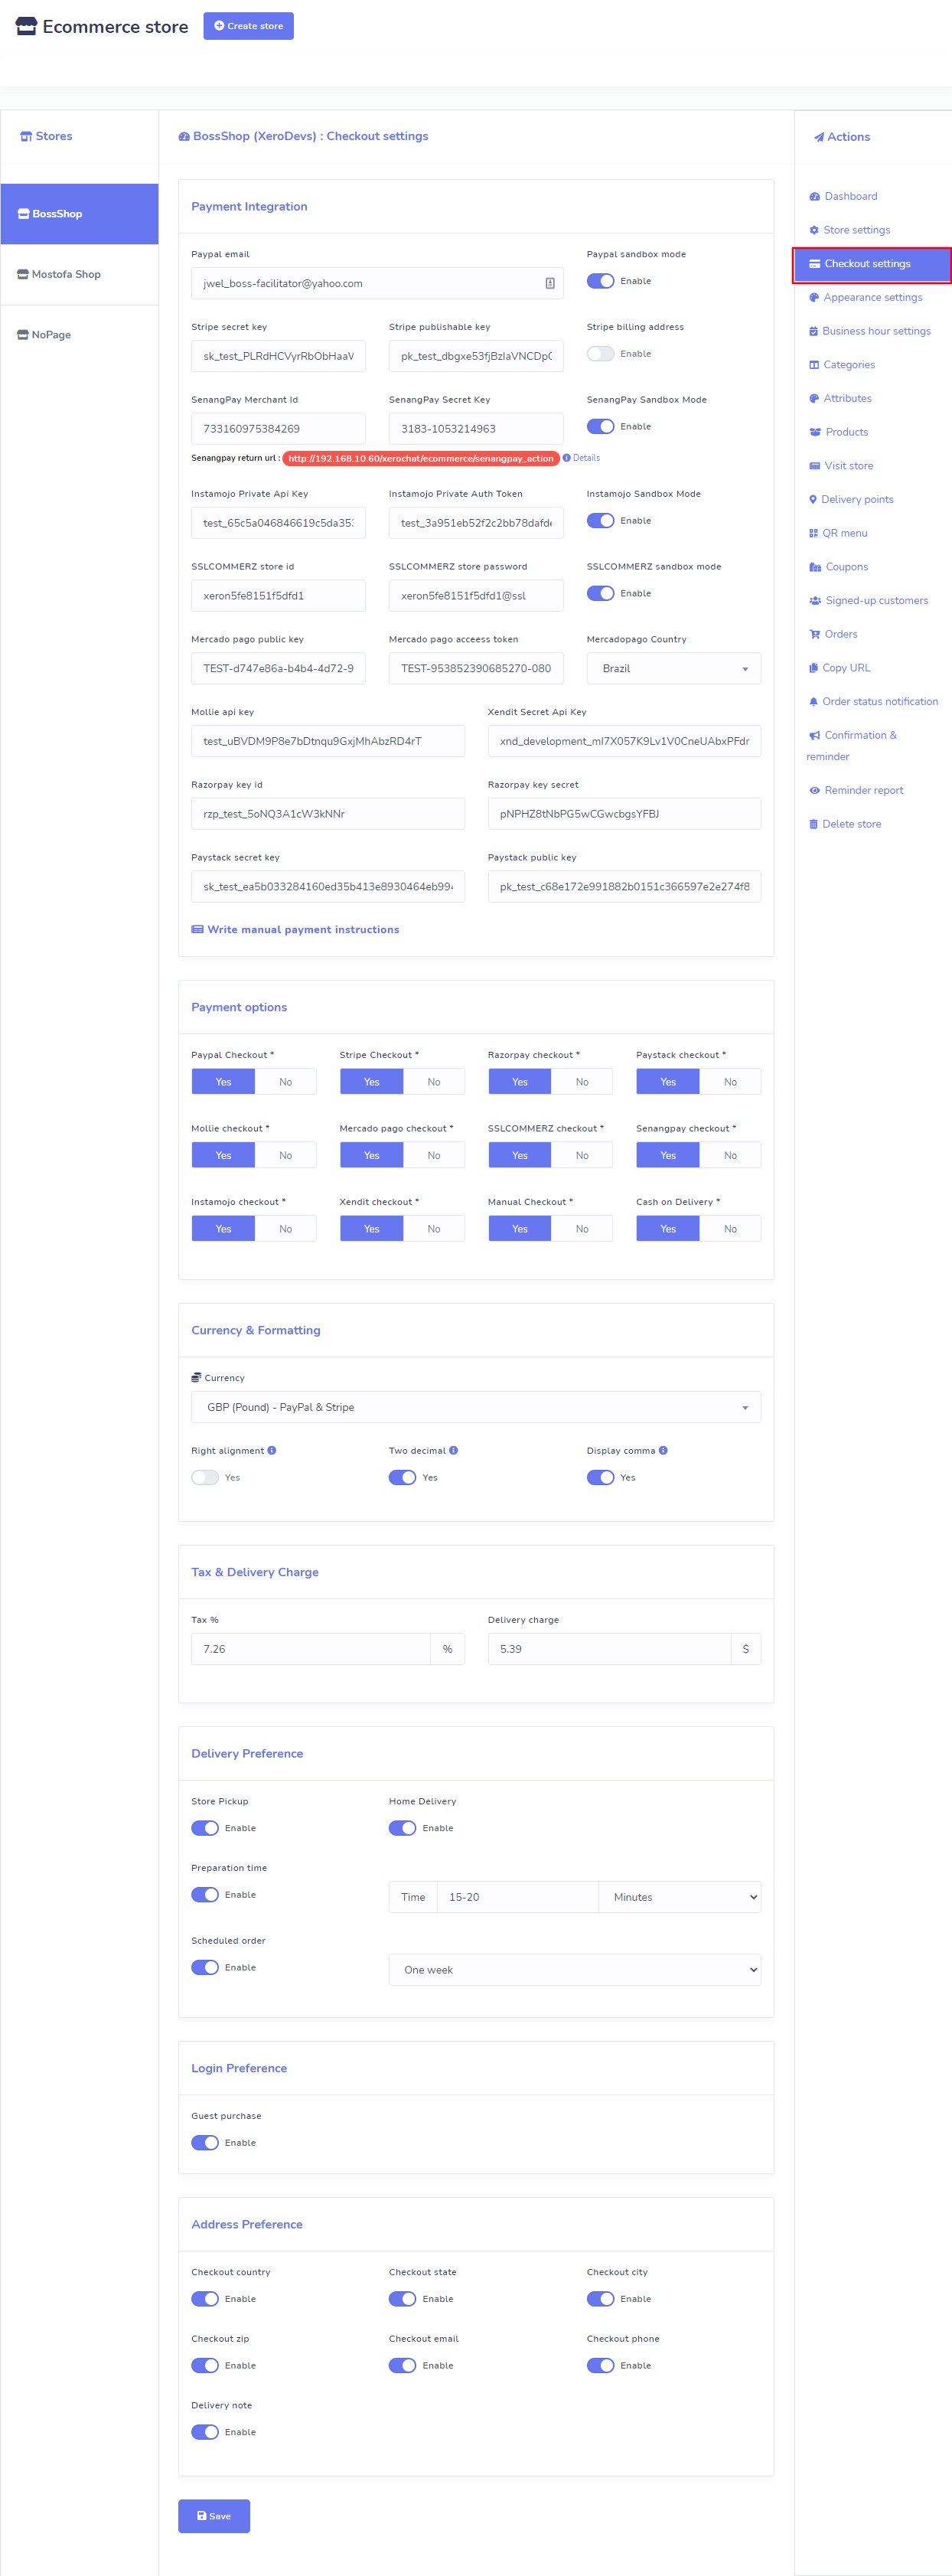
Checkout settings:
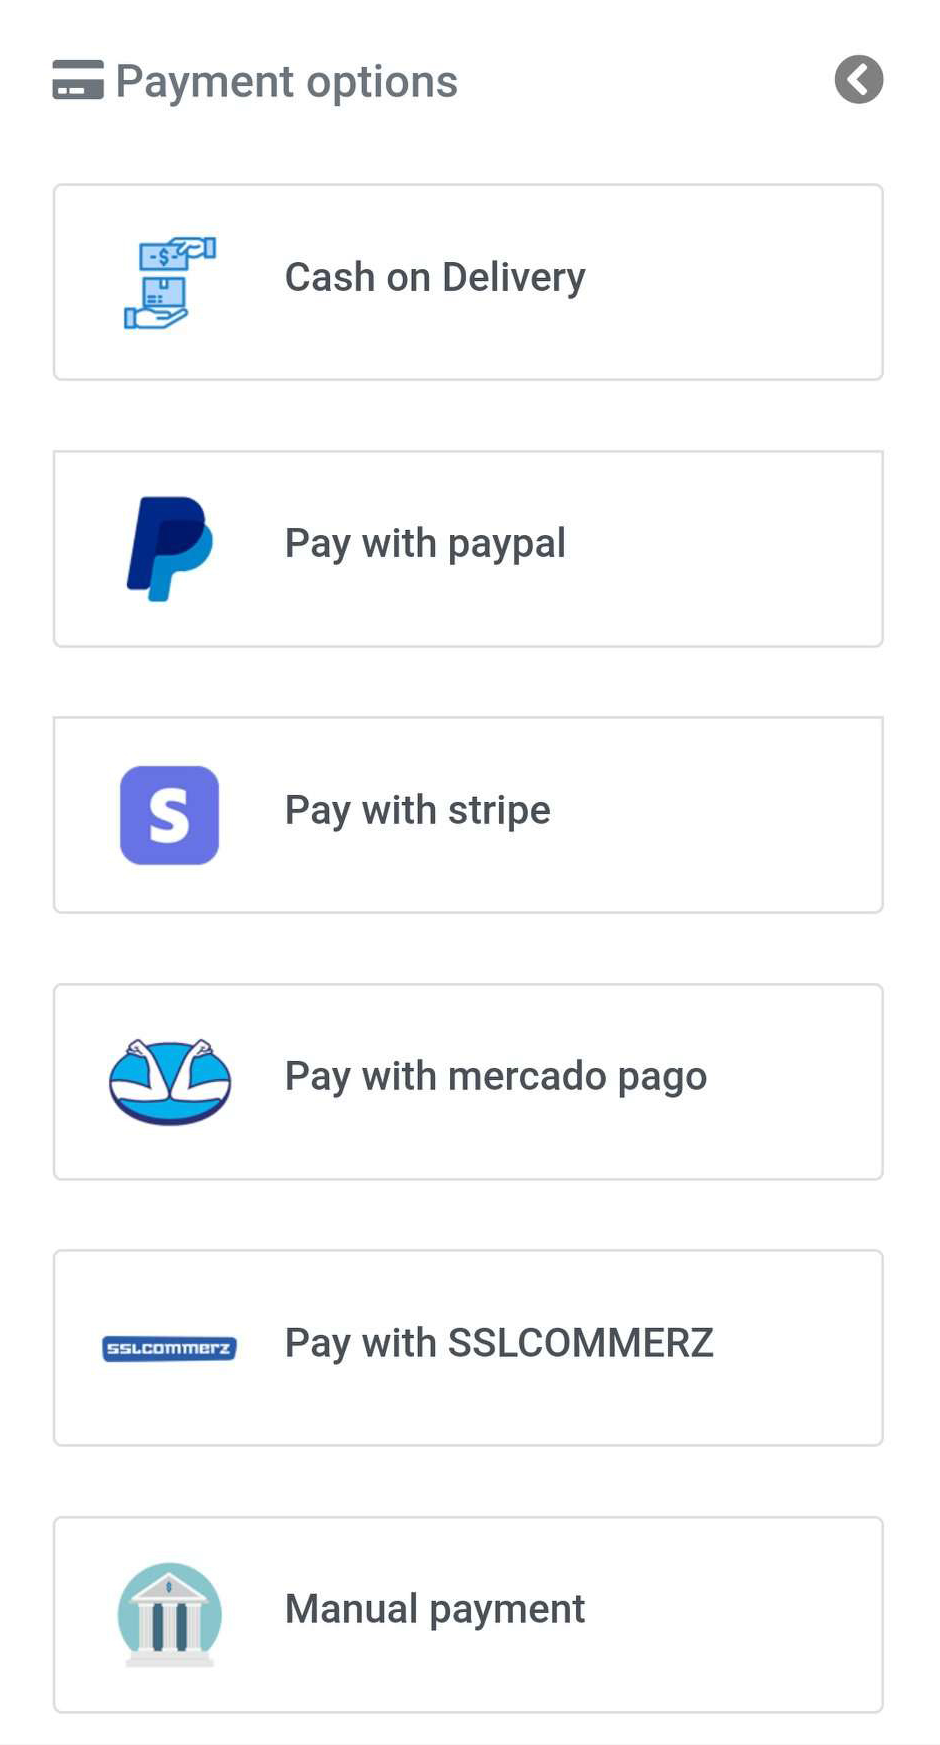
Now you have to make a checkout setting for your store. ChatPion’s Ecommerce store has integrated some online payment methods— PayPal, Stripe, Mollie, Razorpay, Paystack, SSLCOMMERZ and Mercado pago— so that your customers can easily pay via the payment methods. Besides, it supports manual payment and cash on delivery systems.
Now you can make a specific checkout setting for a specific store.
To make a checkout setting, click on the ‘Checkout settings’ > fill-out checkout integration form-- providing your account information.
you will get a checkout payment option. From here, enable any online payment methods and manual checkout for your store. And ‘Cash on Delivery’ is enabled by default. After that, you will get the ‘Currency and Label’ option. From here, select your currency.
Then you will see, in a row, three radio buttons called ‘Right alignment’, ‘Two decimal’, and ‘Display comma’. Hover your mouse over the tooltips of the buttons, to see the functionality of the buttons. Then came the Tax and Delivery charge option. Here, you have to provide the amount of Tax in percentage and delivery charge.
Delivery preference:
You can enable/disable the Store Pickup and Home delivery option.
If you don’t have a real outlet, you can disable the ‘Store Pickup’ option. On the other hand, you have a real outlet, but you decide not to give home delivery of your products, you need to disable the ‘Home Delivery’ option. But suppose you have a real outlet and you give home delivery, you should enable both of the two options-- ‘Store Pickup’ and ‘Home Delivery’.
If you enable the ‘Store Pickup’ button, the clients receive the products directly from your store. On the other hand, if you disable the ‘Store Pickup’ button, you have to provide a delivery address.
Preparation time: You can set the preparation time for all products. The option is useful for the digital menu of a restaurant, for most of the food items of a restaurant need to be prepared after an order for the food has been placed. Of course, you can use the option for your outlet if some of your products are in godown, not in the outlet. So you need time to bring the products from your godown to your outlet. In this case, you can set preparation time for the products.
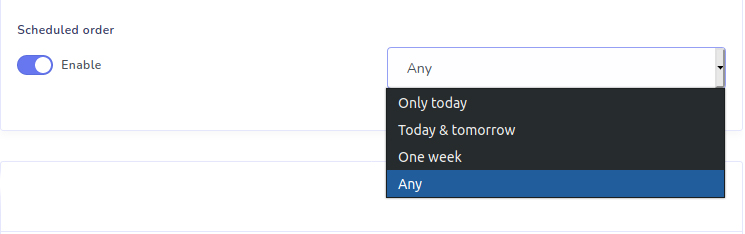
Scheduled order: You can enable or disable schedule order. If you enable schedule order, you can set a time frame for schedule order.
To enable the scheduled order, first you have to turn on the radio button. Next, click on the box and a list of timeframes-- will appear. Now select a timeframe as you think convenience.
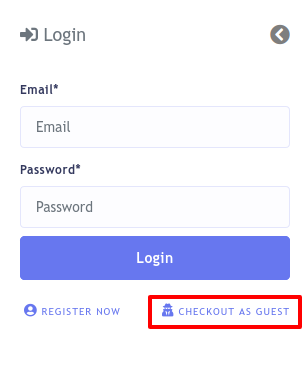
Login preference: In this option, you can enable or disable Guest purchase. If you enable ‘Guest purchase’, any people without signing up and logging in, as a guest, can access your store or digital menu of your restaurant on the browser and buy products or give orders for foods.
And if you enable the ‘Delivery note’ button, your clients can send a delivery note on how they want the delivery.
You can also determine which fields your clients have to provide in the delivery address by disabling and enabling some radio button. If you know the area of your clients, you don’t need to bother your customers to provide their countries, states and cities. On the other hand, if you are uncertain about the area of your customers, let them fill-out their exact addresses. Well, enable and disable them as you see fit.
Now click on the Save button.
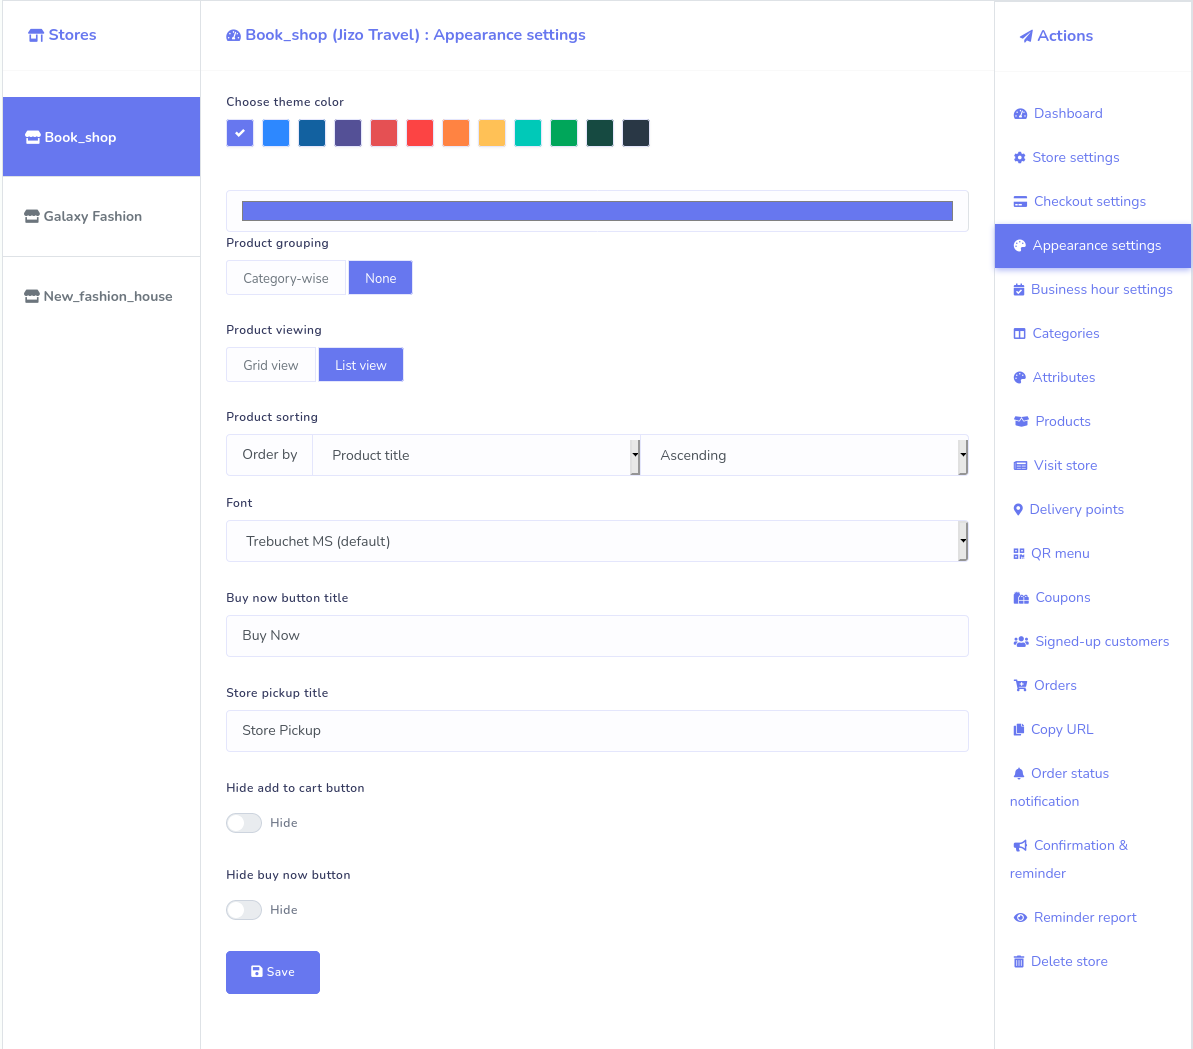
Appearance settings:
With the appearance setting, you can tweak some things to change the default appearance of your store.
To change the appearance of your store, click on the appearance setting and instantly, appearance settings page will appear. You can tweak several things on the page.
Let’s see things that you can tweak:
- You can change the default color: You can choose a theme color from from twelve available colors. Moreover, you can pick a color from a color picker. Click on the blue bar and a color picker will appear. Now you can pick your favorite color from the color picker.
- Product grouping: You can group your products as category wise by enabling the Category wise option.
- Product viewing: You can enable grid view or list view to display your products on your store by enabling grid-view or list-view.
- Product sorting: You can sort your product order by Product title, New product, Price, Total sales and Random either ascending or descending. You can select your product order in the product sorting box.
- Changing font: You can change the default font by selecting a font from a drop-down list of some popular fonts. To change font, click on the box called ‘Font’, a drop-down list of several fonts will appear. Now select your favorite font from the list.
- Hide/show add-to-cart and buy now button: You can Hide or show add to cart or buy now button by turning on and off two radio buttons.
- Changing button title: You can change the button title of ‘Buy Now’ and ‘Store Pickup’ button.
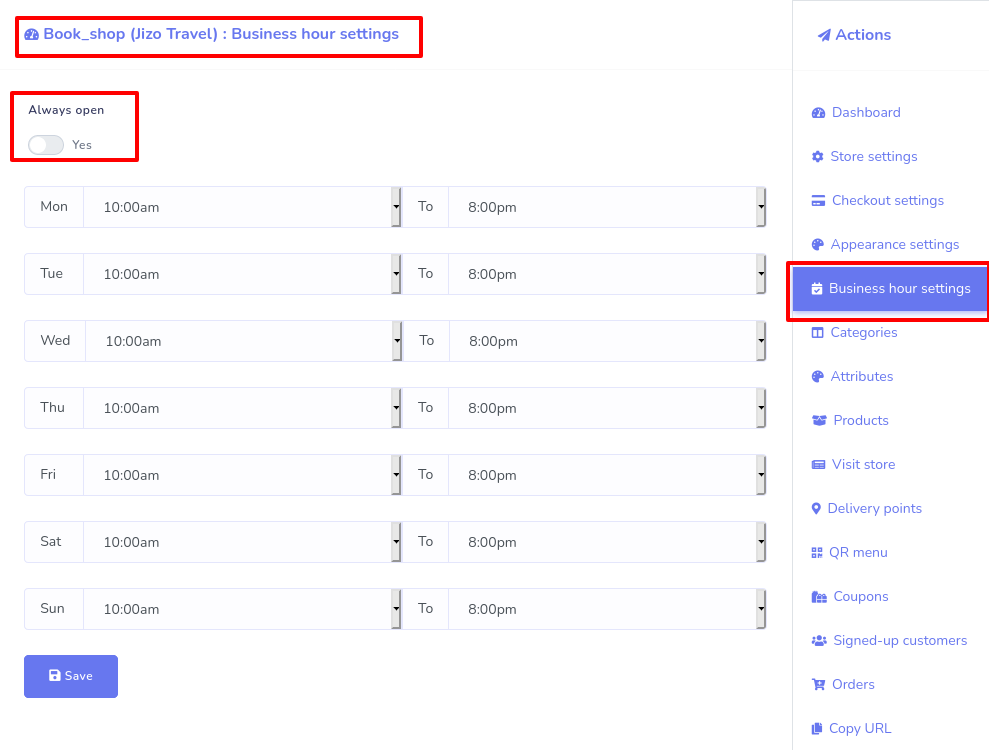
Business Hour Setting:
With the option, you can set the business hour, opening and closing hour for your store.
To set business hours, click on the Business hour settings and instantly the business hour settings page will appear.
If you want to set the business hour of your shop as always open, turn on the radio button called ‘Always open’.
Otherwise, turn off the radio button, and instantly a form will appear. On the form, you can easily set the opening and closing hour of your shop for different days by selecting a time from a drop-down menu.
Add category:
Now you have to add some categories so that you can add products in different categories. The category is an important thing to arrange your products in proper order. If so, your clients can easily choose their desired products.
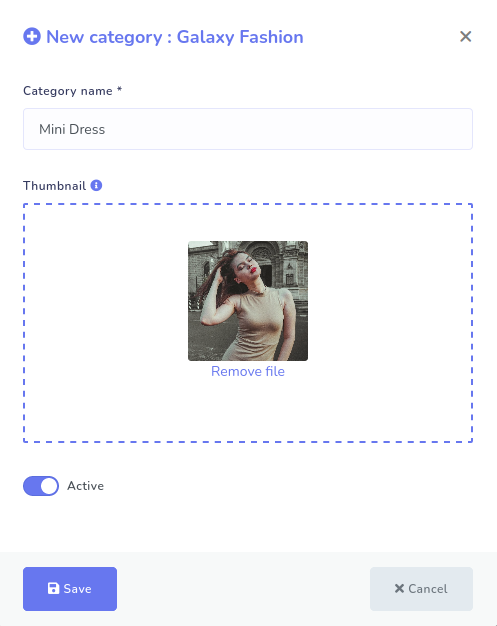
To create a category, go to Categories option at the right panel of the dashboard. A page will appear with add category button at the top of the page. Now click on the add category button.
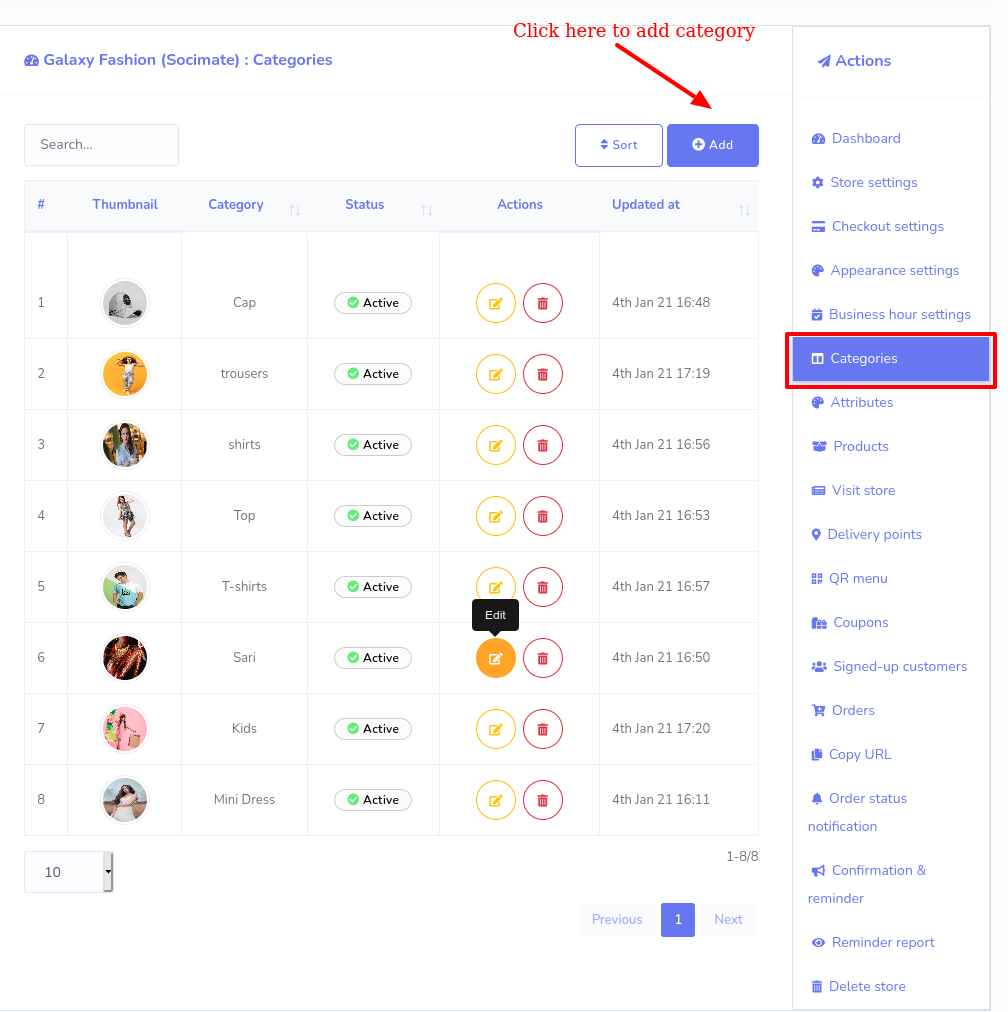
Instantly, a pop-up form will appear. Now select your page and click on Add Category> write down the category name > Click on the Save button.
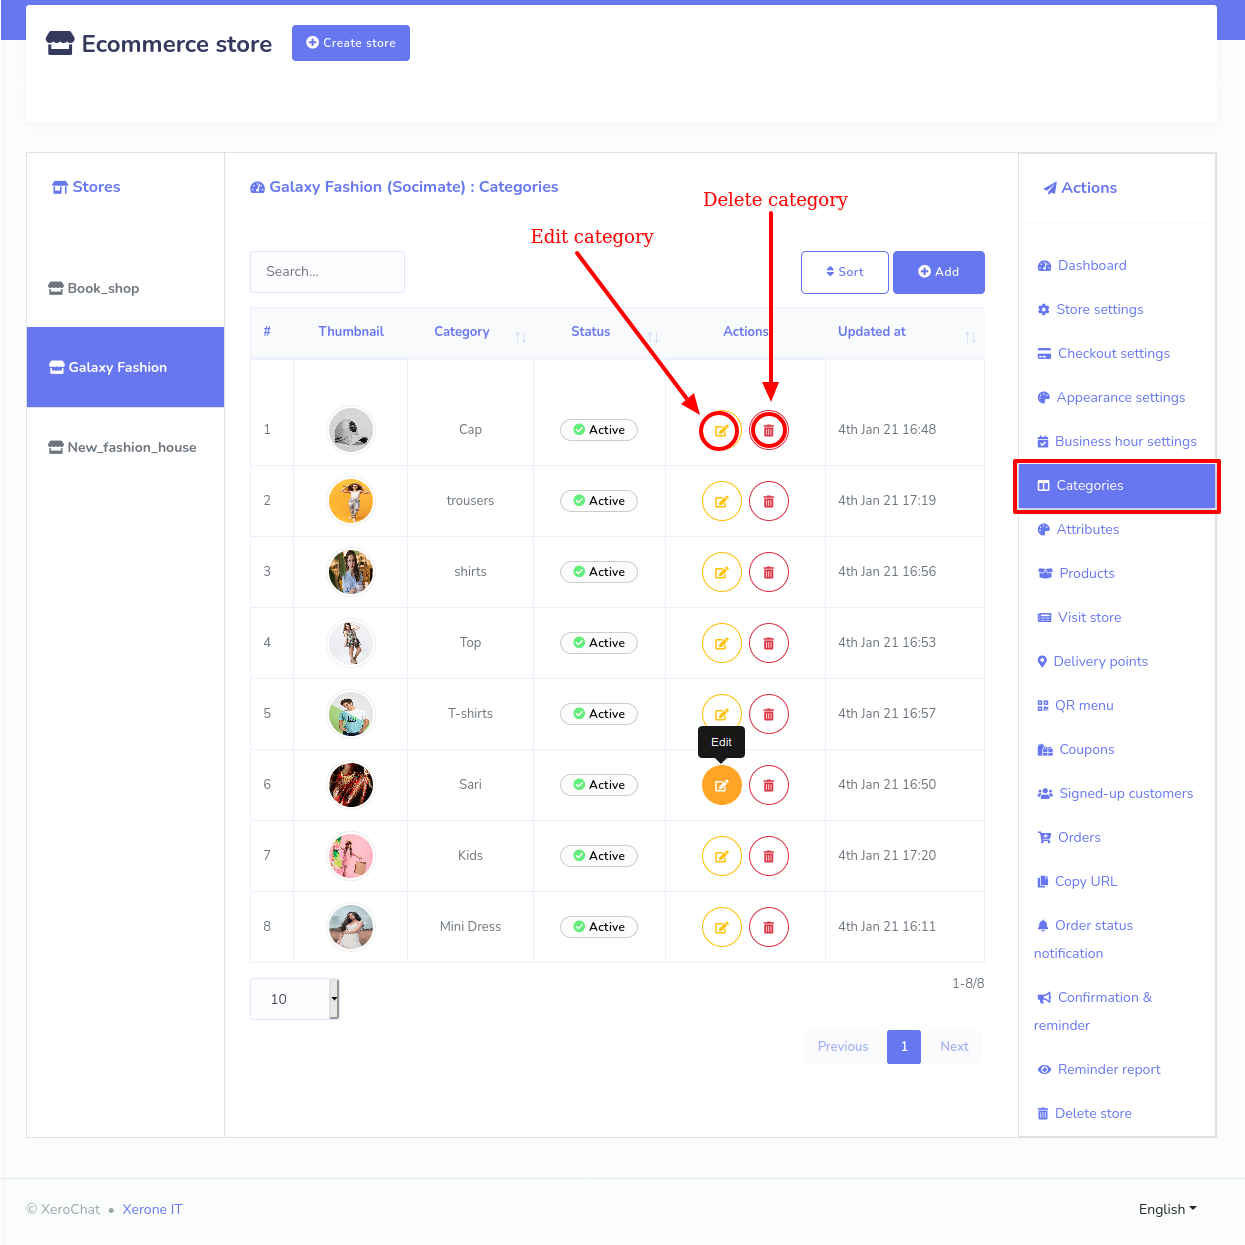
Well, you can create many categories. All the categories-- with edit, delete and status button-- will be listed on the page. By clicking on the edit and delete button, you can edit and delete the category. You can also see the status of the category-- active or not.
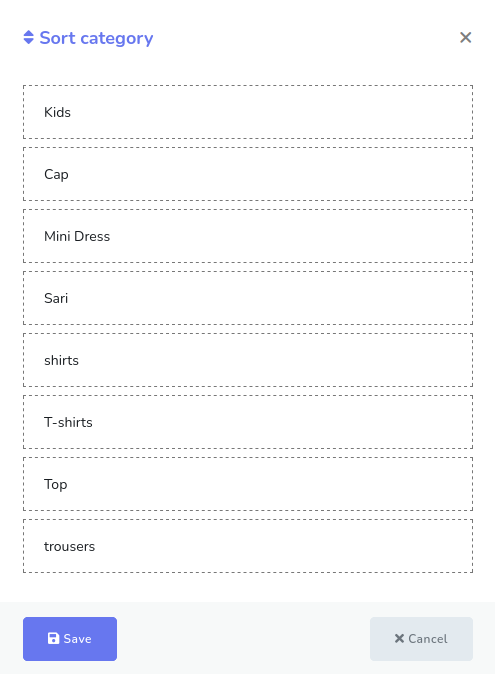
You can also sort the category by dragging and dropping the name of the categories.
To sort the categories,click on the ‘Sort’ button, and instantly, a pop-up page will appear with the names of the categories on it.By dragging and dropping, you can sort the categories.
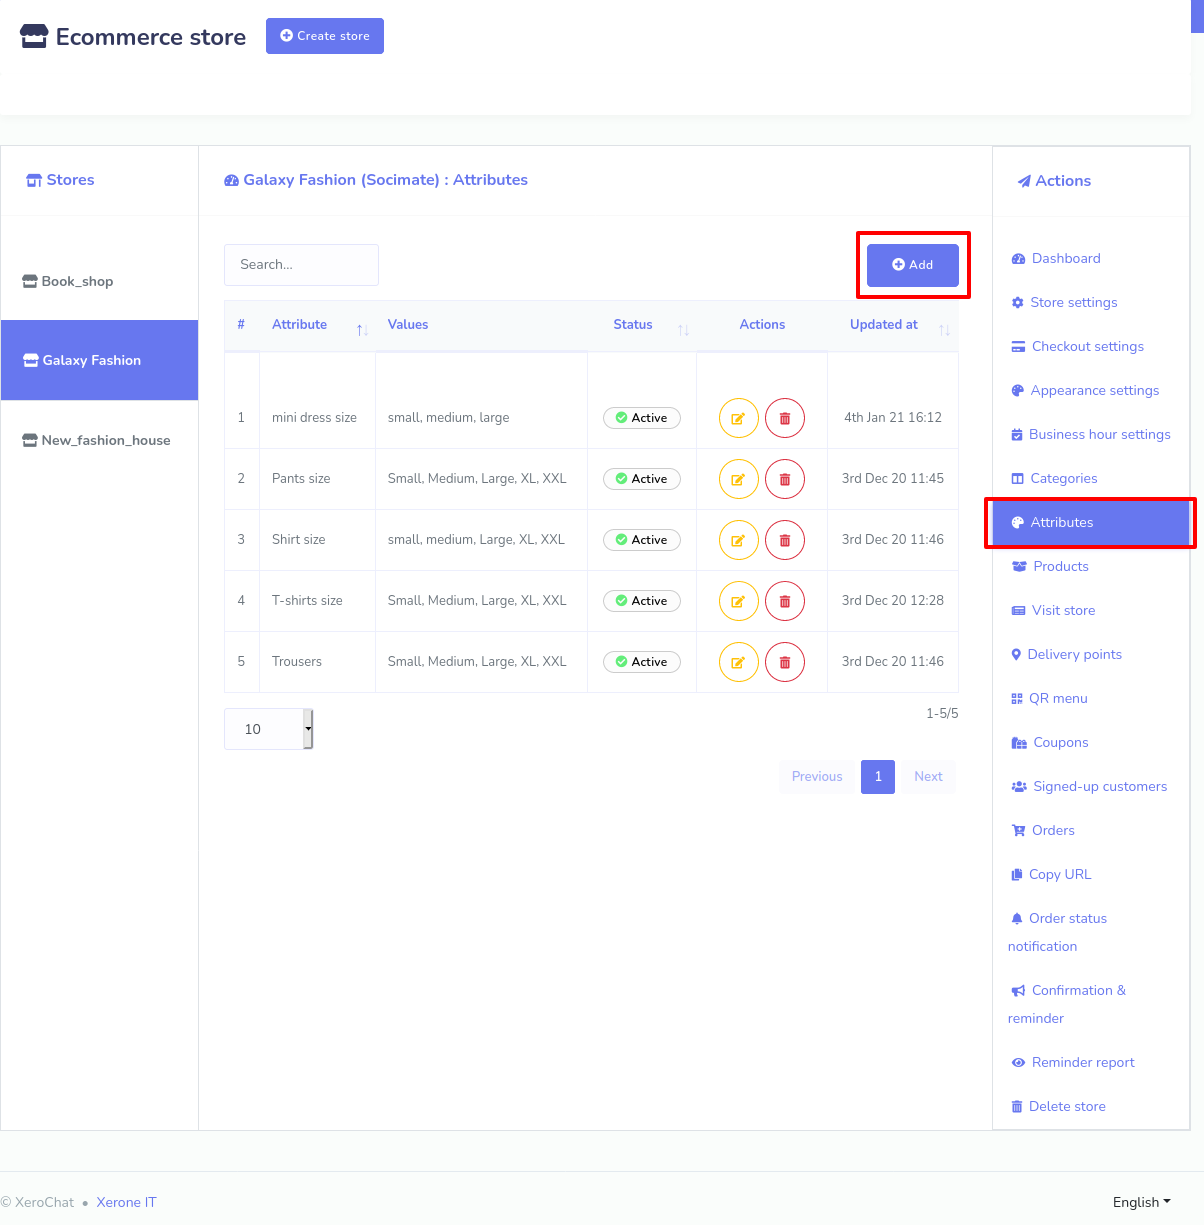
Add Attribute:
To add the attribute,click on Attributes option at the right panel of the Dashboard and a page will appear with Add attribute button at the top of the page. Now click on the Add attribute button.
Instantly, a pop-up form will appear with. Now select your store > write down the Attribute Name > provide attribute value in comma-separated> enable or disable any of the three radio buttons called ‘Multi select’, ‘Optional’, and ‘Active’ as you see fit as you see fit> click on the save button.
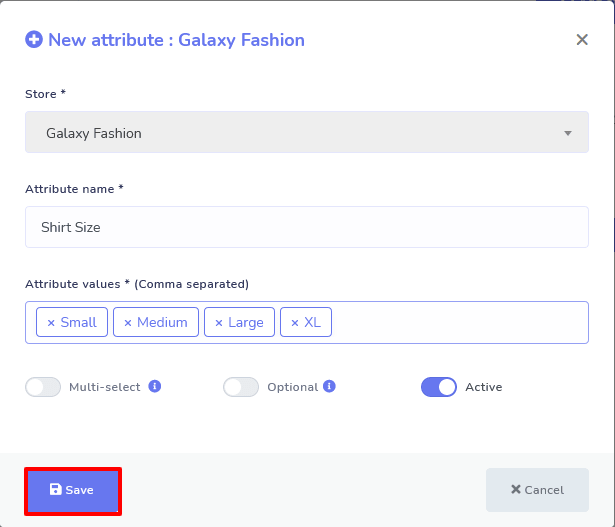
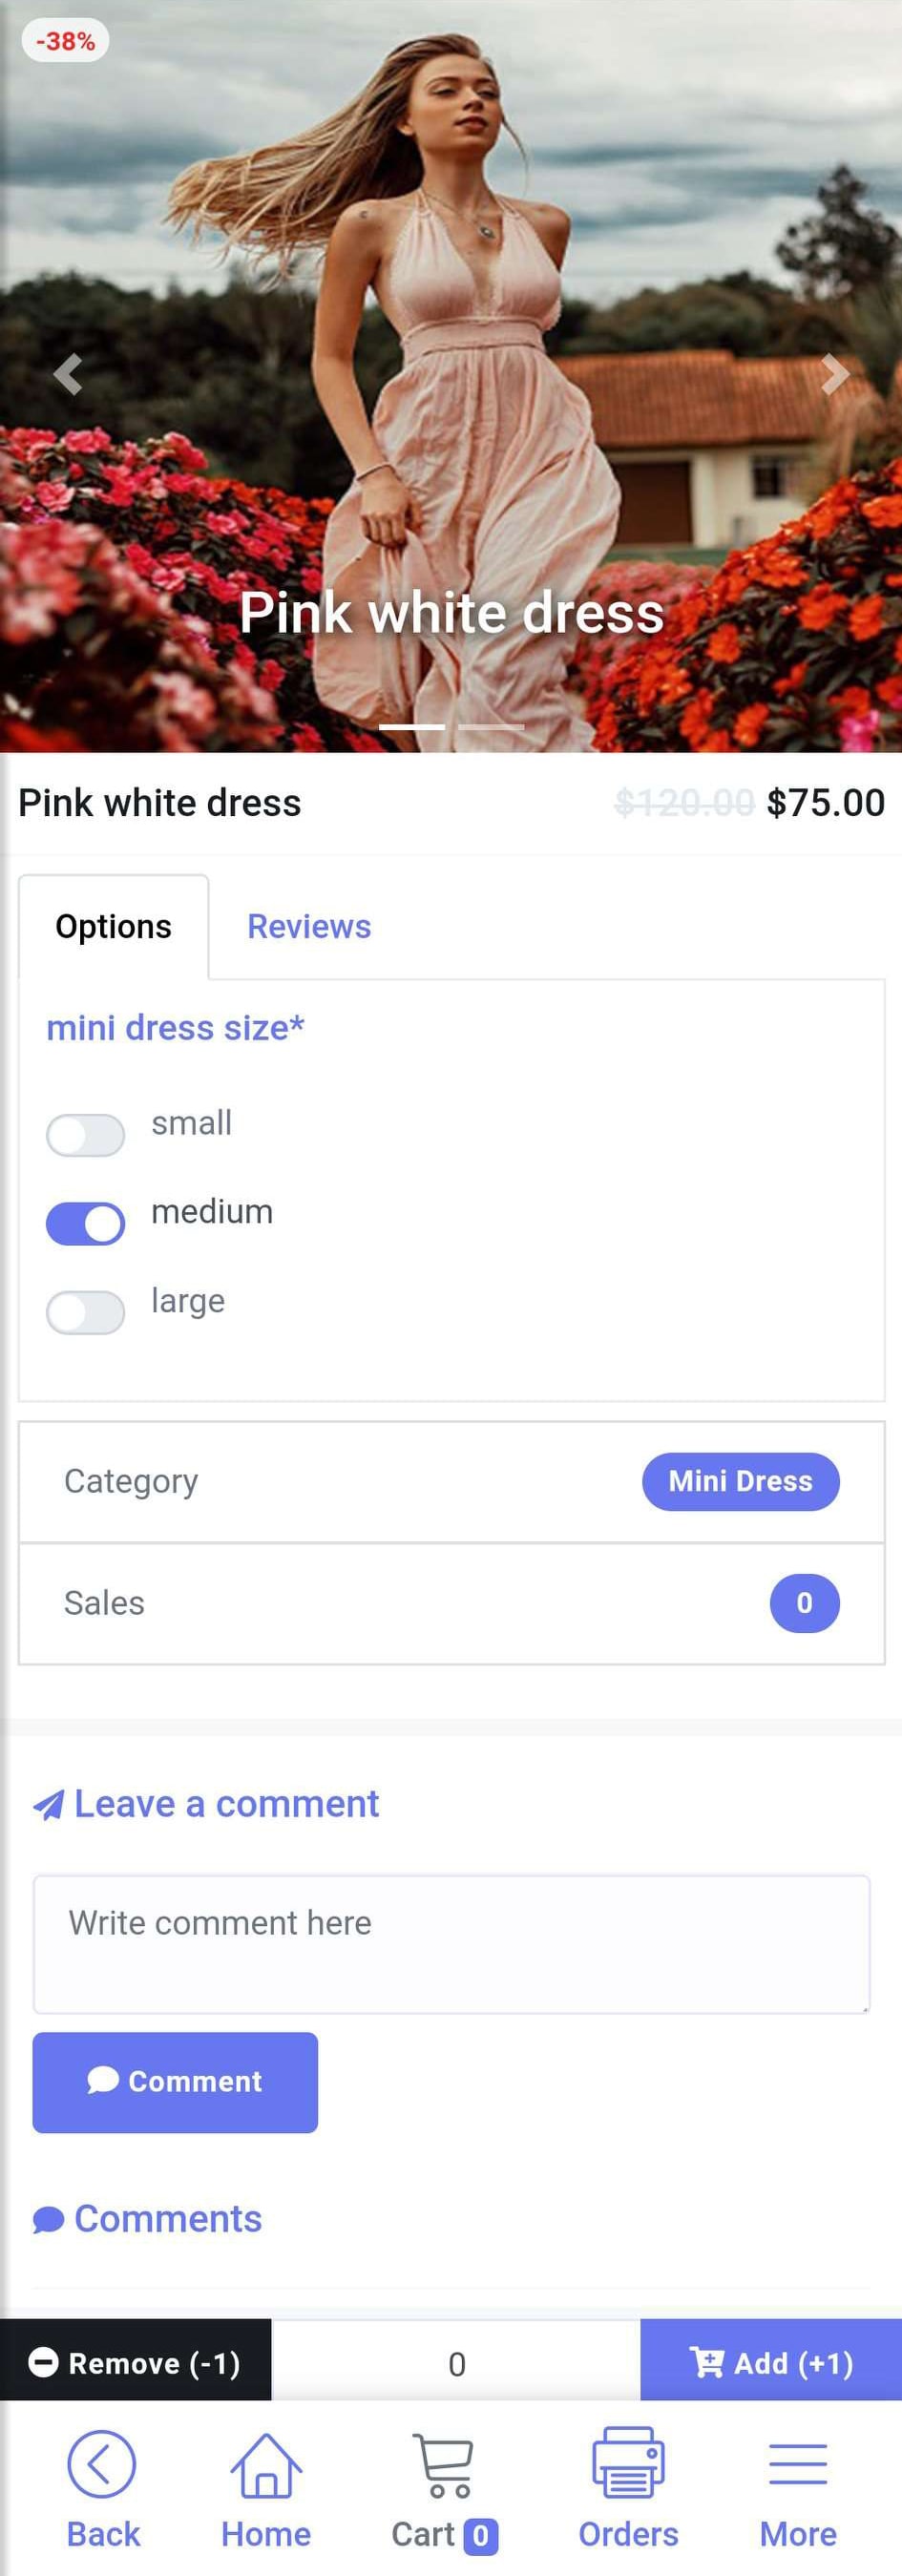
As for the multi-select button, you have to keep in mind that you can’t enable the multi-select button for the attributes like ‘Size’ because a product can’t be small, medium, and large at the same time-- it is not logically possible.
As for optional button, If you enable the optional button, your clients have option not selecting attribute values for a specific product. If a client doesn't select an attribute value, they will order the the product of default attribute value.
But if you disable the Optional button, the clients must choose an attribute. Otherwise, he/she can’t order the product.
By the ‘Active’ button, you can make the attribute Active or Inactive. The functionalities of the other two buttons are a bit complicated to understand. If you enable the ‘Multi-select’ button, your clients can select the multiple attribute values for a specific product. On the other hand, if you disable the ‘Multi-select’ button, a client can only one attribute value for a specific food item.
Like the Category option, after you have added one or more attributes, the attributes will appear on the page. Of course, you can add as many attributes as you want. Well, from the page, you can edit and delete any attribute and can see the status of the attributes if the attribute is active or not.
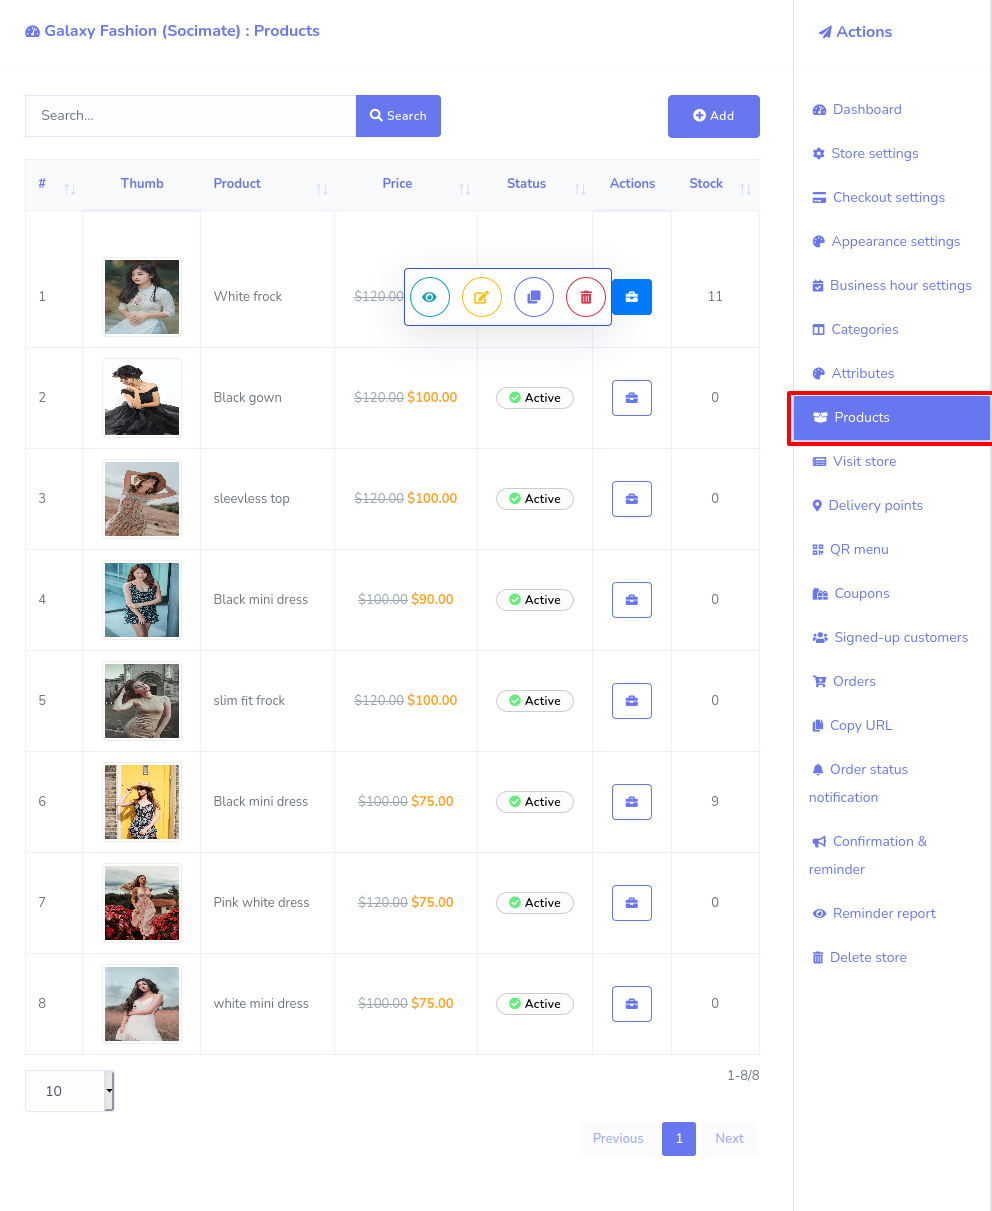
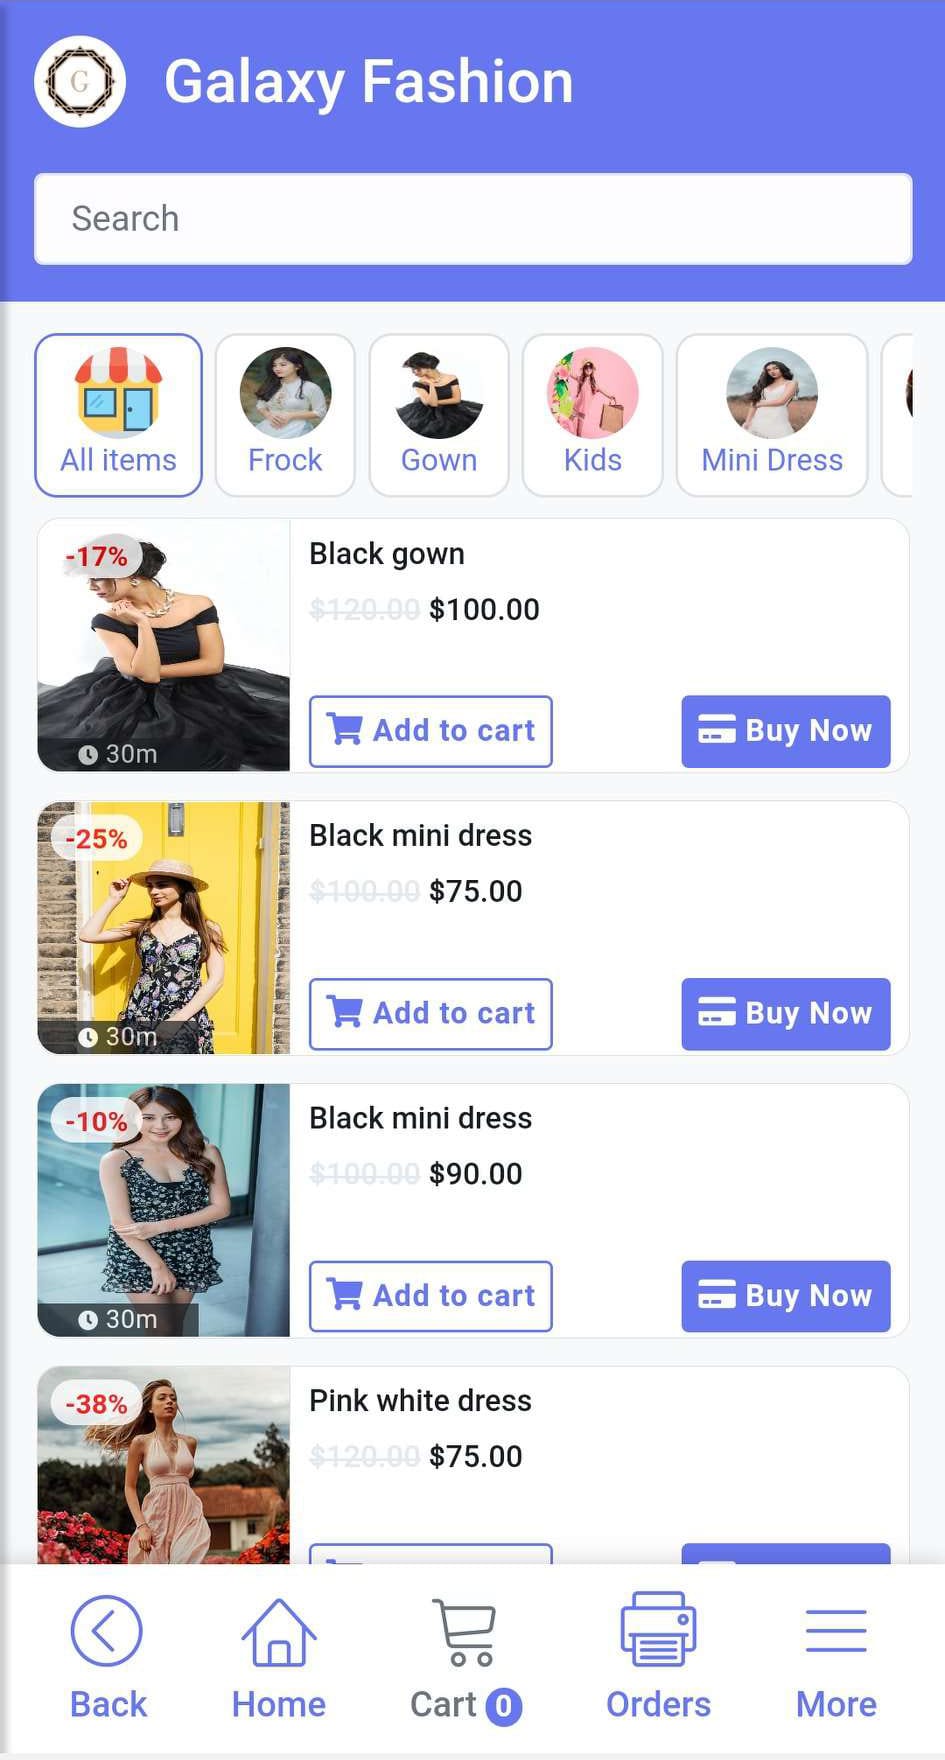
Add products to the store:
After you have added categories and attributes, add some your products that could be included in categories and attached to the attributes.
Click on the Products > Add product > Fill up the form > click Save button.
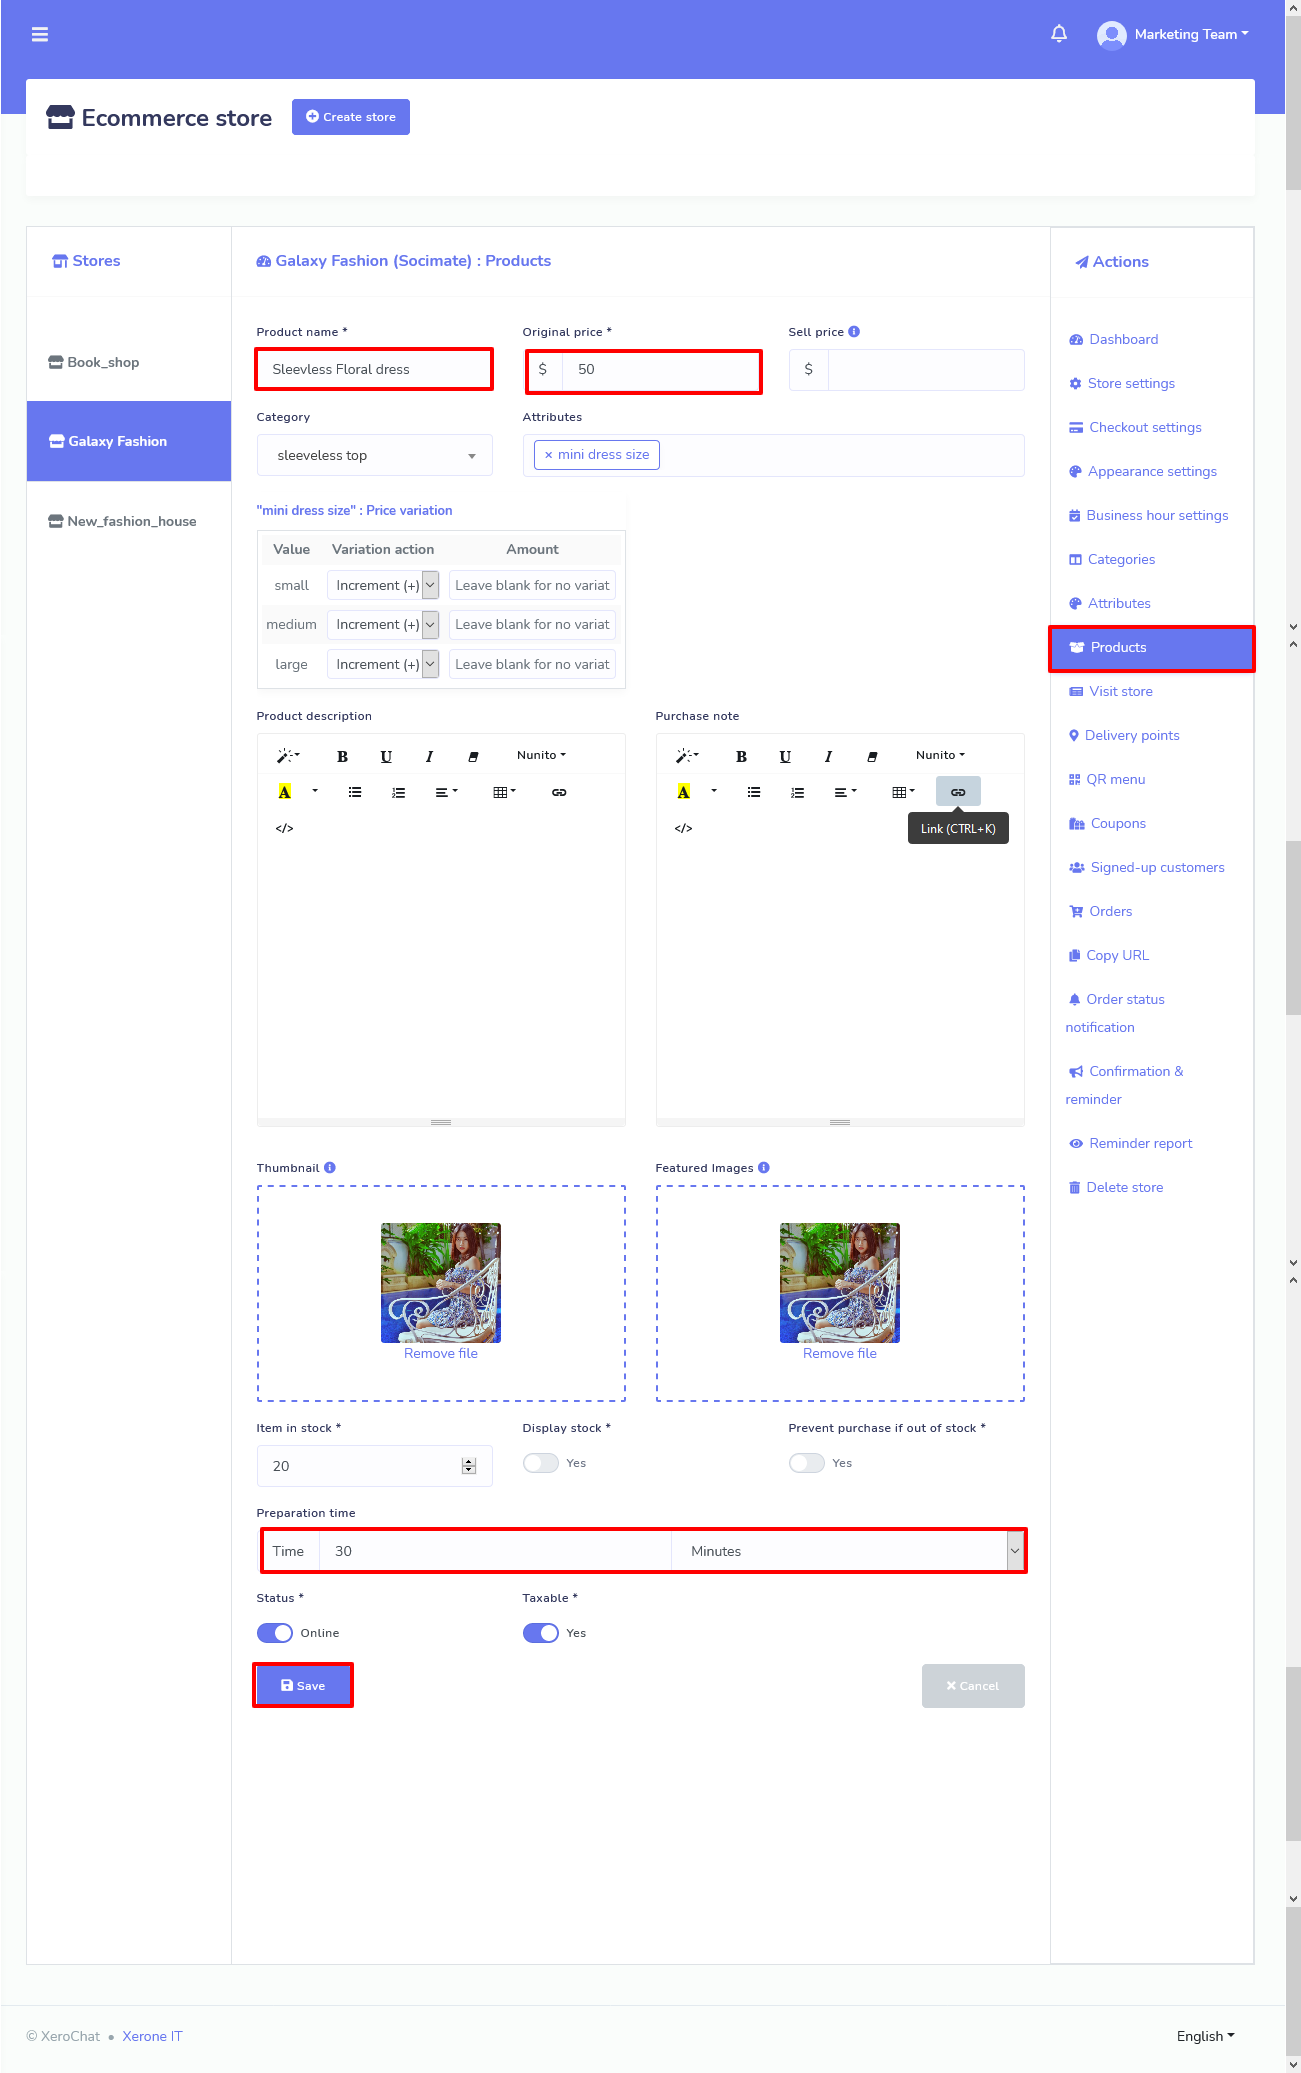
Likewise, you can add thousands of products. And all the products will be shown on the page. And you can edit, delete and clone the products and see the product page of the product by the action button. Also, you can see the price and status of whether the product is active or inactive.
Visit store:
Click on the ‘Visit store’ option to see your virtual store, the interface of your store, the output of your virtual store.
Delivery points:
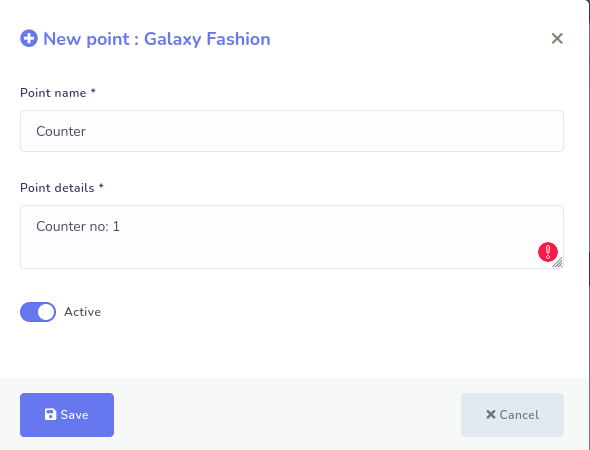
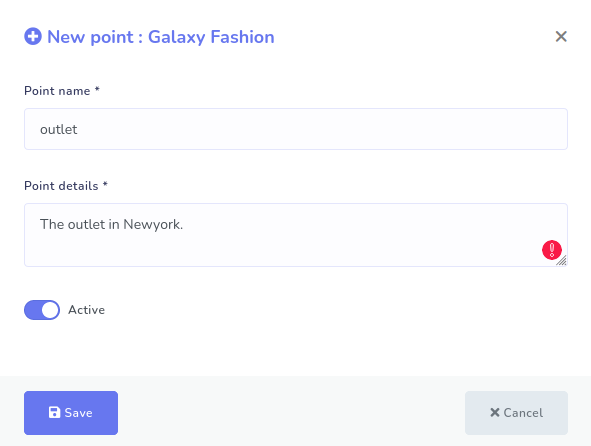
If you enabled the store pickup option, you have to set the delivery points. To do this, you have to add point names and point details.
To add a delivery point, click on the ‘Delivery points’ > Add point> Fill-up a pop-up form-- providing points name and points number > click on the save button.
Delivery point name means the specific location inside your store from where customer will receive their products. And delivery point details means the exact position of the location. For example, for general store, point name could be counter and point details could be counter number. And for restaurant, delivery point name coud be table and delivery point details could be table number.
Delivery points also could be the different outlets of your main store. And the delivery point details could be the address of an outlet.
The Ecommerce store can make specific QR codes for specific delivery point details. So customers don’t have to select delivery point details while giving orders for products.
QR menu:
Now you need the QR code so that you can provide the code to your customers. By scanning the QR code, your customer can enter the virtual shop inside messenger or on browsers.
If you have more than one outlet, you can generate different QR code for each outlet. And if you have a restaurant, you can generate different QR codes for each table of your restaurant.
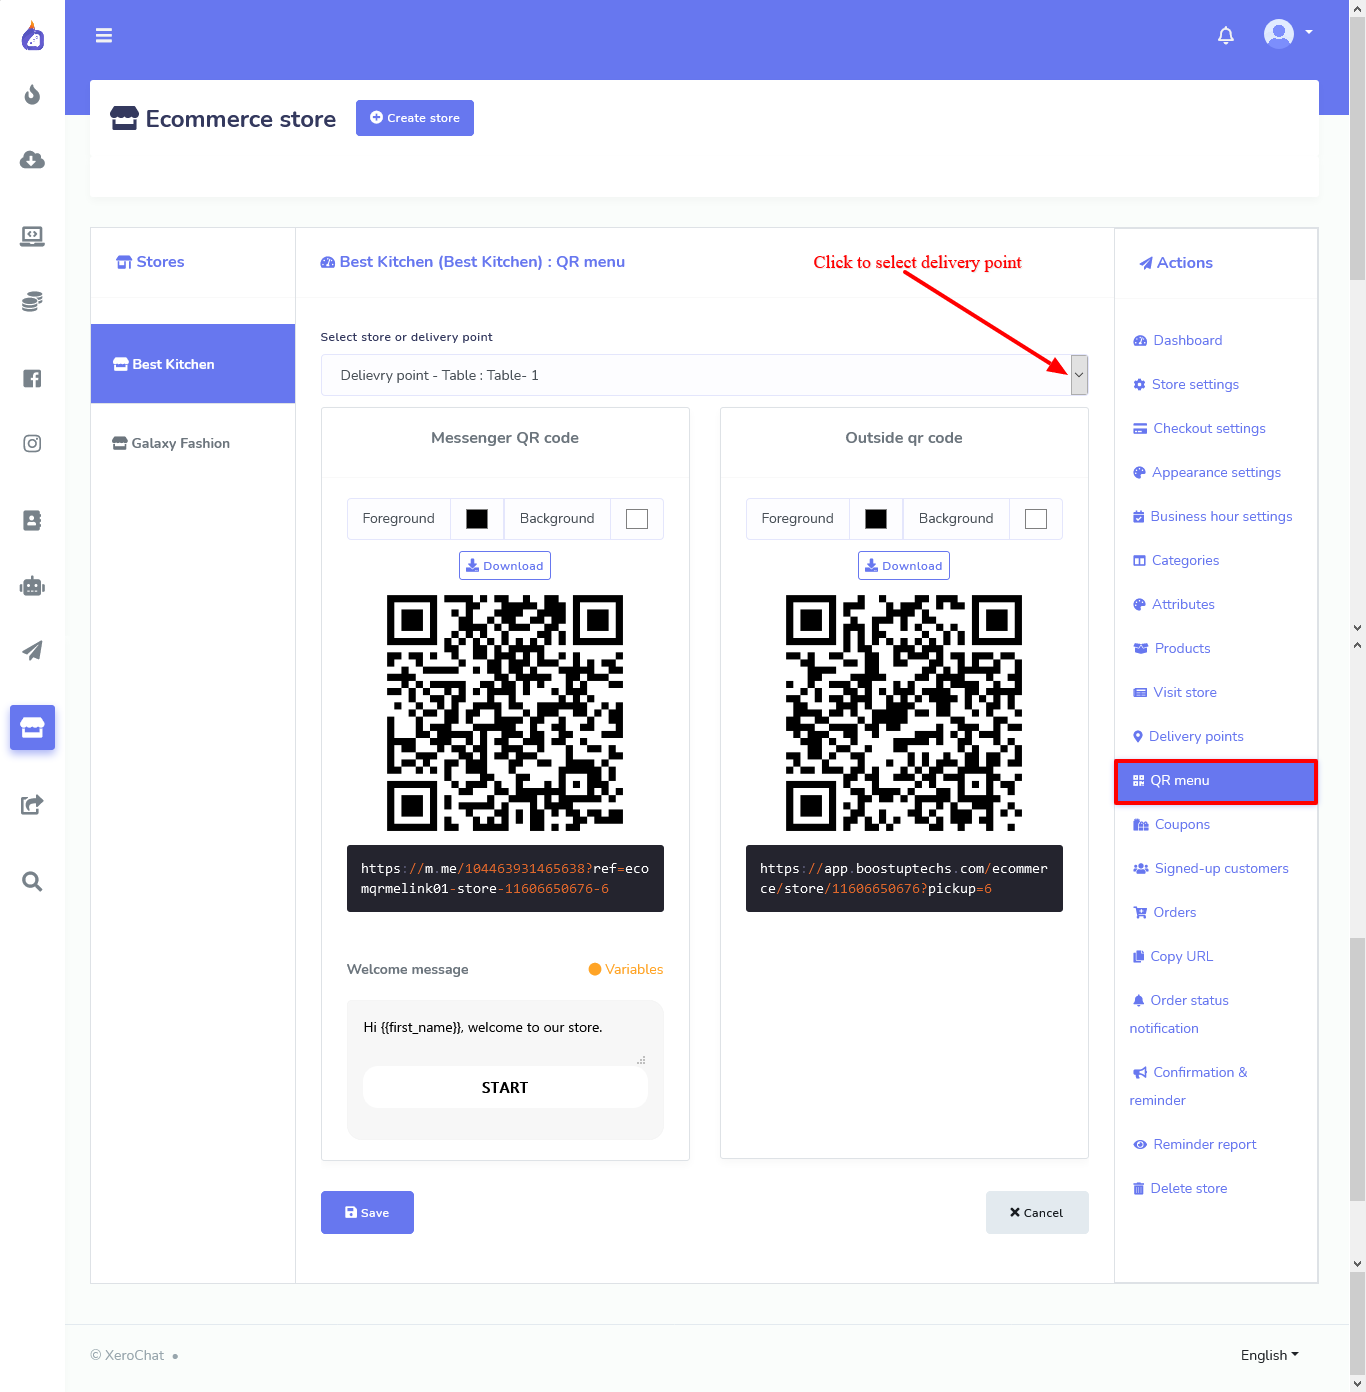
To get the QR codes, click on the QR menu option in the action menu and straightway, the ‘QR menu’ page will appear. Now, select a delivery point for which you want to generate specific QR code. Instantly, the Ecommerce store will automatically generate QR code for the delivery point you have selected— it will generate two types of QR codes— One for Facebook Messenger and Other for browsers.
Under the messenger QR code, you can write a welcome message for your clients. After writing the message, click on the ‘Save’ button. Then your QR code will hold the message you have written.
To download the QR codes, click on the download button. Without delay, QR codes will be downloaded.
Coupon:
If you want to give discounts on some specific products, coupons are required.
To add coupons, click on the Coupons at the right panel of the dashboard> fill-out the form> click Save button.
How to fill-out the form:
First, in the store field, select your store name. Then in the products field, specify the products the coupon will be applicable on. In ChatPion's Ecommerce store, you can make three types of coupons, such as Percent, Fixed cart, and fixed products. Now you have to decide what kind of coupon you want to make by enabling one of the three radio buttons. But before proceed, you have understand the characteristics of the each type of coupon.
Let's explain them:
Percent– Percent coupon type is applicable for selected products only. For example, if the cart contains three (3) t-shirts @ $20 each = $60, a coupon for 10% off applies a discount of $6.
Fixed cart –A fixed total discount for the entire cart. For example, if the cart contains three (3) t-shirts @ $20 each = $60, a coupon for $10 off gives a discount of $10. This coupon type will be applicable for all the products you have added to cart whether you have selected the products or not.
Fixed product – A fixed total discount for selected products only. Customers receive a set amount of discount per item. For example, three (3) t-shirts @ $20 each with a coupon for $10 off applies a discount of $30.
Then you have to fill-out the following boxes:
Coupon amount- Then you have to provide the amount for the coupon. Depending on the discount type you choose, the coupon amount will be a Fixed value or percentage. Enter the amount without a currency unit or a percent sign, which will be added automatically based on the discount type you choose e.g., Enter ’10’ for £10 or 10%.
Coupon expiry date– Date the coupon should expire and can no longer be used.
Max usage limit- You have to specify the number of times the coupon could be used before reaching the expiration date.
Coupon deactivate- By disabling the status button, you deactivate the coupon anytime.
Free shipping – If you enable Free shipping, the shipping cost will be removed when the coupon is used.

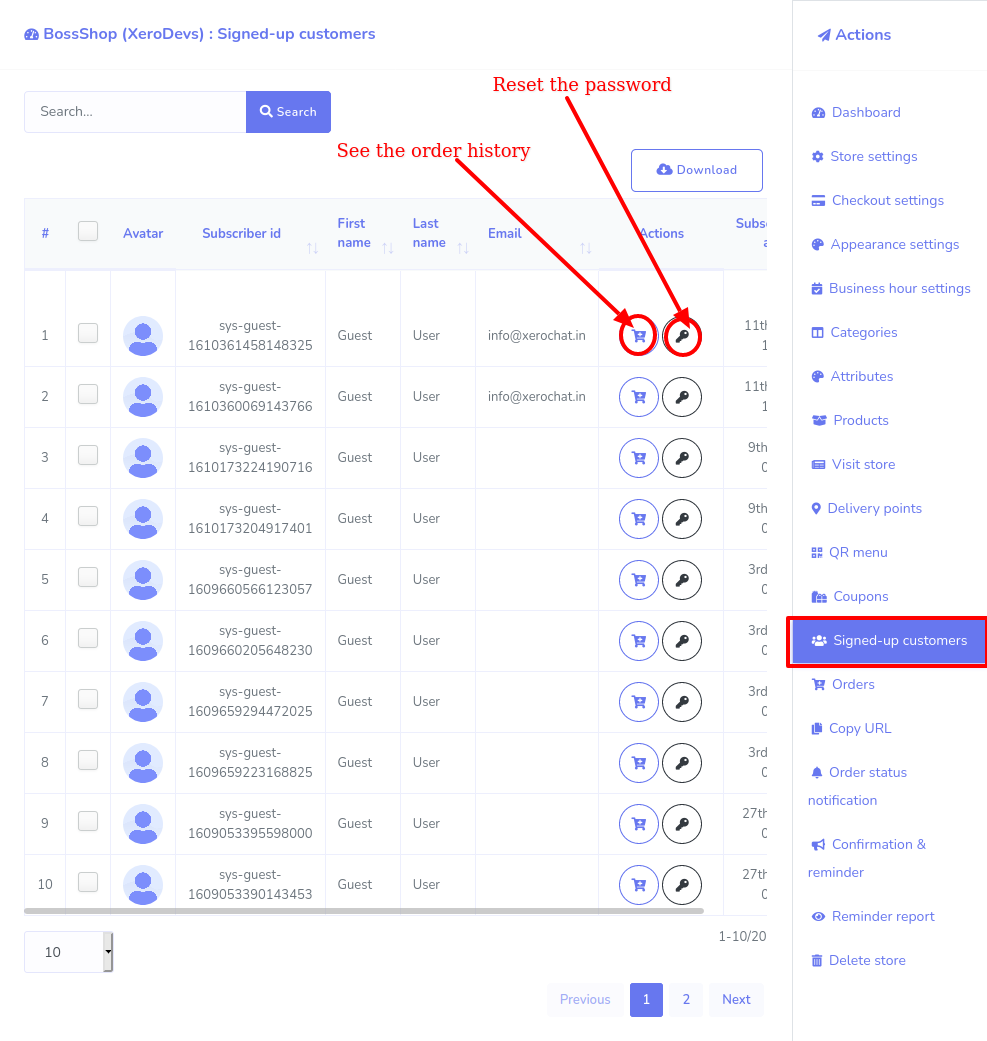
Signed-up customers:
With the option, you can see the list of sign-upped customers for the e-commerce store on the browser. You can also see the order history of a specific customer and can reset the password at the request from your customers.
To see the list of signed-up customers, click on the signed-up customers option and instangly the list of signed-up customers will appear.
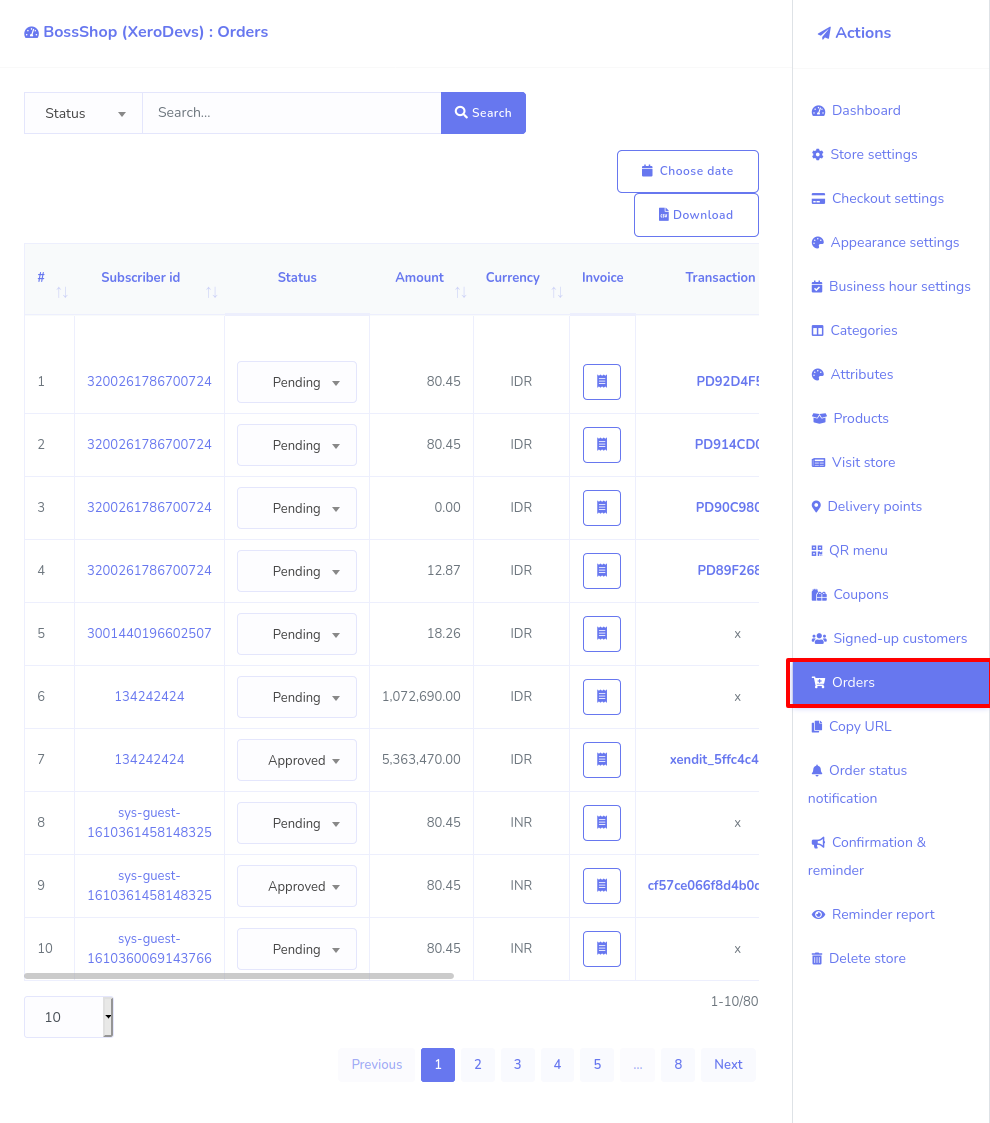
Orders:
On the order page, you can see the full details of the orders given by clients. Besides, you can, using a thermal printer, print the invoice of the order to hand the printed copy to your delivery person and the client.
To see the details of orders and print the invoices, click on Orders in the ‘Action Menu’ and Instantly, all the orders will be shown on the page. Move the bottom scroll bar to see the whole details of the orders.
Now you can change the status of the orders. Click on the Status field beside the specific order and a drop-down menu with ‘Pending’, ‘Approved’, ‘Rejected’, ‘Shipped’, ‘Delivered’, and ‘Completed’ will appear. Now select one of them according to the real status of the order.
Click on the Choose date button to see the orders given at a specific date such as the last 30 days, this month, last month, custom range. And click on the download button the list of orders in a CSV file.
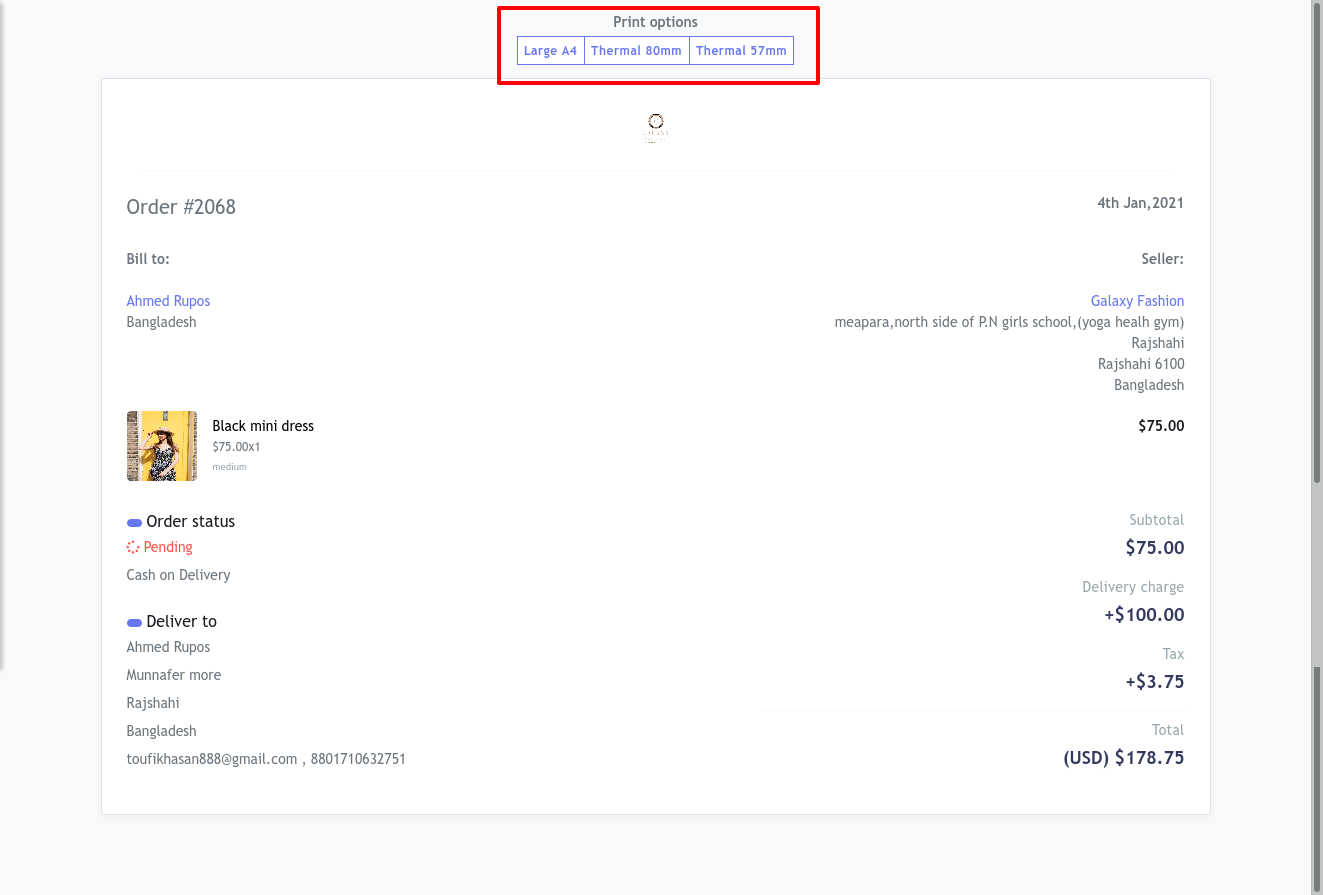
To print the invoice, click on the invoice button > click on any of the three options-- Large A4, Thermal 88mm, Thermal 57mm to print the invoice.
After the invoice is printed, give the copy to your delivery person so that they can pick up the products to deliver. Of course, you can give the printed copy of the orders to your clients.
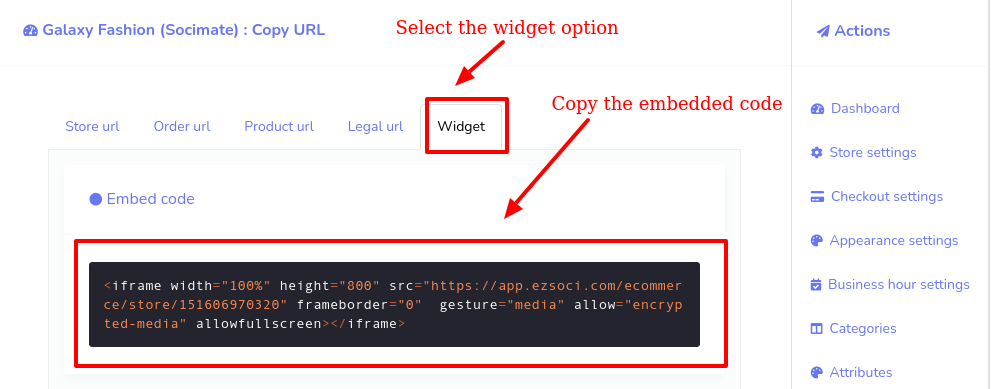
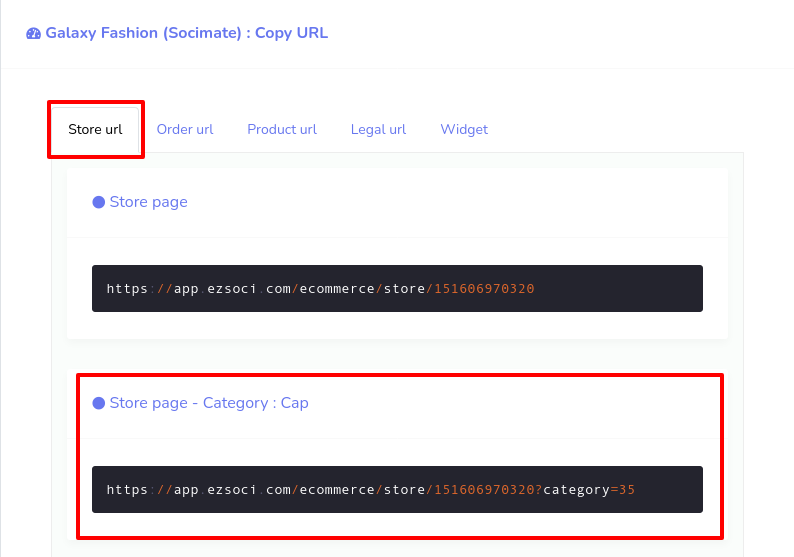
Copy url:
To copy the different types of urls to your virtual store, first, click on the ‘Copy url’ option> then copy the url you need.
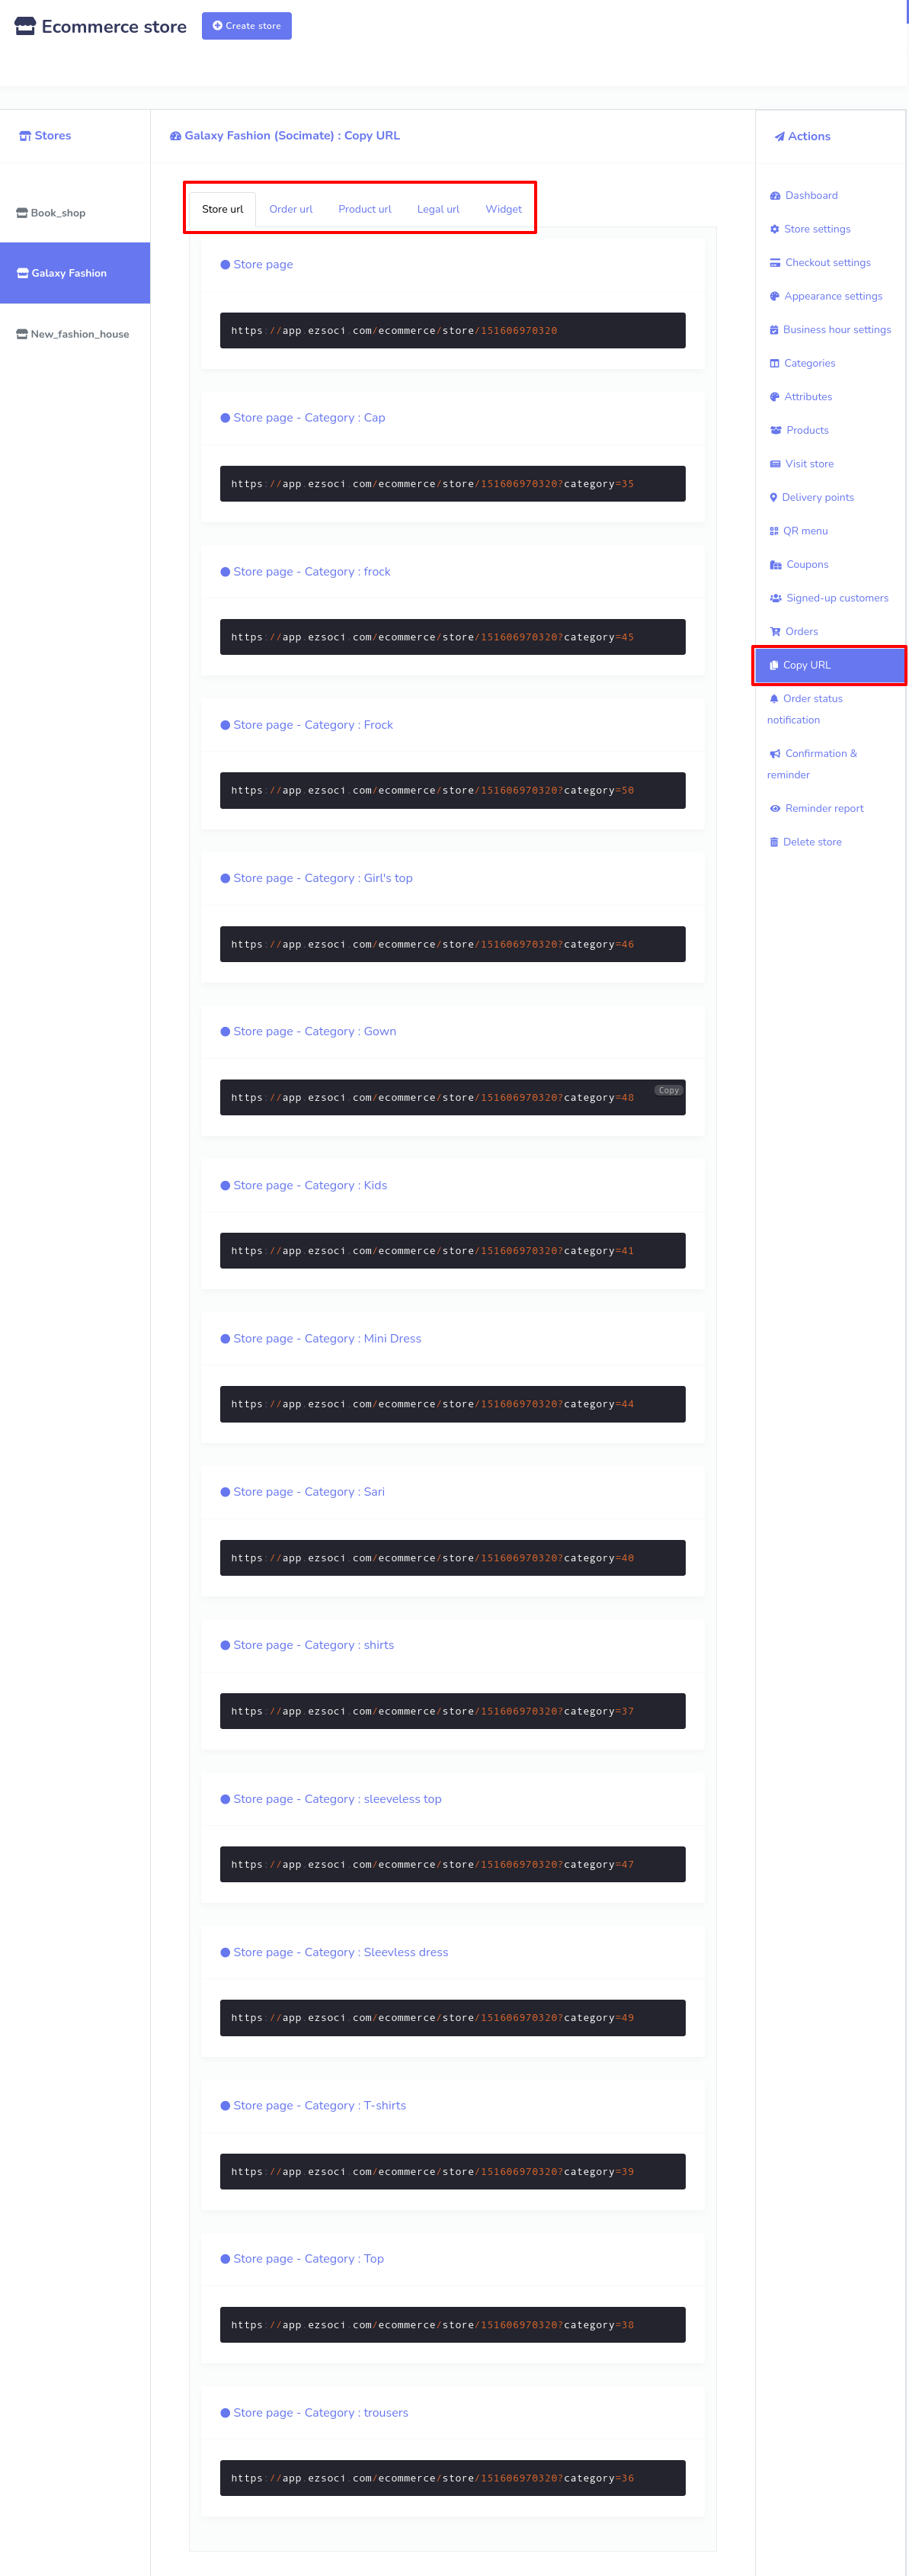
You need the url to integrate your virtual shop to your Facebook page messenger. If you integrate the virtual store to the messenger, the client can directly enter your shop without scanning the QR code generated by your store by sending a message.
Widget:
At the last of the copy url section, you will see a widget option. With the widget option, you can place your store on your website. To do this, first, select the widget option and instantly an embedded code will appear. Next, copy the embedded code and paste the code in the html file of your website. And the store will appear on your website.
Integrate your virtual store to Facebook page messenger:
To integrate your virtual store to Facebook page messenger, copy the store url and product urls and go to the messenger bot of the ChatPion.
Click on the Messenger bot > bot settings > action> add bot reply> fill out the bot reply settings form.
How to fill-out the form:
First you have to select a Facebook page which the Ecommerce store was created with.
Next, you have to provide a bot name and keywords in comma-separated. Next, you have to select the reply type as text with buttons. Select ‘text with button’ reply type. You can enable typing on display and set a time for delay in reply in seconds. True you can write a message in the message content box.
Now select webview as button type and paste the store url in the web url box.
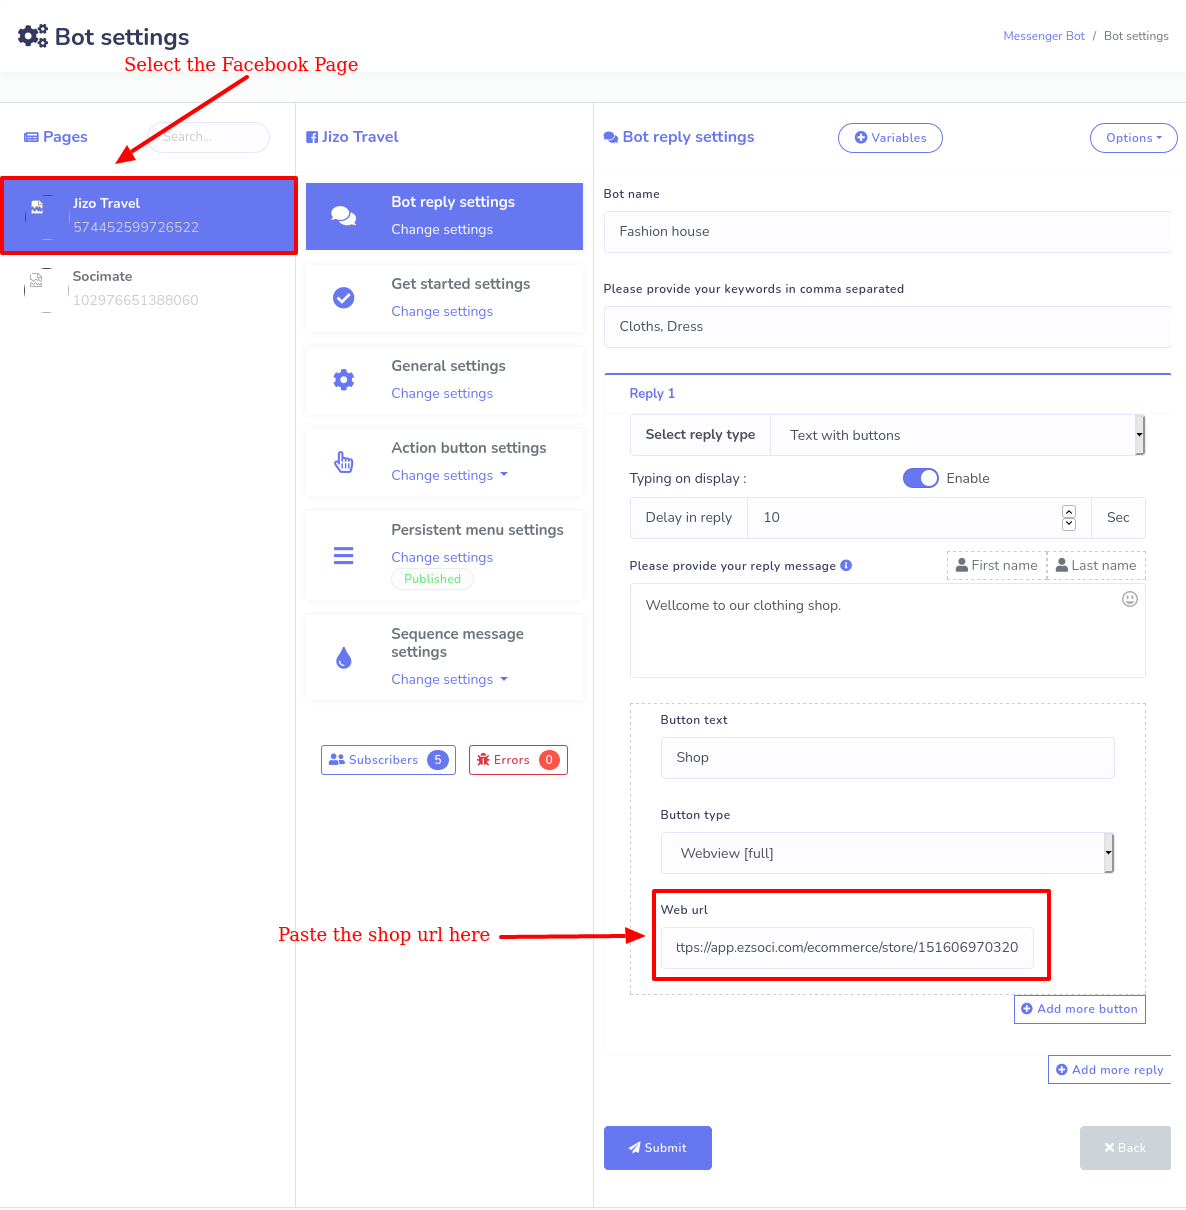
In this case, the whole shop will appear inside the messenger.
Likewise, by providing the category url, you can insert all the products of the category inside the messenger. Follow the same way described before.
Clicking ‘Add more button’ and ‘Add more reply’ button, you can add more buttons and replies.
Click on the Submit button to save the bot settings for your virtual shop. Now the Messenger bot is ready to handle your virtual shop inside the messenger. That is, your clients can enter your virtual restaurant by sending messages.
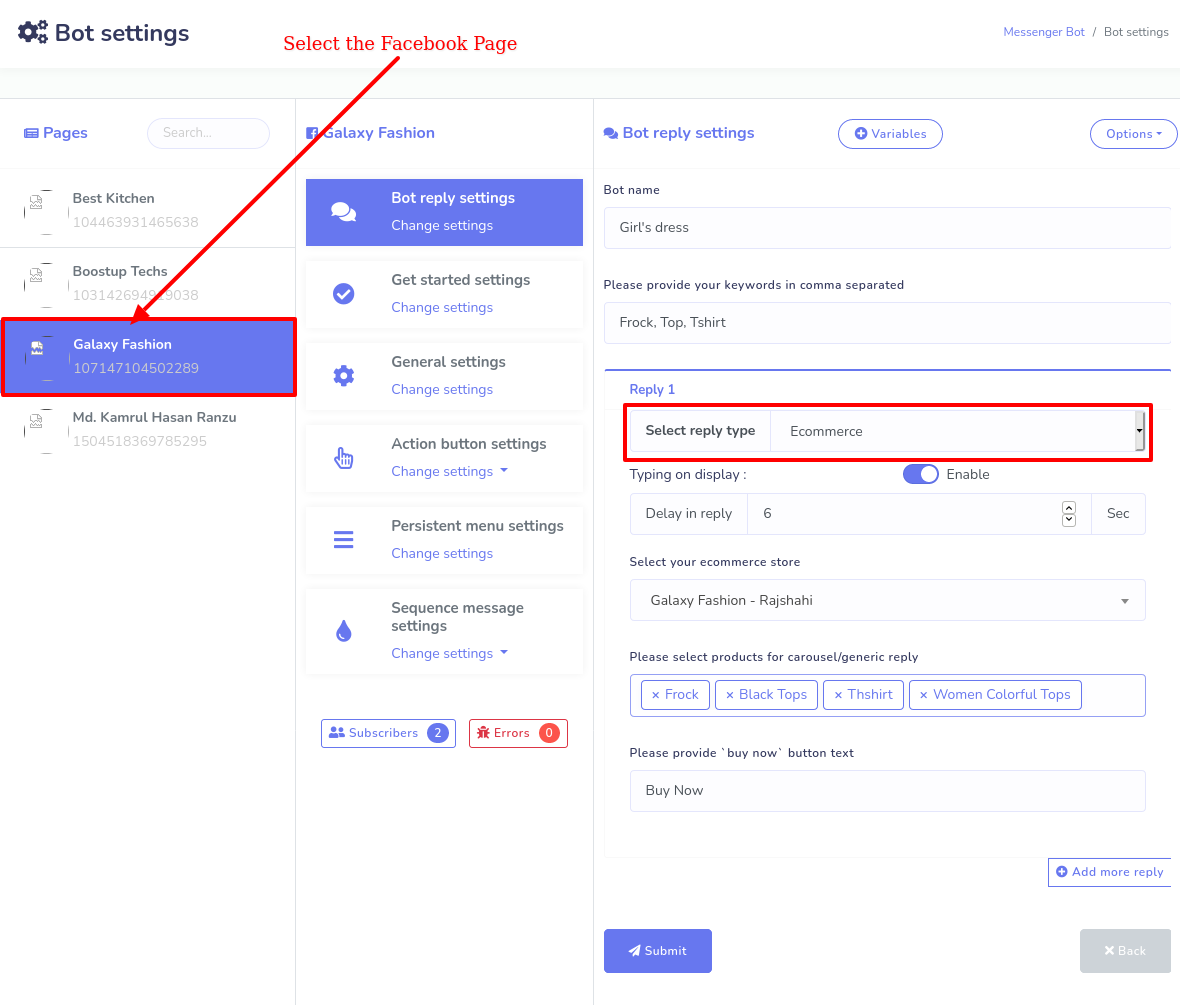
Creating a carousel of products in the messenger bot easily:
You can, of course, easily create a carousel of products of your e-commerce store in the messenger bot.
To make a carousel of products in the messenger, go to Bot settings page. Now click on the ‘Add bot reply’ button, and instantly, a form will appear. Fill up the form to make a carousel of products of your store.
How to fill-up the form:
Write a bot name in the box called ‘Bot name’, then write keywords in comma separated.
Now click on the select reply type box, instantly a pop-up menu will appear. Select ‘Ecommerce’ as a reply type.
You can enable typing on display and set a time for delay in reply in seconds.
You can enable typing on display and set a time for delay in reply in seconds.
Well, now you have to select your Ecommerce store and select products of your store to create a carousel of the products.
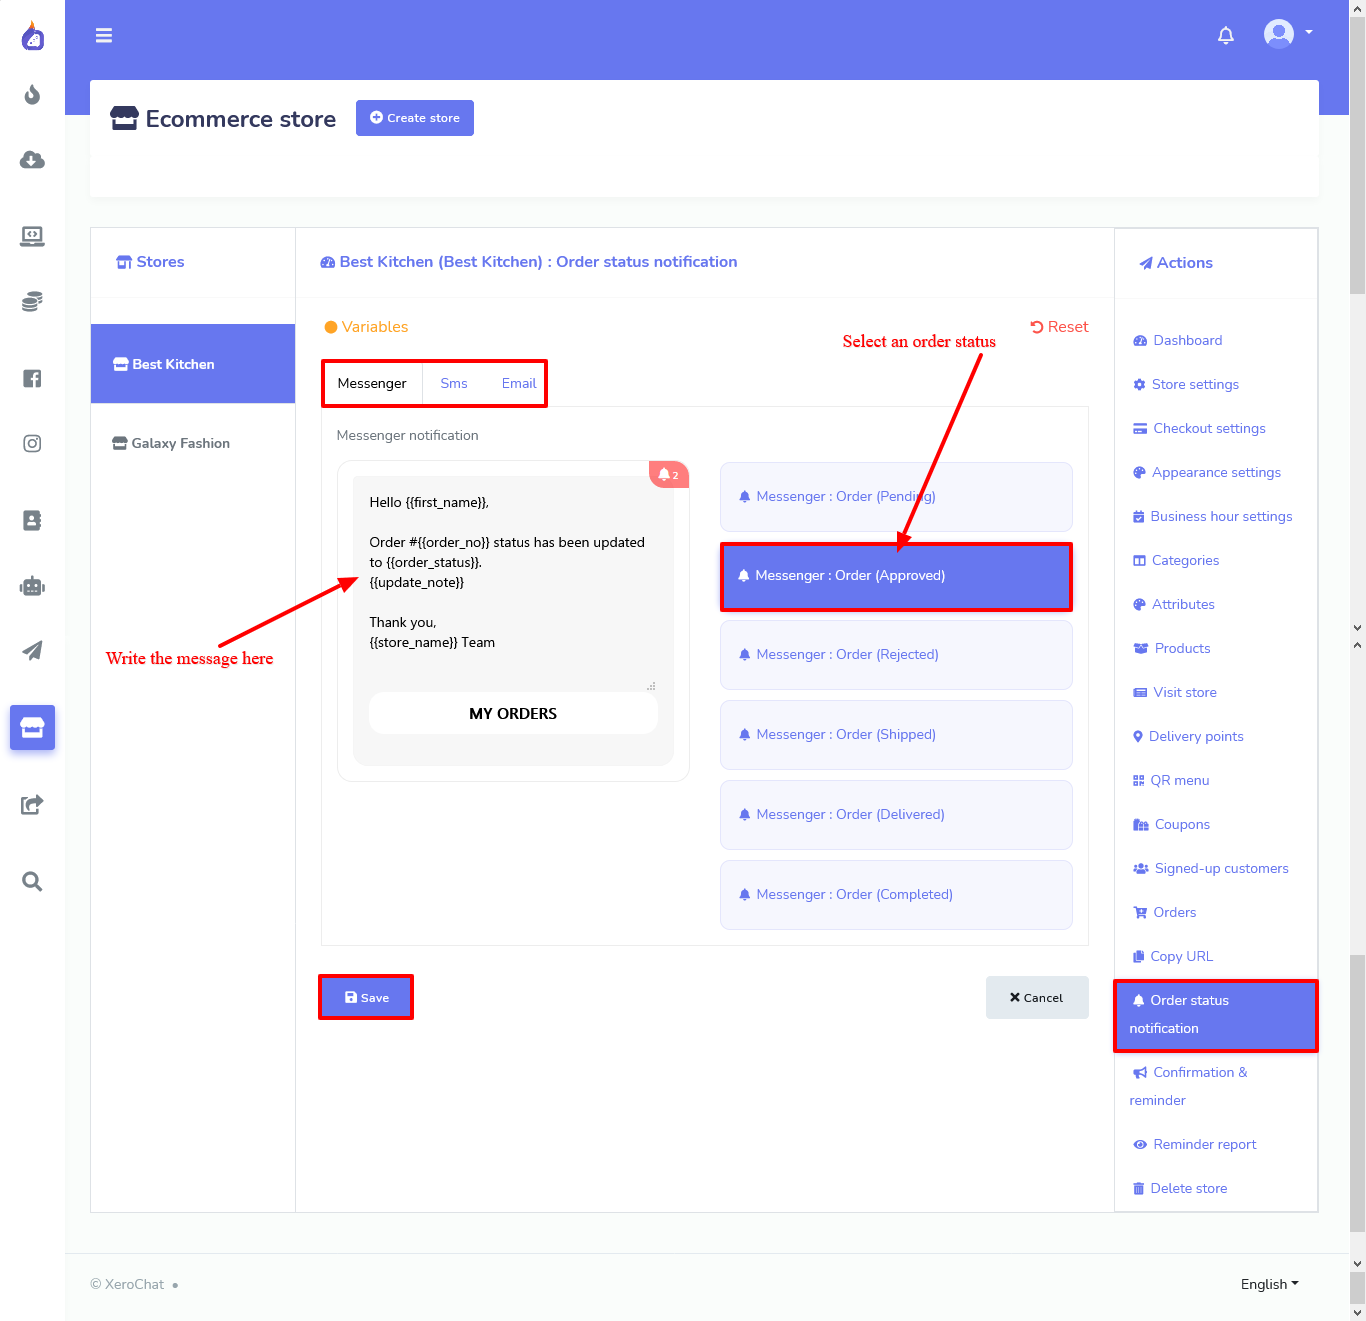
Order Status Notification:
Ecommerce store can notify the customers about the status of their orders— pending, approved, rejected, shipped, delivered, completed. It can send Order Status Notification via Messenger, Email and SMS.
To send an Order Status Notification, first, you have to write a message in the notification box. In the message, you can use variables-- click on the button called variables to learn about the available variables. Well, then you have to select the order status you want to send as notification. Click on the save button.

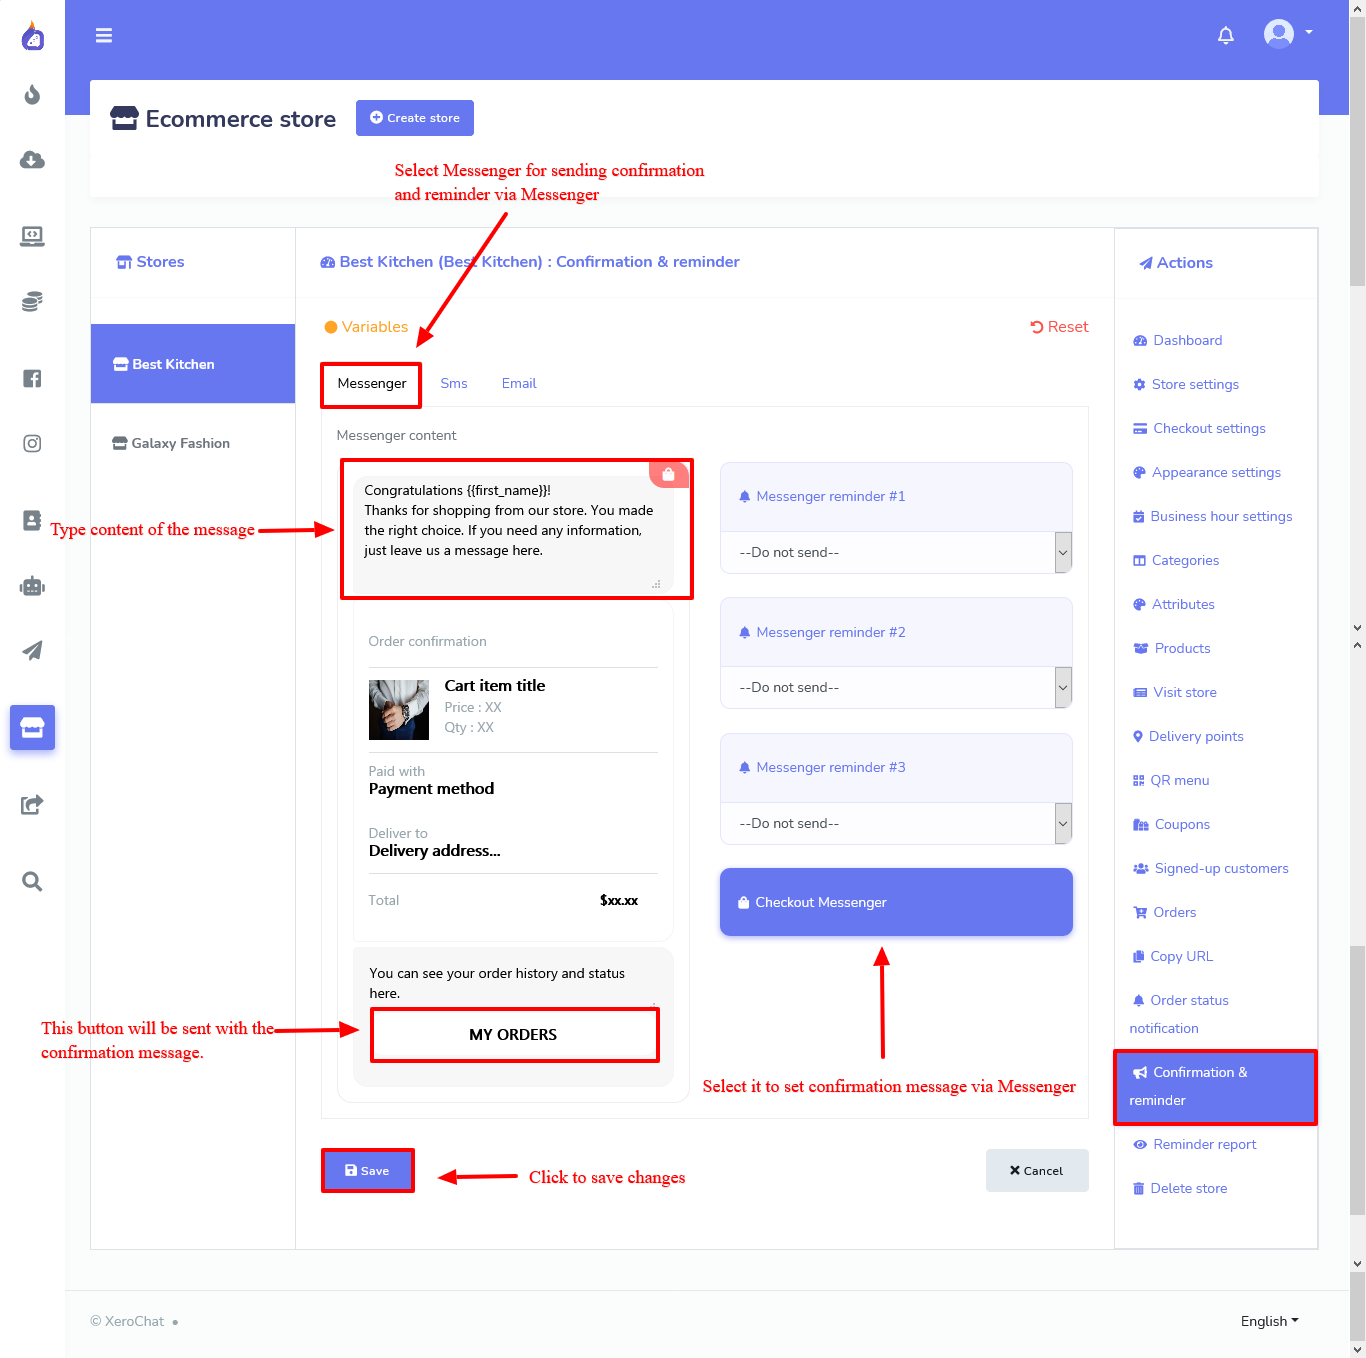
Abandoned cart recovery reminder:
ChatPion Ecommerce store can send abandoned cart recovery reminders to the clients if they leave your virtual store after adding products to the cart. It is a very important feature because it can recover lost sales by bringing back the potential customers to your virtual store.
To set abandoned cart recovery reminder, click on the ‘Confirmation and Reminder’> fill out a form.
How to fill-out the form:
First, select either Messenger, Sms, or Email. Then you will see a list of three options. by the options, you can send three abandoned cart recovery reminder.
You can determine the time of sending abandoned cart recovery reminder. By default ‘Do not send’ option is selected. Click on it, and drop-down menu with hours list-- from one hour to 24 hours-- will appear. Select one option to set hours for sending the abandoned cart recovery reminder. If you want to send more than one abandoned cart recovery reminder, select other options, too and set the hours of reminder to send the reminders one after another. But if the clients return and finish the check out the left reminders won’t be sent. Instead, a confirmation will be sent to them.
You can, of course, edit the default text for the message content in content box. That is, you can send a coupon code via the message to give discount on the products added to the cart.
Confirmation message:
Likewise, you can make a setting for confirmation message.
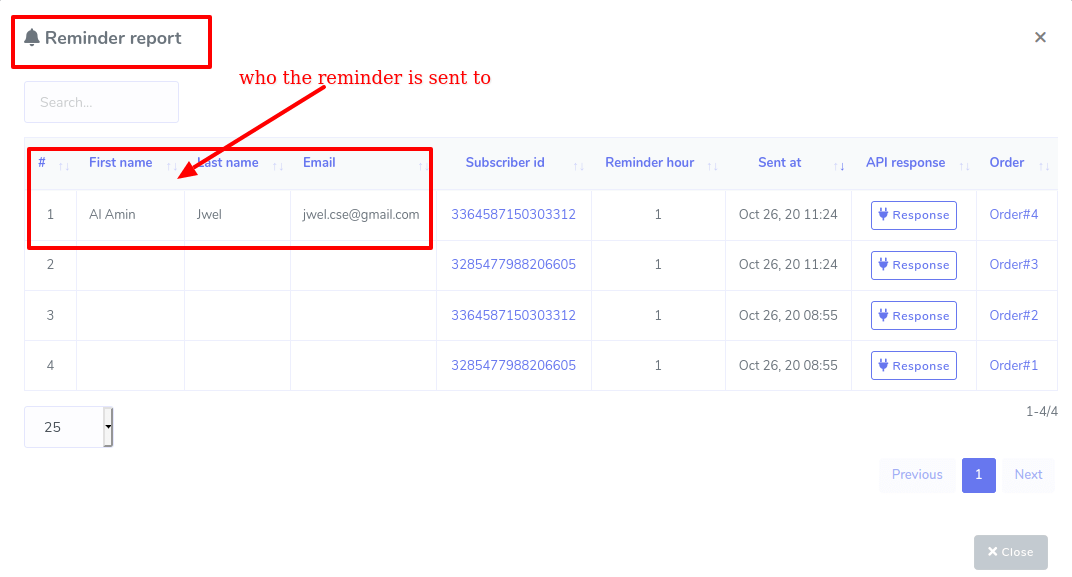
Reminder Report:
Click on the ‘Reminder report’ to to see the details of the abandoned cart reminders that have been sent
Usage of the E-commerce store:
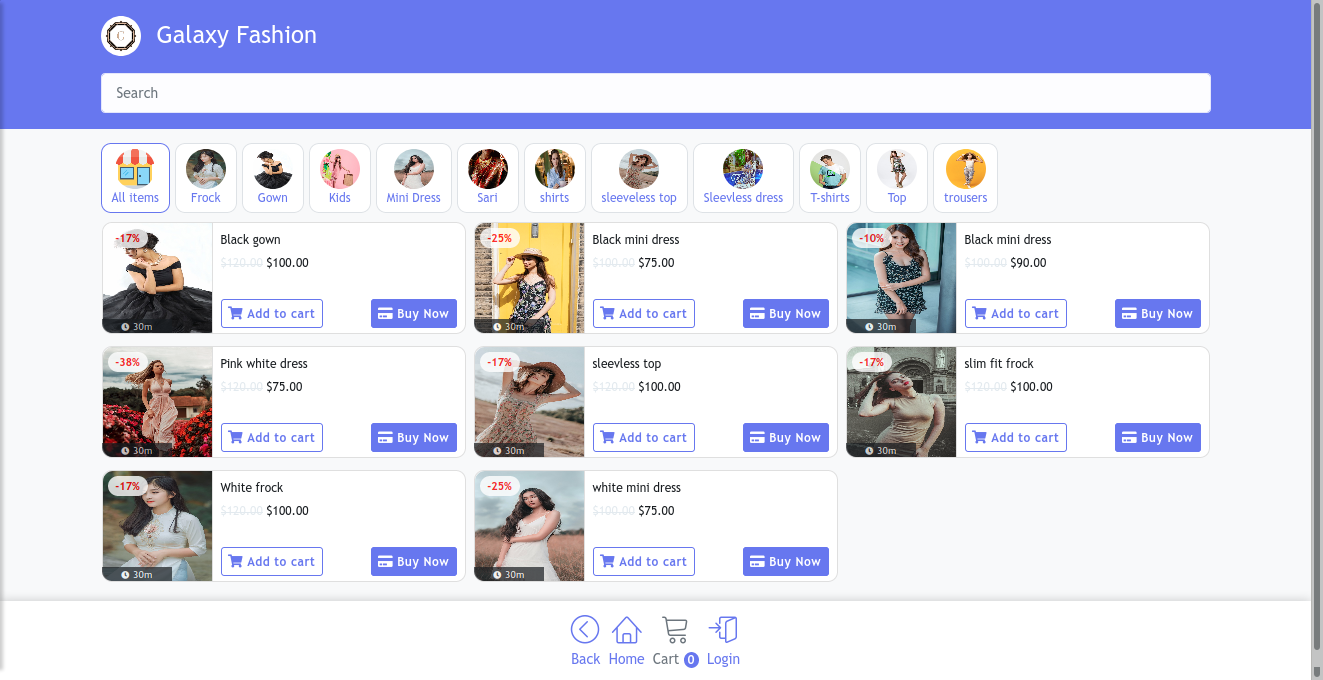
Your virtual store created by ChatPion’s ‘Ecommerce store’ can generate two types of QR code— one for messenger and one for browser. Well, just as a client scans the QR code, the digital chart of your products appears on the mobile screen. If they scan the QR code for messenger, they can access the digital chart of your products inside messenger. On the other hand, if they scan the QR code for browsers, they will access the digital chart on the browsers-- anyone can access the virtual store without signing up and logging in by clicking on the checkout as guest option.
The digital chart is more than a normal chart, for the digital chart is itself is the virtual store. On the digital chart, they can scroll through different products and can choose from them, select attribute of the product and add the product to the cart and can buy the product.
Then they have to let the your virtual store know from where they want to pickup the products-- whether from the store or not. If a client wants to pickup the products from the store, they have to enable the store pickup option. If customers enable the 'Store pickup' option, they have to select the delivery points such as the address of an outlet or the counter number in an outlet. Just as they click on the box, a drop-down list of delivery points will appear. They have to select a delivery point details such as an address of an outlet or a counter number.
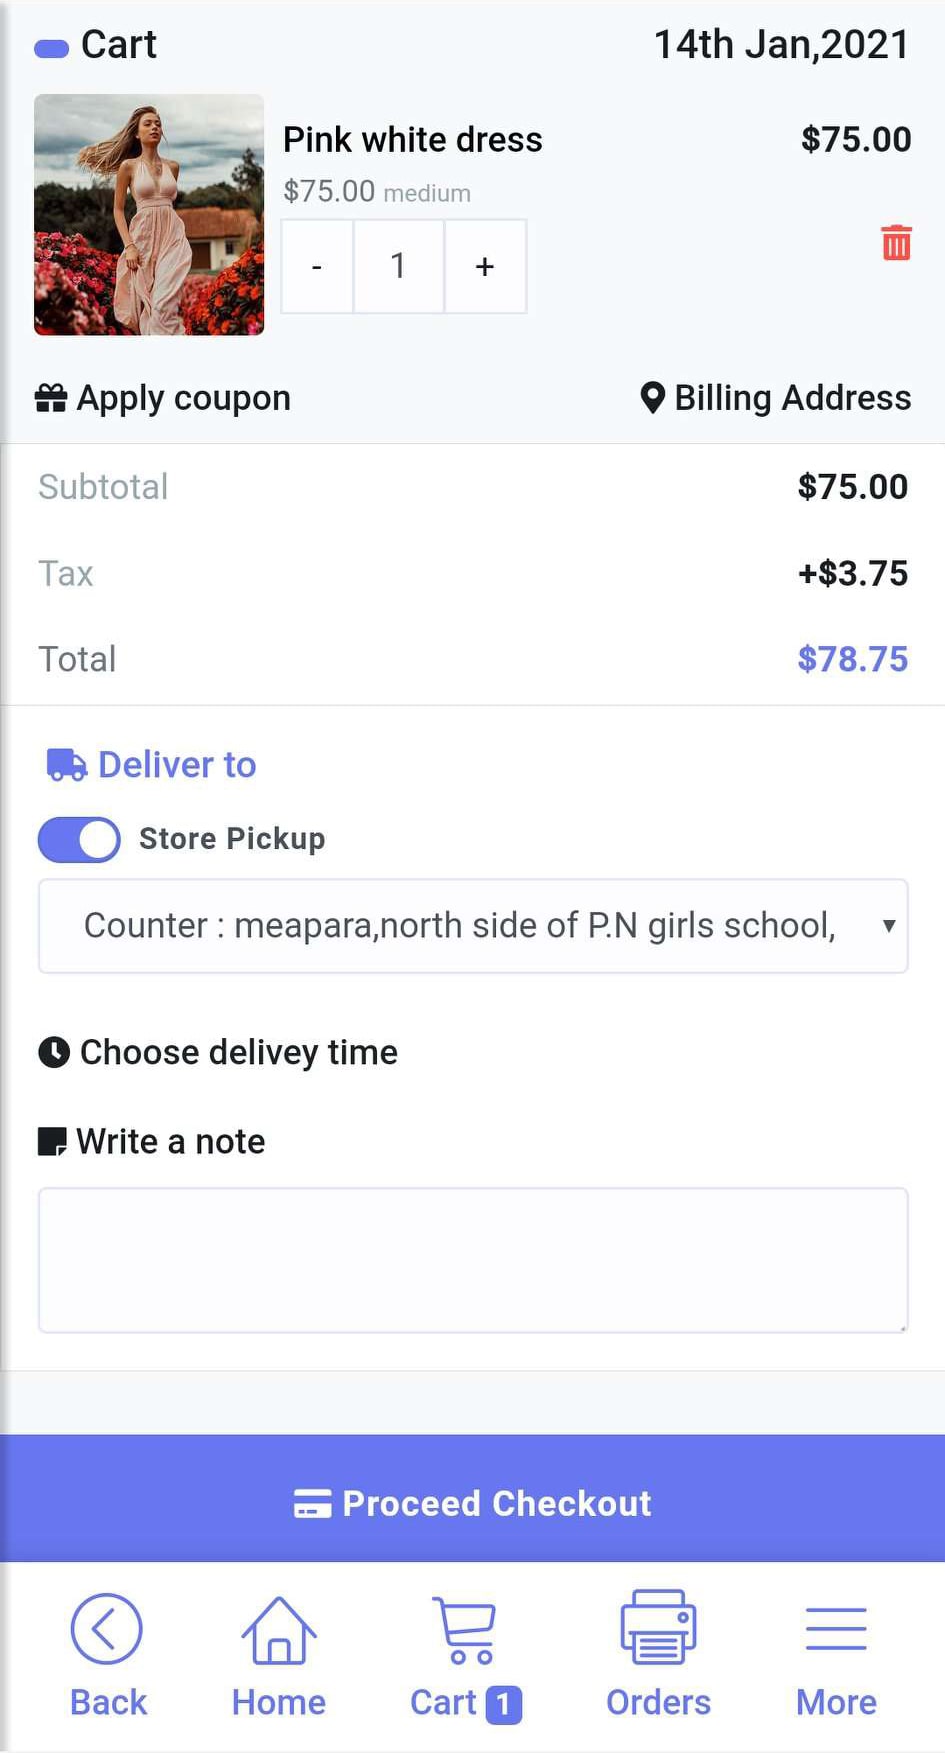
On the other hand, if they want to receive products at the home or office, they have to disable the store pickup option and they have to provide the delivery address.
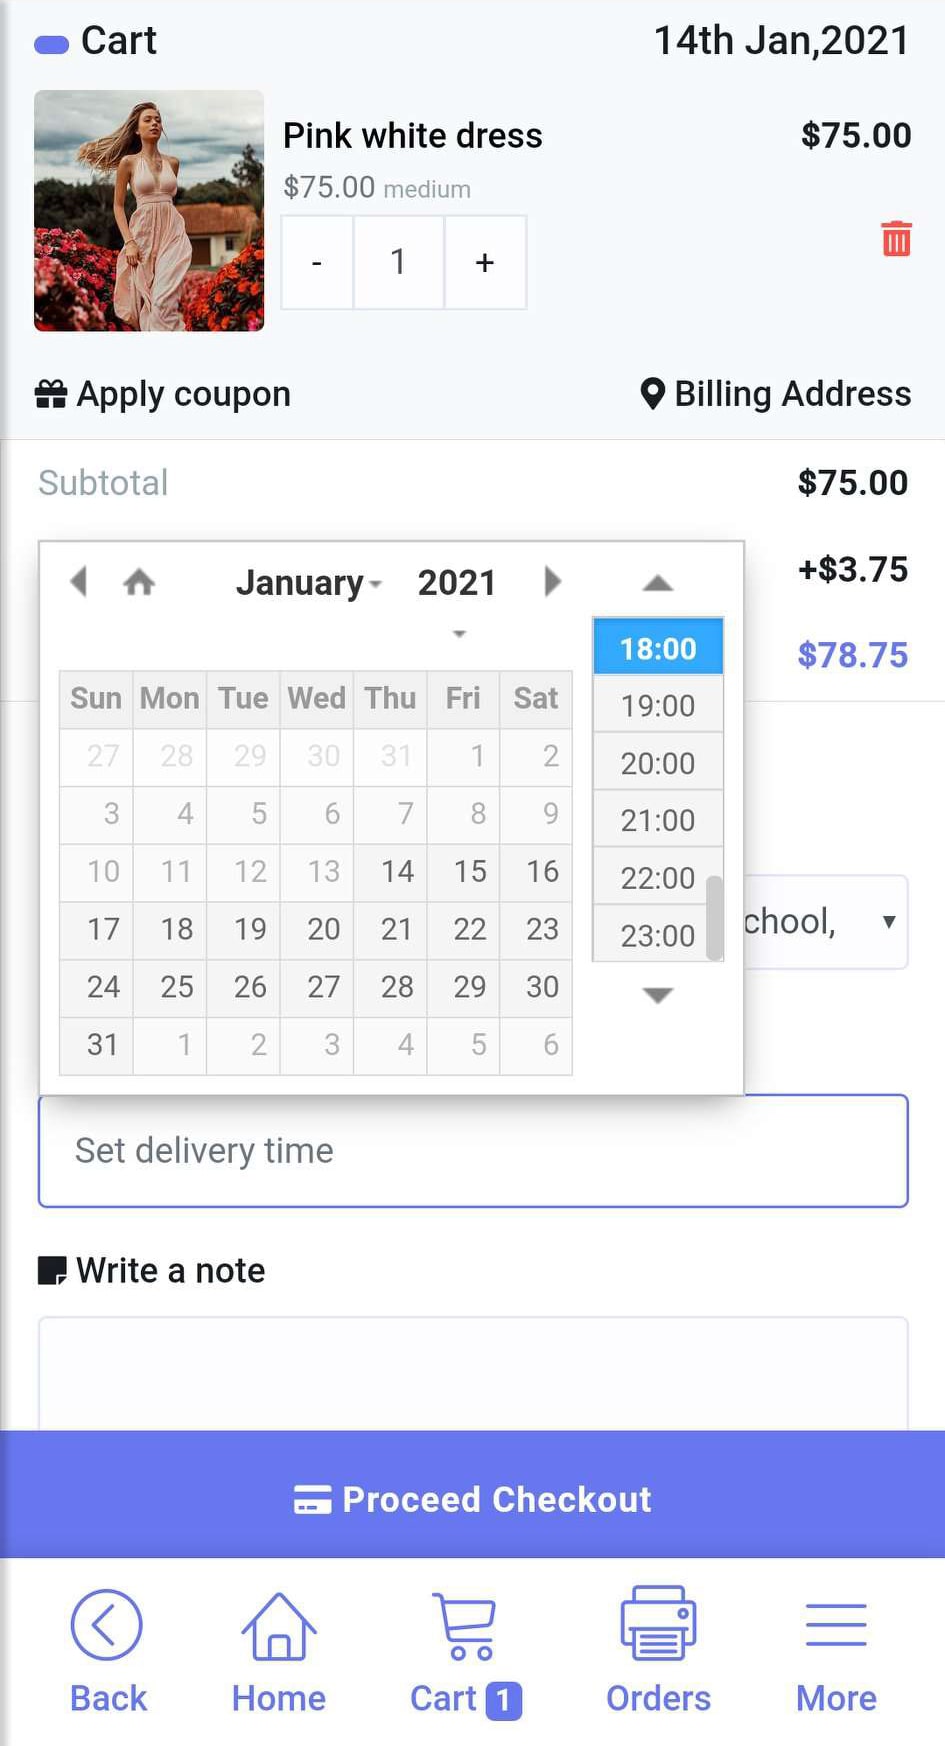
Then come the choose delivery time option. with the option, the customer can choose an delivery time from a pop-up calender.
Anyway, they can also write a delivery note that will be sent along with the orders. In the delivery note, they can dictate how they want the delivery.
Then they have to make payments to finish the checkout. They can make payments via any of the online payment methods including PayPay, Stripe and so on. Also, they can make payment via ‘Manual Payment’ or can choose ‘Cash on delivery.
Well, just as they finish making payments, a page will appear with a confirmation message at the top and order details on the middle, meaning they have finished purchasing successfully.
Using ecommerce store for clients are very easy and convenient. The clients can do shopping using the ecommerce store from home or office. Also, they can do shopping in the store without talking to any person in the shop.Therefore, they don't have to come to direct contact to any person. Therefore, they can feel safe form corona virus while shopping.
Of course, you can create a virtual restaurant in the Ecommerce store in the same way. You just have to add food items instead of products and provide table number in the delivery point details field instead of counter number.
Related Topics :How to setup Ecommerce Payment Settings in ChatPion
How to make QR Code Menu for Restaurant food order with ChatPion
How to Recover Lost Sale With ChatPion Abandoned Cart Reminder


23 Comments Login to comment
-

I need to insert products with a decimal price. Example 2.50 € how can I do?
-
xeroneitbd Admin
3 years agoYou will be able to do it from next update. We will give the update by this week hopefully.
-
-

Already have an Facebook Store Catalog over the Facebook Business Manager. Can this Shop integrated or Imported?
-
xeroneitbd Admin
4 years agoNo, You can't . It's for creating store external & then integrate with Messenger BOT.
Thanks
-
-

HI team, please let us able to change the currency from $ to our local currency. Thank you
-
xeroneitbd Admin
4 years agoYes, You can change the currency of-course from payment settings.
Thanks
-
-

hi,
can we have dual pricing currency for each product?-
xeroneitbd Admin
4 years agoSorry but it's not available.
Thanks
-
-
Hi Team thanks for the great feature.
May I ask :
1) Can we modify the currency symbol from $ to our own currency? Else people will confused the product is selling in US dollor evertime
2) Can we make shipping cost dynamic according to how many product are added to the cart?
-
xeroneitbd Admin
4 years ago1. All currency is now available in payment settings . You can set your own currency .
2. Currently not available.
Thanks
-
-

How to remove decimal and change format of price?
-
xeroneitbd Admin
4 years agoCurrently there is no settings/option for change these. We will think about in future update.
Thanks
-
katetan
4 years agoThis is quite important feature. Please kindly consider
-
-

1. Is there a plan to use woocommerce as the main e-commerce system just like the custom e-commerce system you created And use it with "WC Abandoned Cart Recovery" ??
2. Can i sell digital / downloadable products with this ecommerce system?
-
xeroneitbd Admin
4 years agoThanks for your suggestion. We will have a think about these in future hopefully.
Thanks
-
-

Hi!
I hope digital products and licensed key selling will be available too :)-
xeroneitbd Admin
4 years agoWe will think about it in future.
Thanks
-
-

stock control is missing
-
xeroneitbd Admin
4 years agoYes, It's not in our current goal. However we will think about inventory management in future .
Thanks
-
-
I want to improve the Spanish language in the store which files I must modify.
Thank you-
xeroneitbd Admin
4 years agoCheck language files as like as the total system.
Thanks
-
info@xeroneit.net
4 years agoI didn't find how to translate the payment buttons into Spanish https://ibb.co/5h75YW7
-
xeroneitbd Admin
4 years agoWe will check the matter soon.
-

23
21511
Social Media Management