Instagram chatbot
Instagram chatbot, a XeroChat add-on, is an Instagram chatbot-building platform. If you have the add-on, you can build Instagram chatbot easily. Like XeroChat, the main application, the Instagram chatbot has two types of bot-building platforms, -- classic bot builder and Flow Builder, a visual drag and drop chatbot editor. Note that Flow Builder is an add-of xeroChat. Therefore, if you want to build Instagram chatbot on the Flow Builder, you have to add the add-on to XeroChat first. Otherwise, you have to build an Instagram chatbot on the classic bot builder.
In this instructional blog, I will show you step by step how to build an Instagram chatbot on the classic bot builder of the Instagram chatbot add-on. Please read the how-to blog and follow the commands one by one to build Instagram chatbot on the classic bot builder of Instagram chatbot add-on.
First, you have to import your Instagram account into XeroChat. Then you have to enable the bot connection.
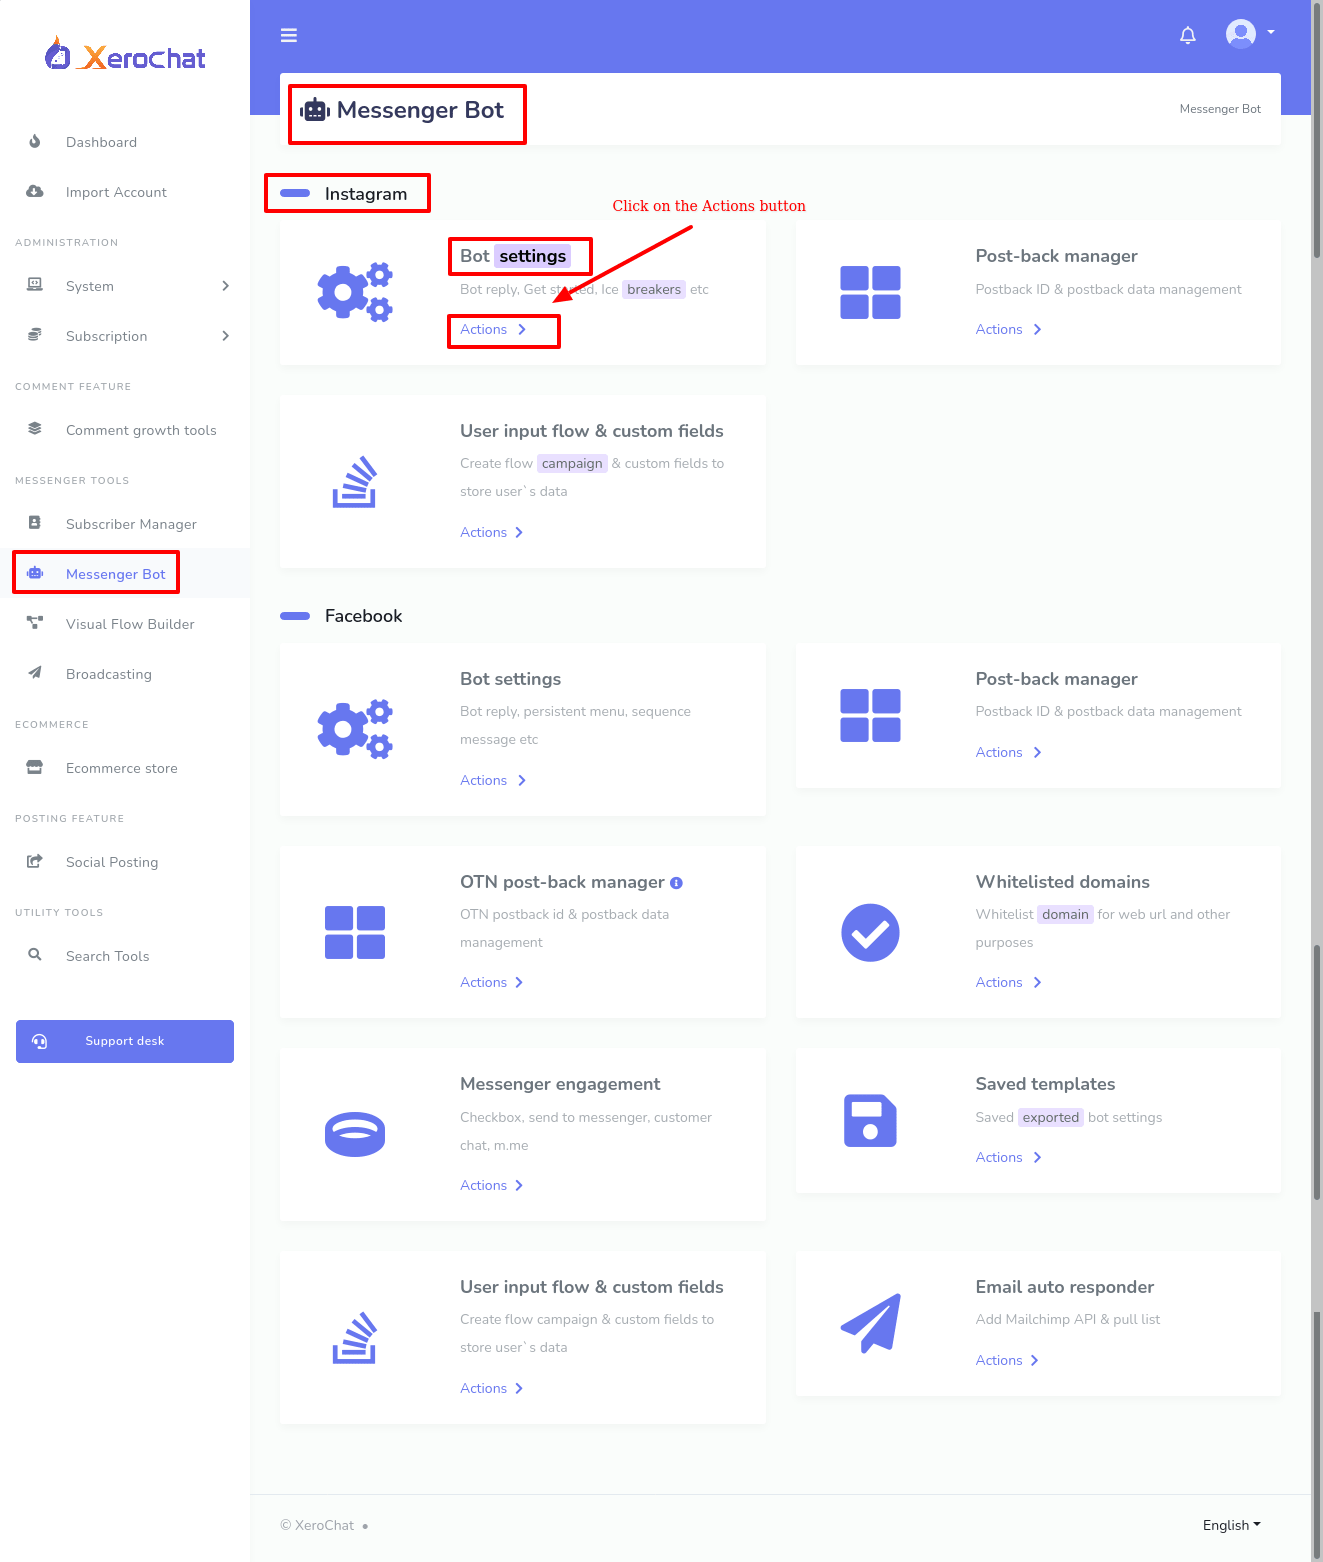
After that, go to the Dashboard of the XeroChat. Click on the Messenger Bot option at the right sidebar. Instantly, the Messenger bot page will appear. The page is divided into two sections-- Instagram and Facebook. In the Instagram section, click on the action button of the bot settings.
The Instagram chatbot settings page will appear without delay. The Instagram chatbot settings page is divided into three sections.
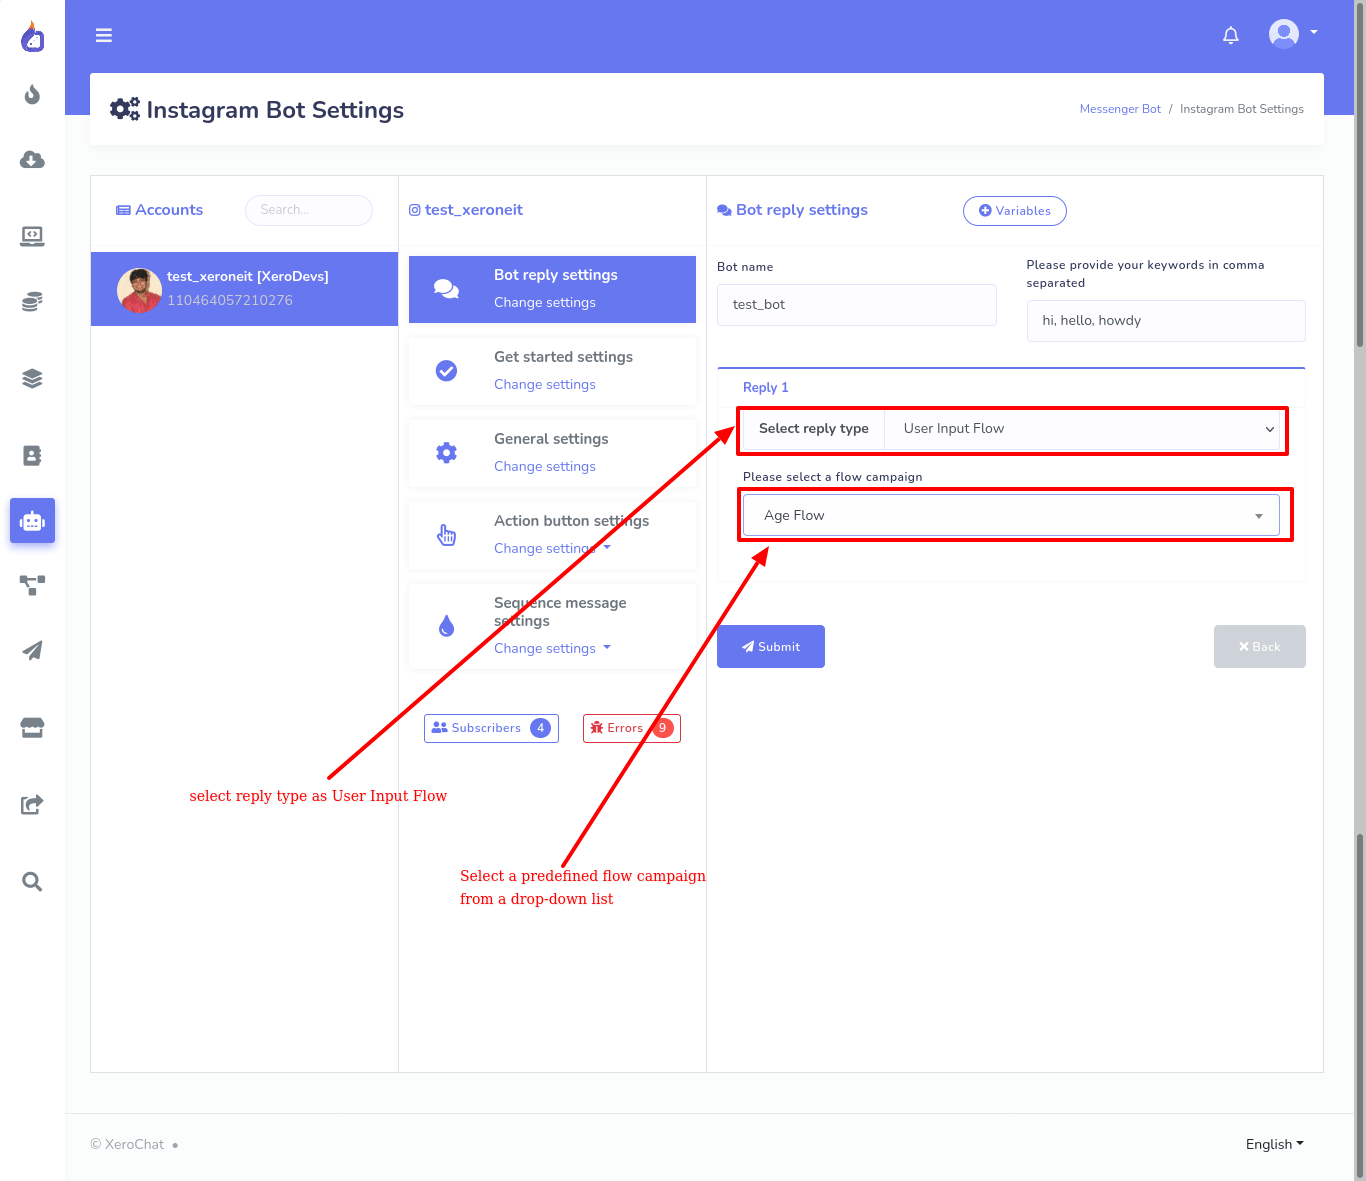
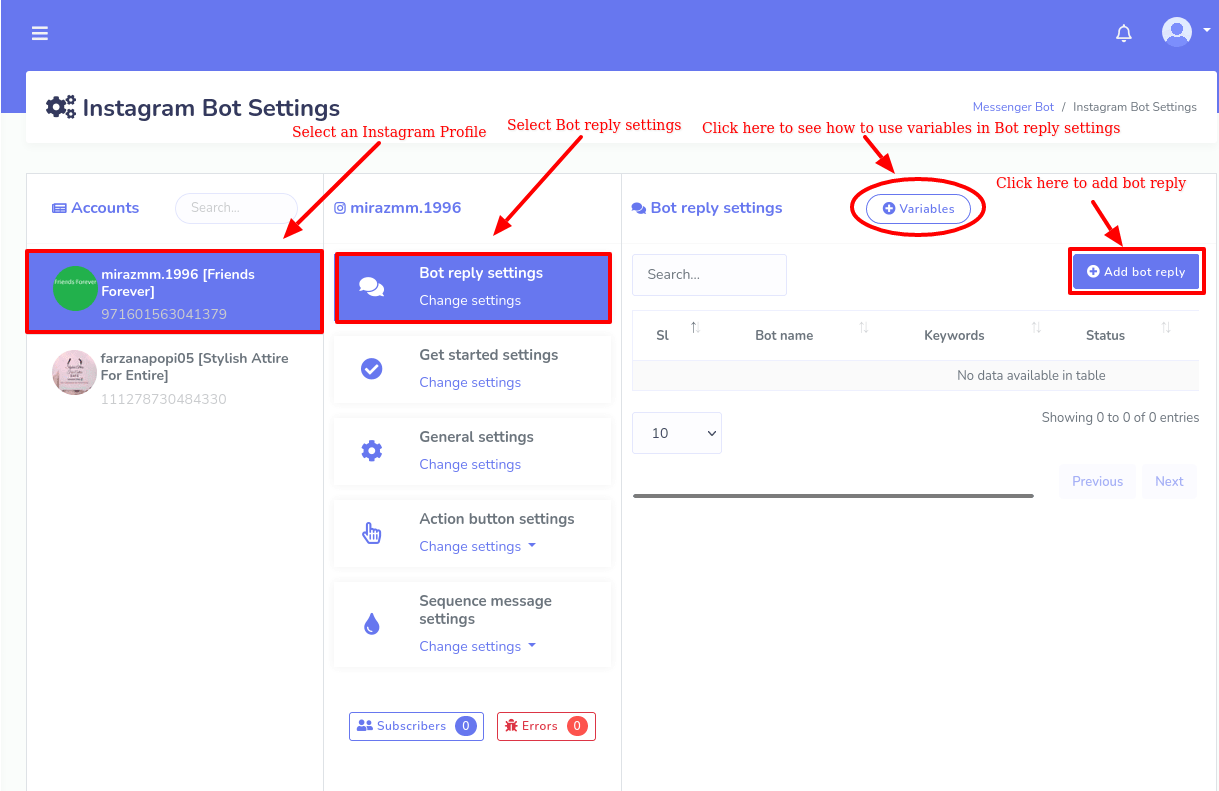
In the accounts section, you have to select the Instagram profile for which the bot will be created. In the second section, the bot reply settings option is already selected. If not, select the option, bot reply settings. And you will see the interface of the bot reply settings in the third section.
At the top of the Bot reply settings section, you will see a button called variables. Click on the button to learn how to use variables in the bot reply settings. Without delay, a show modal with some text will appear. Read the text, to learn about how to use variables in the bot reply settings.
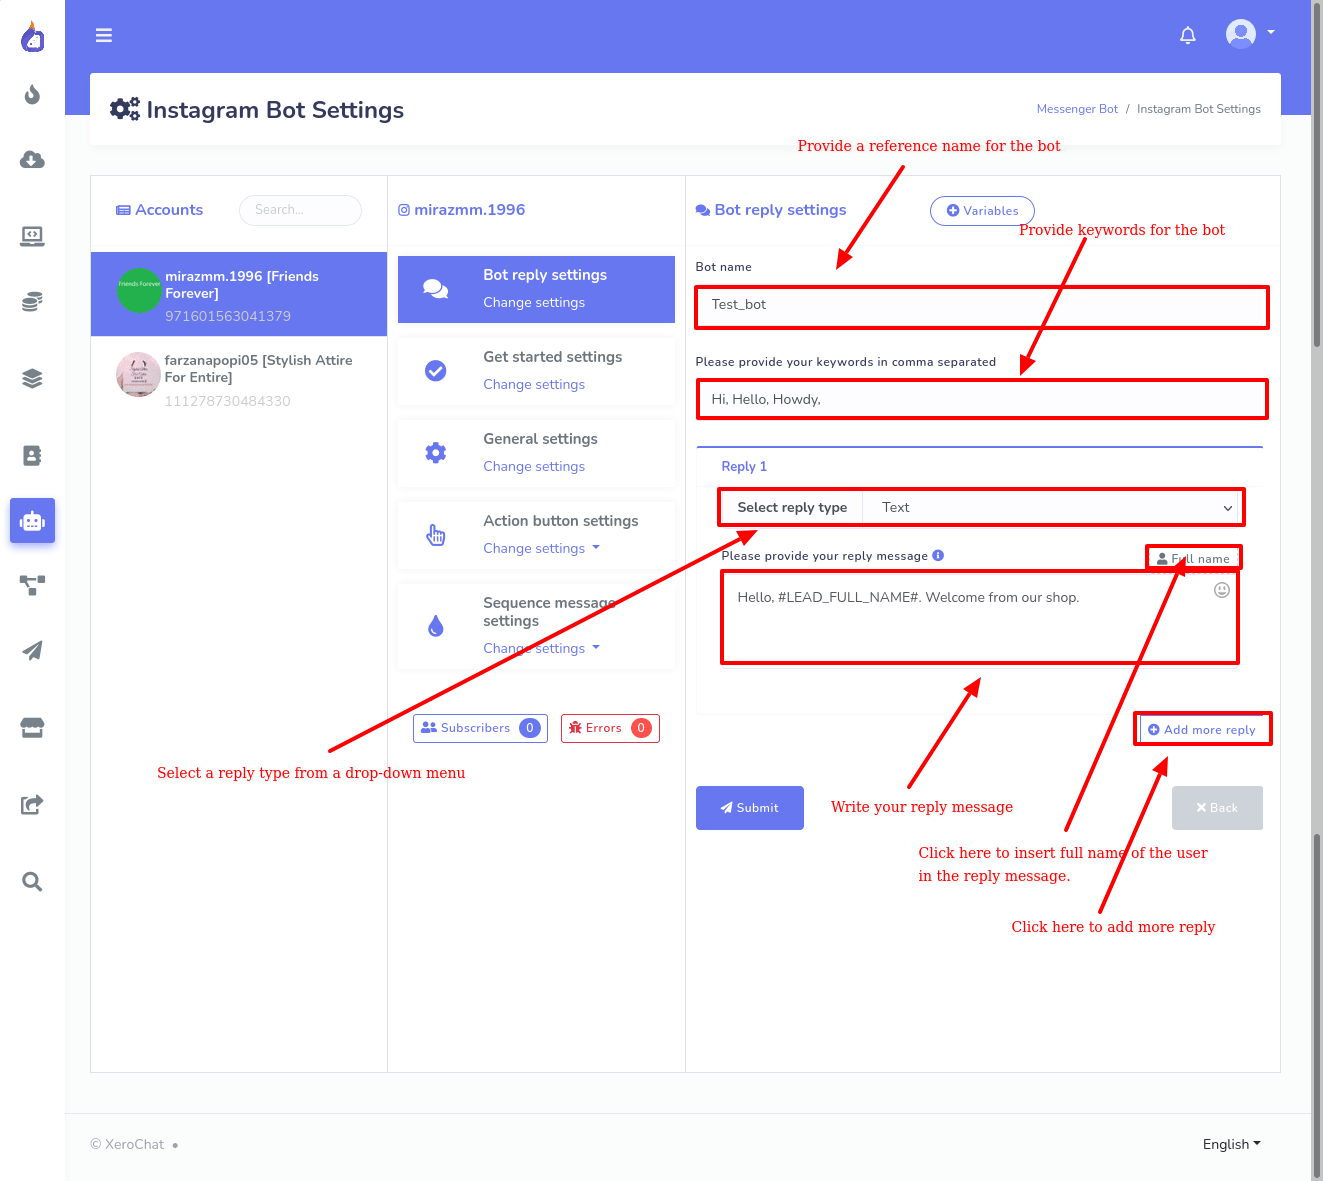
At the right, you will see the Add Bot Reply button. Click on the Button and instantly appear a form you have to fill up to build an Instagram chatbot.
Now let’s fill out the form:
First, provide a bot name in the Bot name Field. Then provide keywords in comma-separated in the field below. After that, you have to select a reply type. By default, the reply type Text is selected. To select another reply type, click on the the select reply type field and a drop-down menu of different reply types such as Text, Image, Quick Reply, Generic Template, Carousel, User Input Flow, and E-commerce will appear. You have to click on the Reply type you want to select.
Reply With Text
To reply with normal text, select Text as reply type and provide your reply message in field below. Also, you can include the full name of the user by clicking on the Full Name button above the field. Now click on the submit button and a success message will appear. Now click on the ok button to dismiss the success message.
A simple bot with only text reply is built. Now the bot will be added to the list of the predefined bot. Now you will see the details of the bot in the list. All the bots you will create later will be listed here. From here, you can edit a bot at any time. Now click on the action button beside the name of a bot in the list and a drop-down menu with three options-- Stop, Edit bot reply, Delete bot reply. If you want to stop, edit or delete the bot, click on the stop, edit or delete options respectively. Just as you click on the Edit bot Reply, the bot reply settings page will appear so that you can edit the bot. After you have changed the bot and click on the update button and the bot will be updated.
Now, if you want to add more replies to the bot, just click on the Add more Reply button. And instantly, another reply setting option will appear. Like before, click on the select reply type to choose your desired reply type from the drop-down menu.
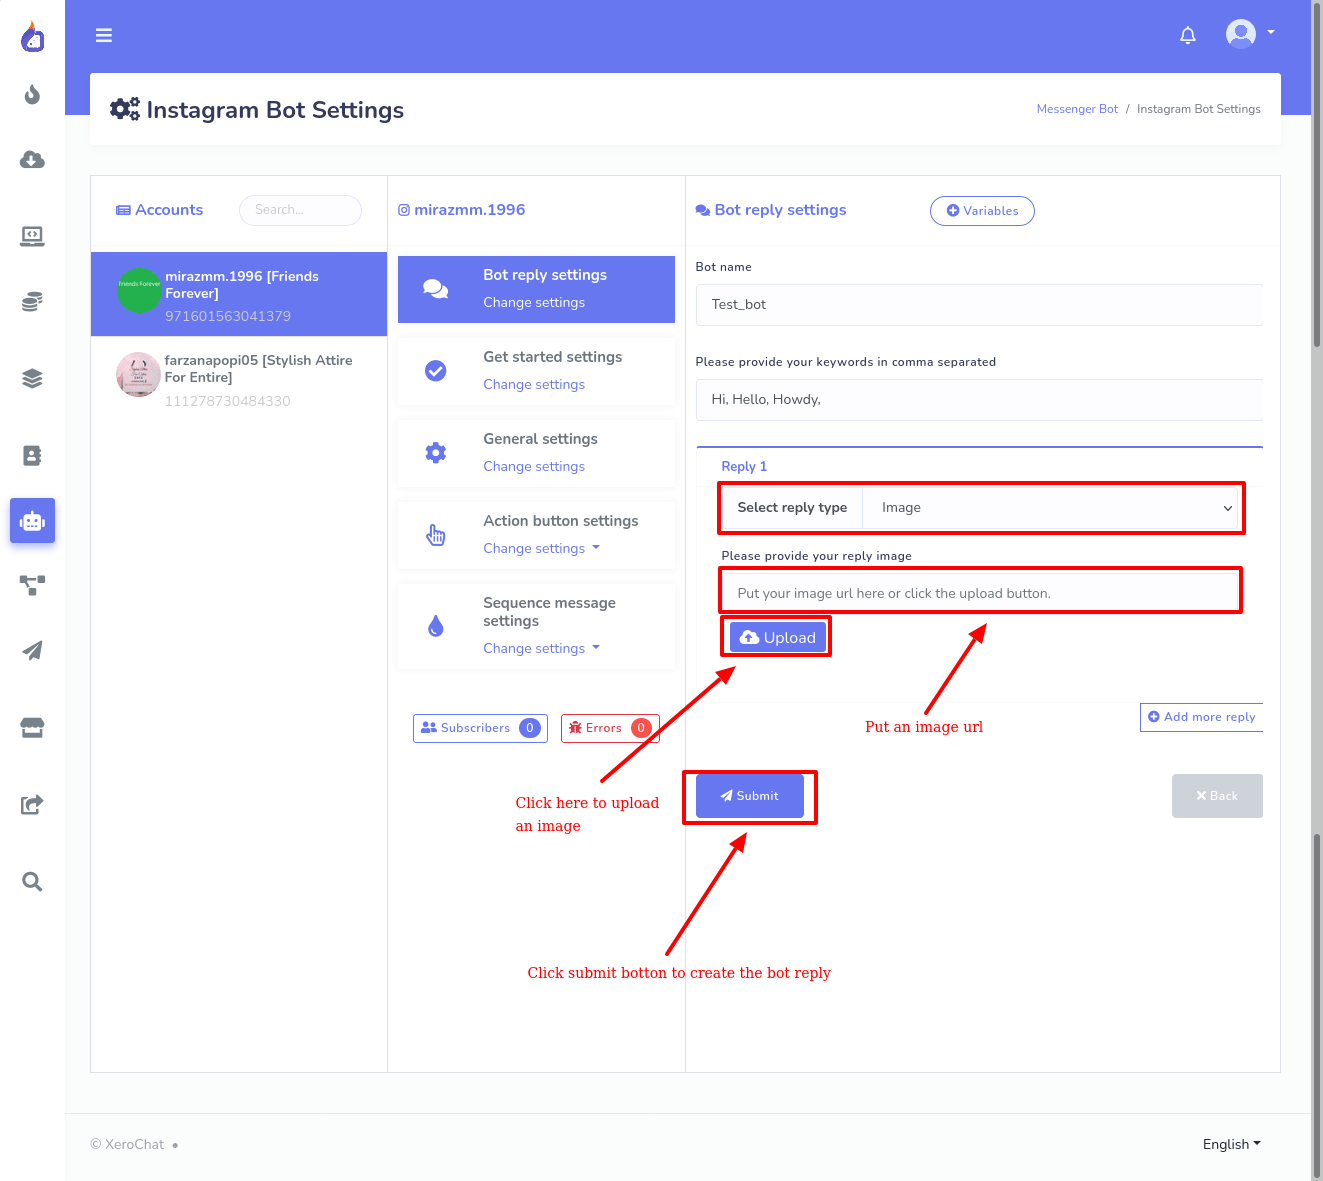
Reply With Image
If you want the bot to reply with an image, select Image as the reply type. Instantly, a field and upload button will appear. If you want to use an image from the internet, you have to put the image URL into the field. On the other hand, if you upload an image from your local computer, click on the upload button to upload the image. After uploading the image, the image will be saved on the internet and the image URL will appear in the field. Well, by clicking on the preview button, you can see the preview of the reply. Also, you can delete the image anytime by clicking on the delete button. Now click on the update button to update the bot. Just as you click on the update button, a success message will appear.
Reply With Quick Reply
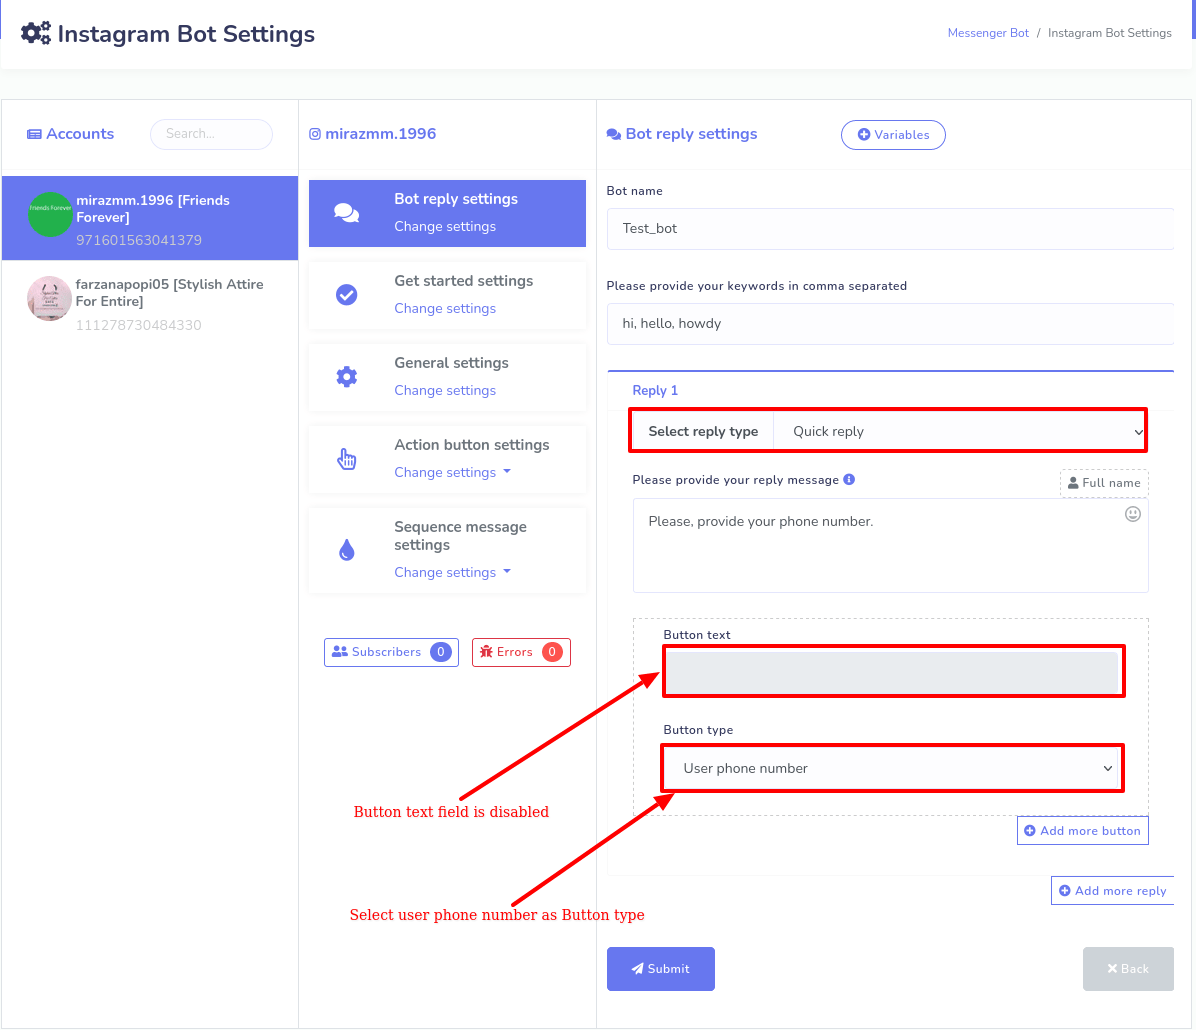
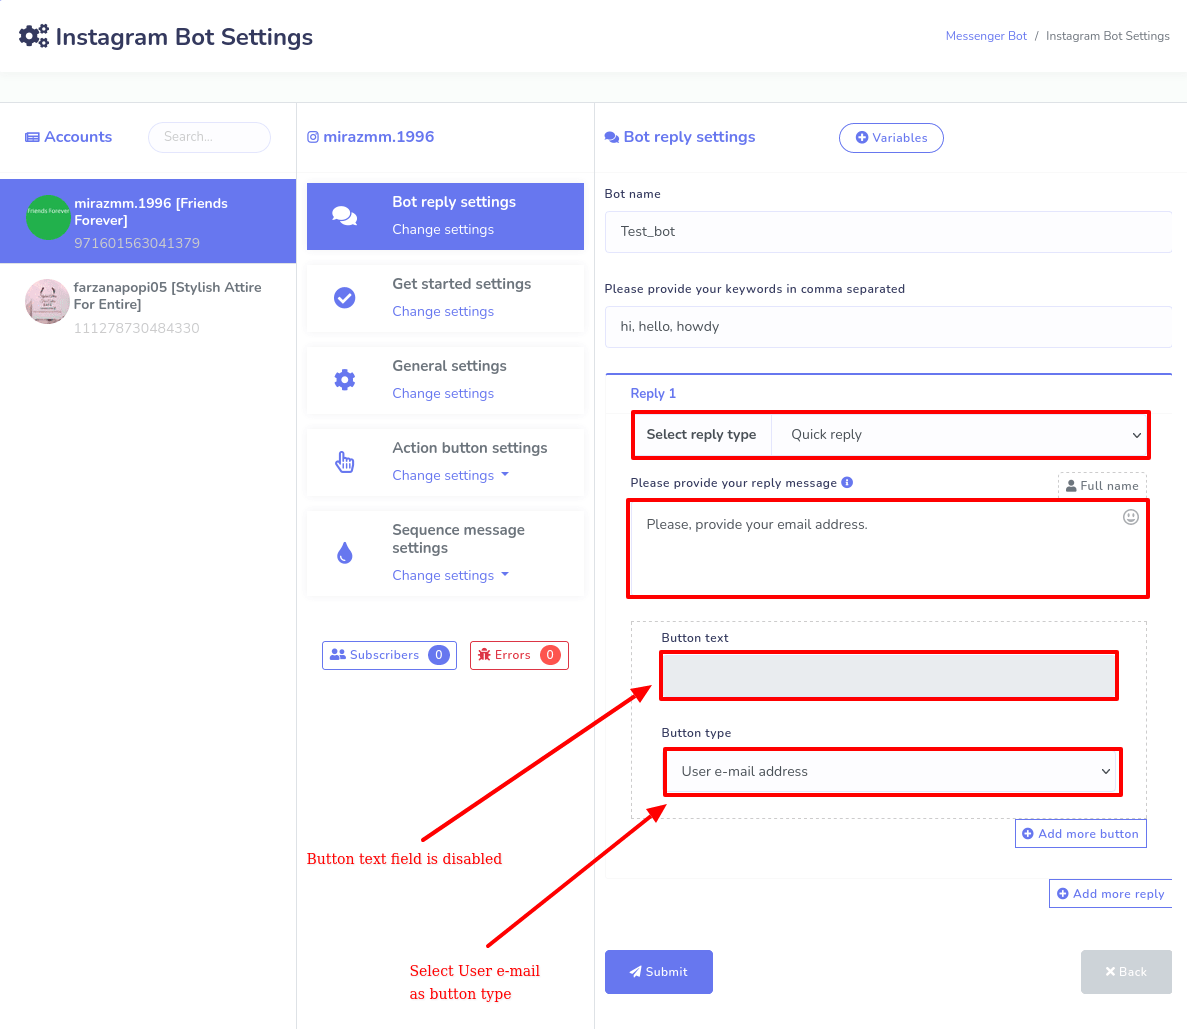
To use Quick Reply in your bot, select Quick Reply as the reply type from the drop-down menu. After you have selected Quick Reply, some fields will appear. In the first field, you have to provide a reply message. Then you have to provide button text and select a button type. Just as you click on the button type field, a drop-down menu of three types of button-- Postback, User phone number, User email address-- will appear.
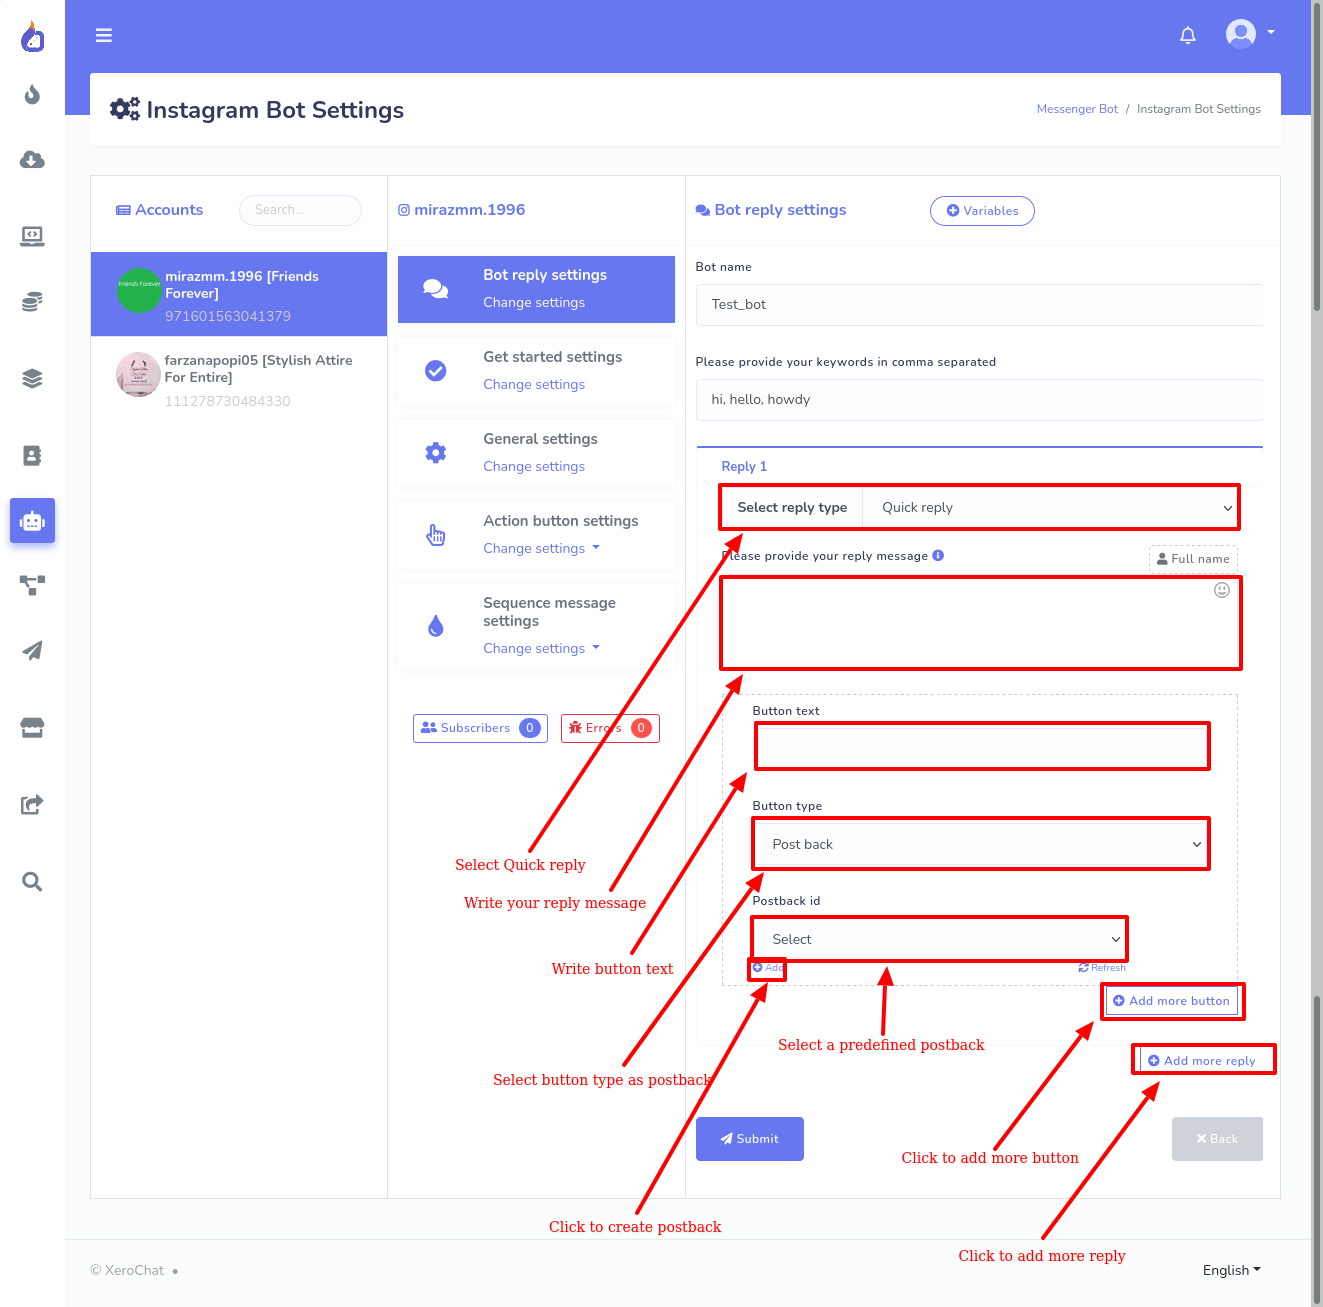
Postback in Quick Reply:
If you select postback as the button type, first, you have to provide button tex in the button text field. Then you have to select a postback from a drop-down list of pre-built postback templates. Also, you can create a postback template by clicking on the add button. Just as you click on the add button, a form will appear. And you have to fill out the form, to create a new a postback template.
User Phone number in Quick Reply:
If you want the quick reply to collect users’ phone numbers, you have to select the User phone number as the button type. And if you select User Phone number, the button text field wil bel disabled since button text will automatically be generated.
User email address in quick reply:
On the other hand, if you want your bot to collect users’ email addresses, you have to select User email address as the button type. And if you select the User email address, the button text field also will be disabled, since button text will automatically be generated.
Generic Template
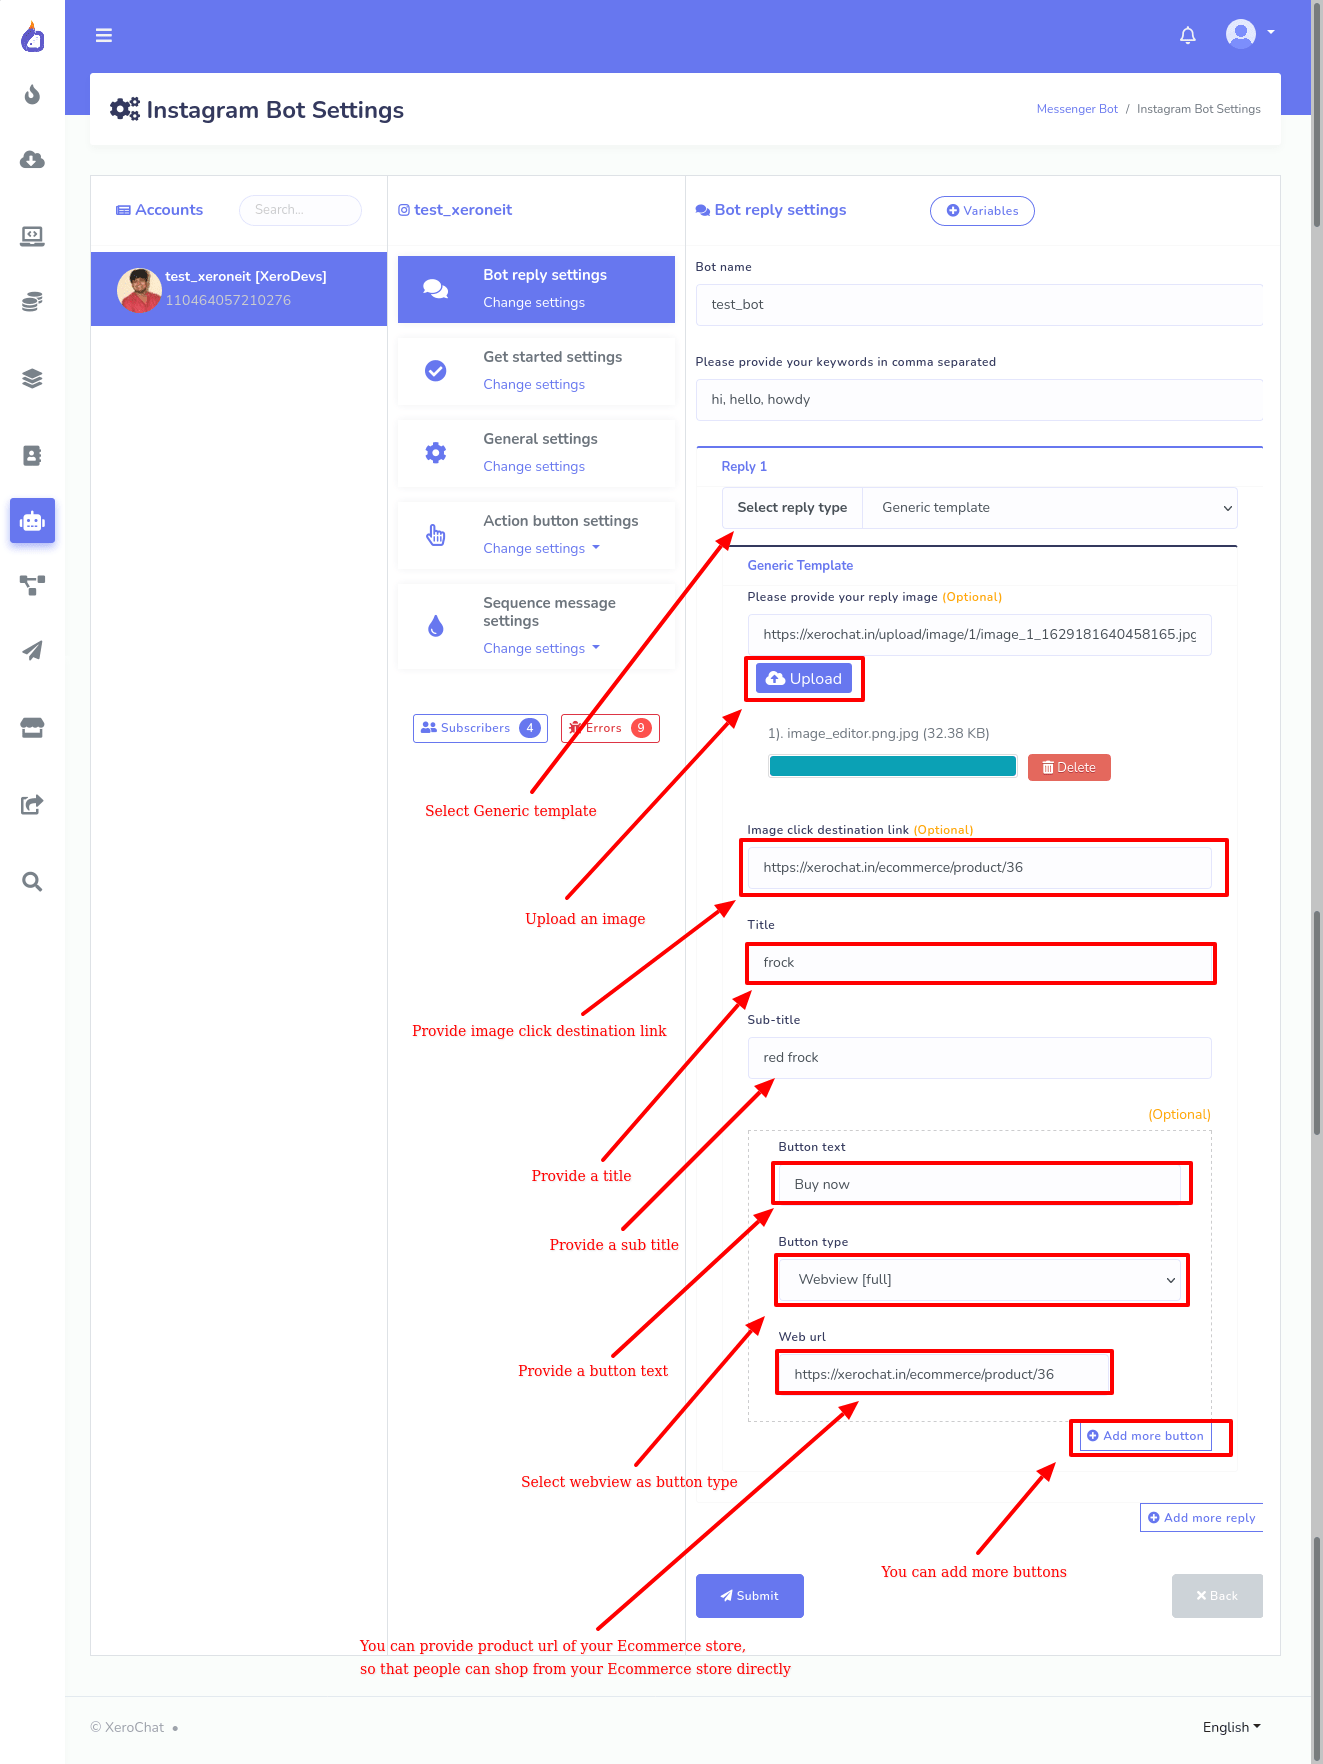
If you want to create a Generic template, select the Generic template as the reply type. After you have selected the Generic Template, some fields will appear, and you have to fill out the form to create a generic template in the bot.
First, you have to provide an image for the generic template. Then you can provide a link in the image click the destination link field. When a user clicks on the image, the user will be redirected to the link. Then you have to provide Title and subtitle for the generic template.
You can also add a button to the generic template. In this case, you have to provide a text for the button text and select a button type from a drop-down menu of different button types. If you select any of the webview button, an additional field called web url will appear. In the web url field, you have to provide a web url. In the web url field, you can provide a product URL from your Ecommerce store. In doing so, you can let the users shop from your e-commerce store inside the Instagram Messenger.
Carousel
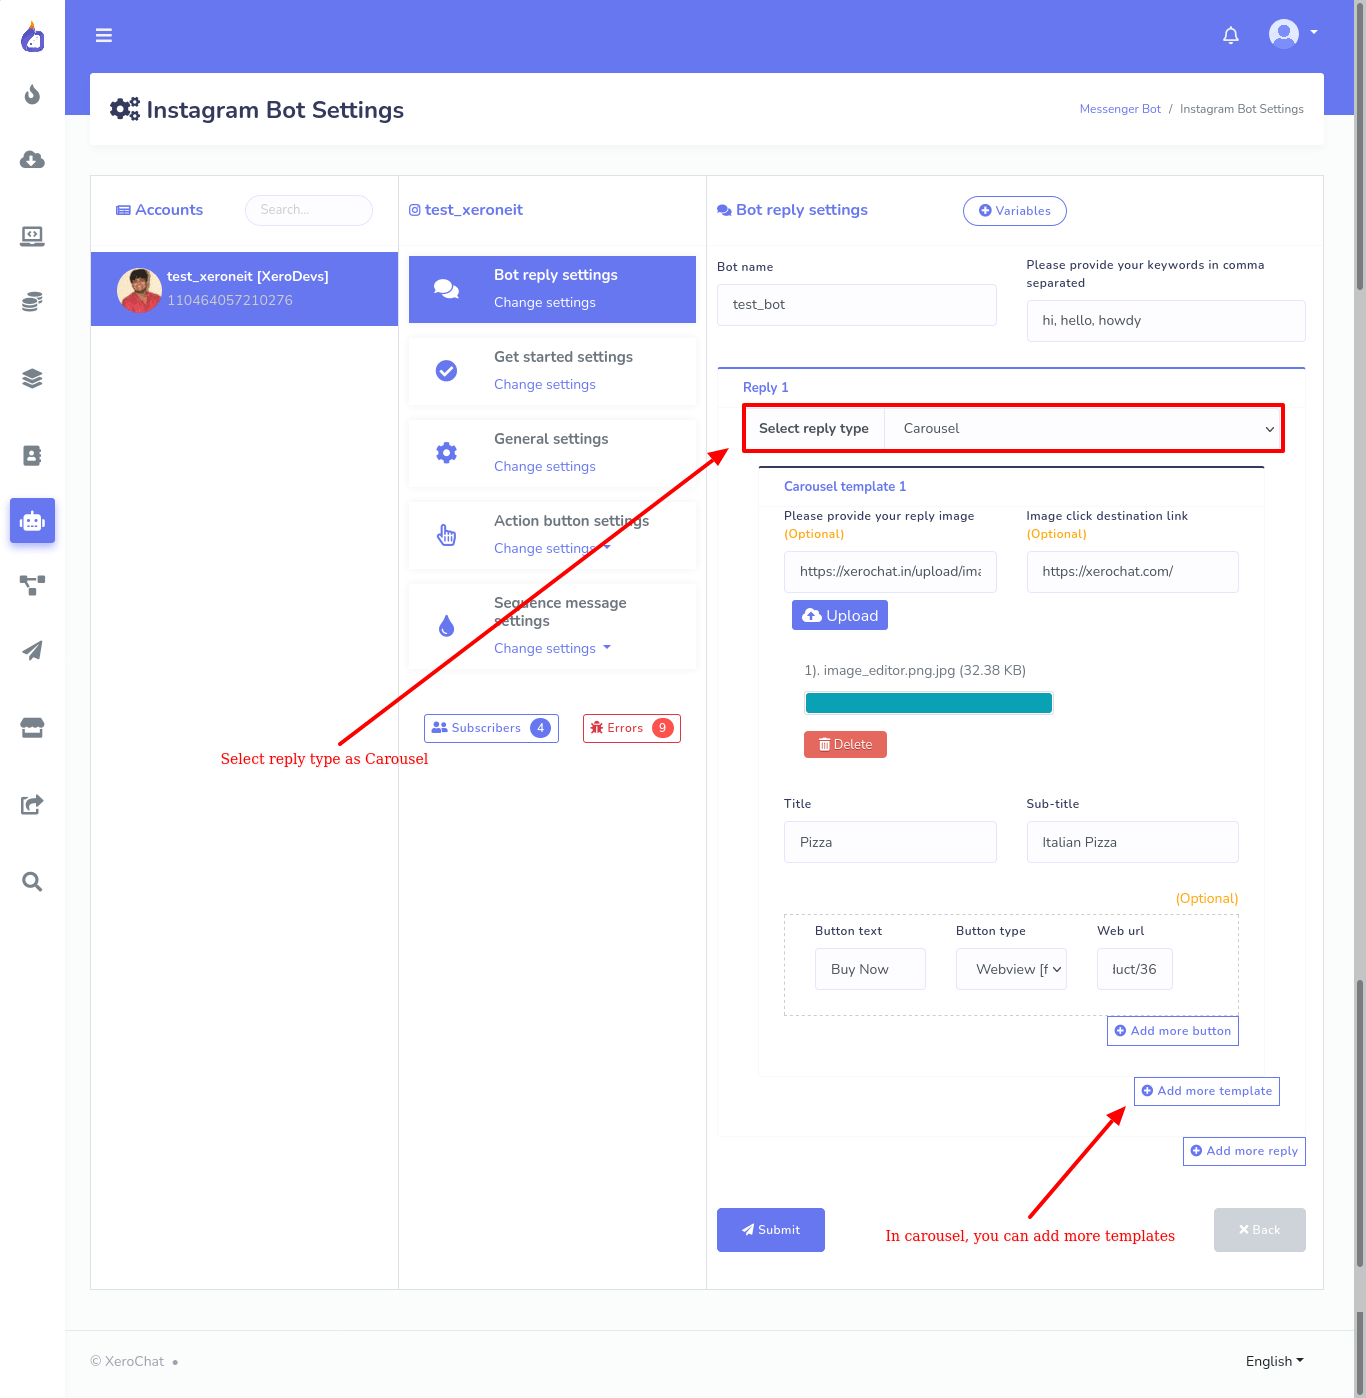
If you want to create Carousel, select Carousel as the Reply type. Then you have to create a template the way you have created a template in the Generic template Reply type. Unlike Generic Template, you can create one more template in the carousel Reply type. If you want to create one more template, click on the add more template button.
Click on the add more template button and do the same process to add more templates in the carousel. In this way, you can add as many templates as you want. Like Generic Template, in the Carousel, you can provide the product url of your Ecommerce store so that users can shop from your Ecommerce store inside Instagram messenger.
Ecommerce Store
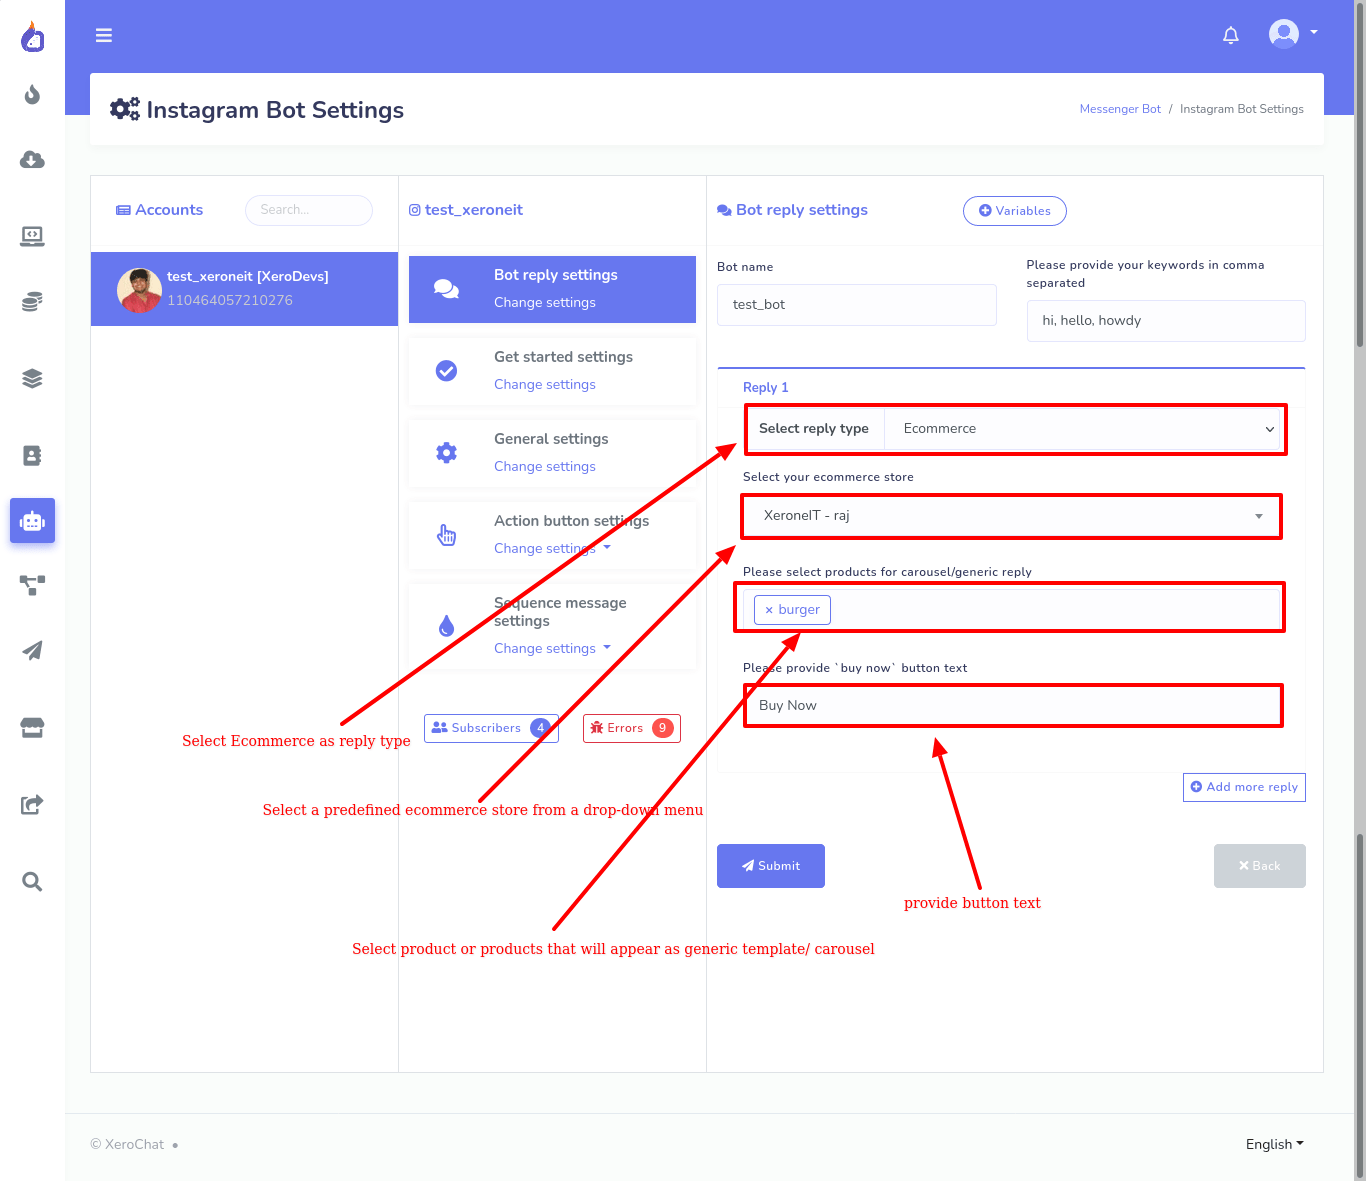
If you want to import your Ecommerce store to the bot, you have to select Ecommerce as the reply type. Click on the select reply type form and select Ecommerce option from the drop-down menu. Then select a pre-defined Ecommerce store. If you don’t have Ecommerce store created before, you have to create ecommerce store first. If you don’t know how create Ecommerce store, read the article and follow the step by step instructions.
To add products of your Ecommerce store you selected, click on the below field and a drop-down menu of all the products of your store will appear. Now you have to select a product or products that will appear in a generic template or Carousel inside the messenger. And your user will be able to buy products and give payments inside the messenger.
Also, you can edit the buy now button if you want.
Now click on the update button and you will see success message. That is, your bot has been created. Now if a user write any of the keywords you provided in comma separated, the bot will start.
Ice breakers
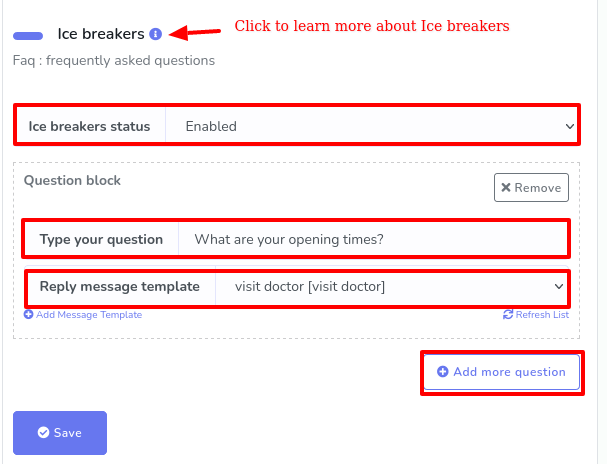
Before setting Ice breakers, you have to learn what does icebreakers mean. According to Facebook, Icebreakers provide a way for users to start a conversation with a business with a list of frequently asked questions.
That is, to set Icebreakers, you have to set some frequently asked questions and answers.
Well, to set Icebreakers, first, select get started settings. Instantly, Ice breakers setting page will appear with one field called Icebreaker status that is selected as disabled. To set Ice breakers, first you have to enable the status. Click on the field and select enabled. And instantly, a question block will appear.
Now you have to provide your question in the type your question field. Then you have to select a message template as an answer. If you have predefined message templates, they will appear in the drop-down menu. Otherwise, you have to create a message template for the question by clicking on the add message template. To add another question, click on the add more question button and instantly a new question block will appear.
After fill-out out the question block, click on the Save button and your icebreakers will be saved.
And if you set icebreakers, when a user just opens the messenger of your page, the questions will appear inside the messenger. And when the user clicks on a question, the answer to the question will appear inside the messenger. In this way, a user can easily be familiar with your business.
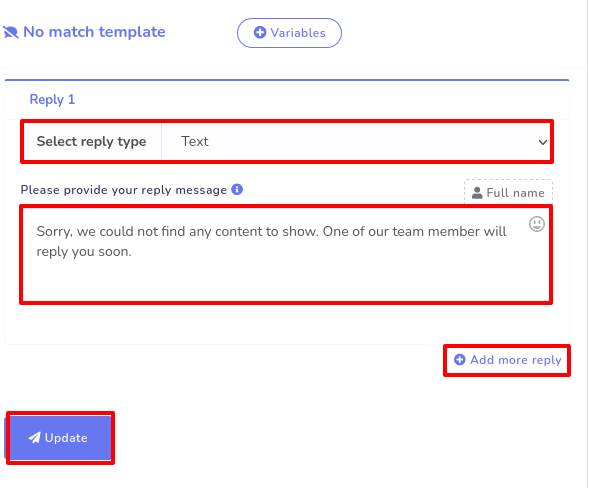
No match template
Click on the action button setting, a drop-down menu of no match template and story mention will appear. Now click on the no-match template and no match template form will appear. It is almost the same as the bot setting form. You just don’t have to provide keywords and the name. Since you have read the article so far, you already know how to fill out the form to create the template.
Story mention template
In Instagram, a user can mention a story to anyone. And in the story, the user can mention one more person. The moment you mention a story, the story will be sent to the people whom you mention.
Well, if you create a story mention template in the Instagram chatbot, the messages on the template will be sent whenever someone mentions you in their stories.
To create a story mention template, click on the action button settings and a drop-down menu of two options-- No match template and story mention template will appear. Click on the Story mention option and instantly a form will appear. And you have to fill out the form. Okay, fill out the form and click on the update button. The form is the same as the Bot reply settings form.
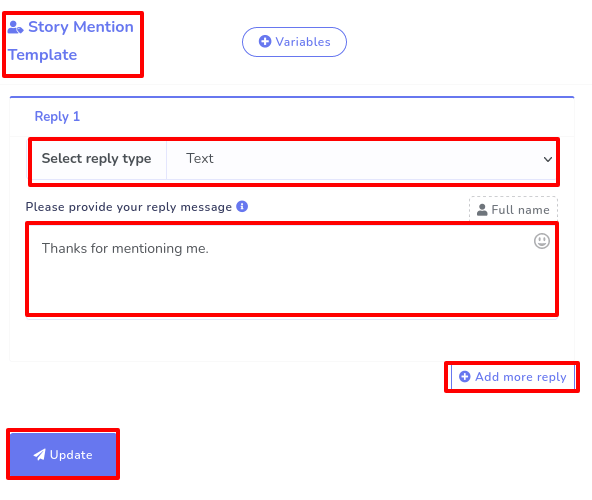
If someone mentions you in their story, the message on the template will be sent automatically.
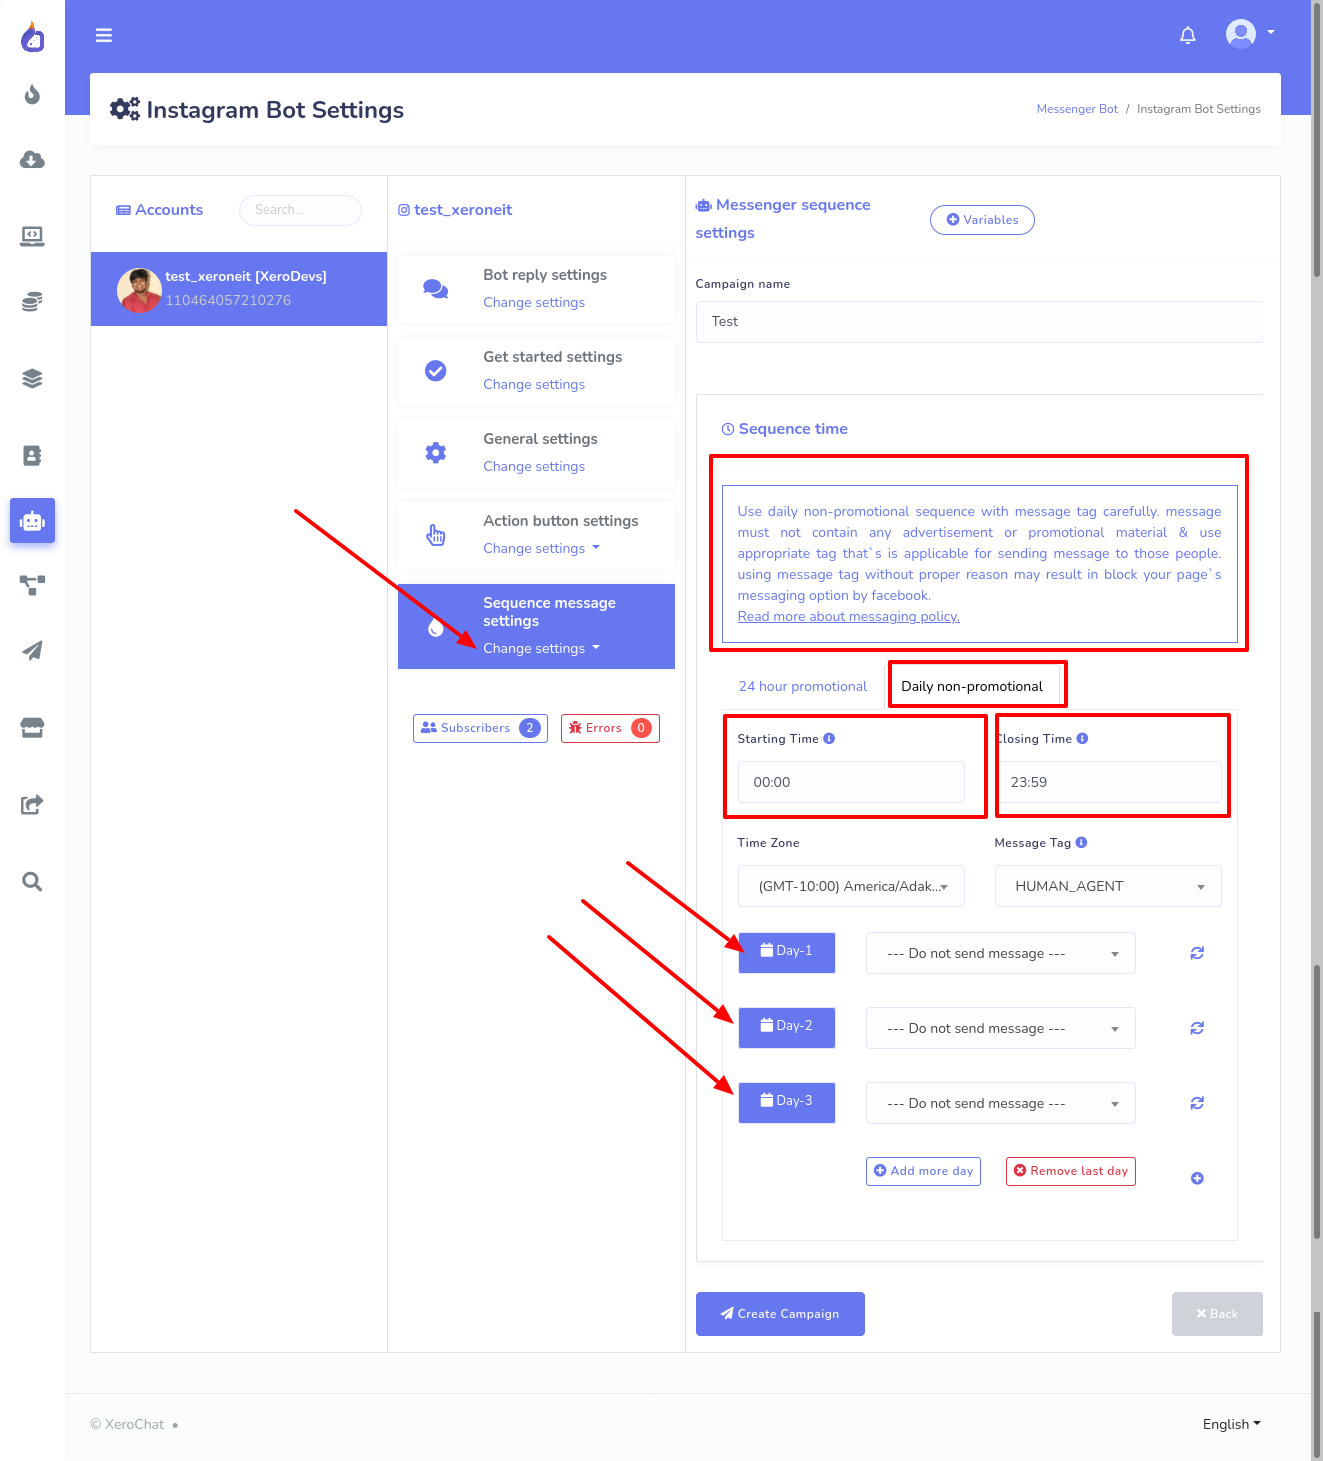
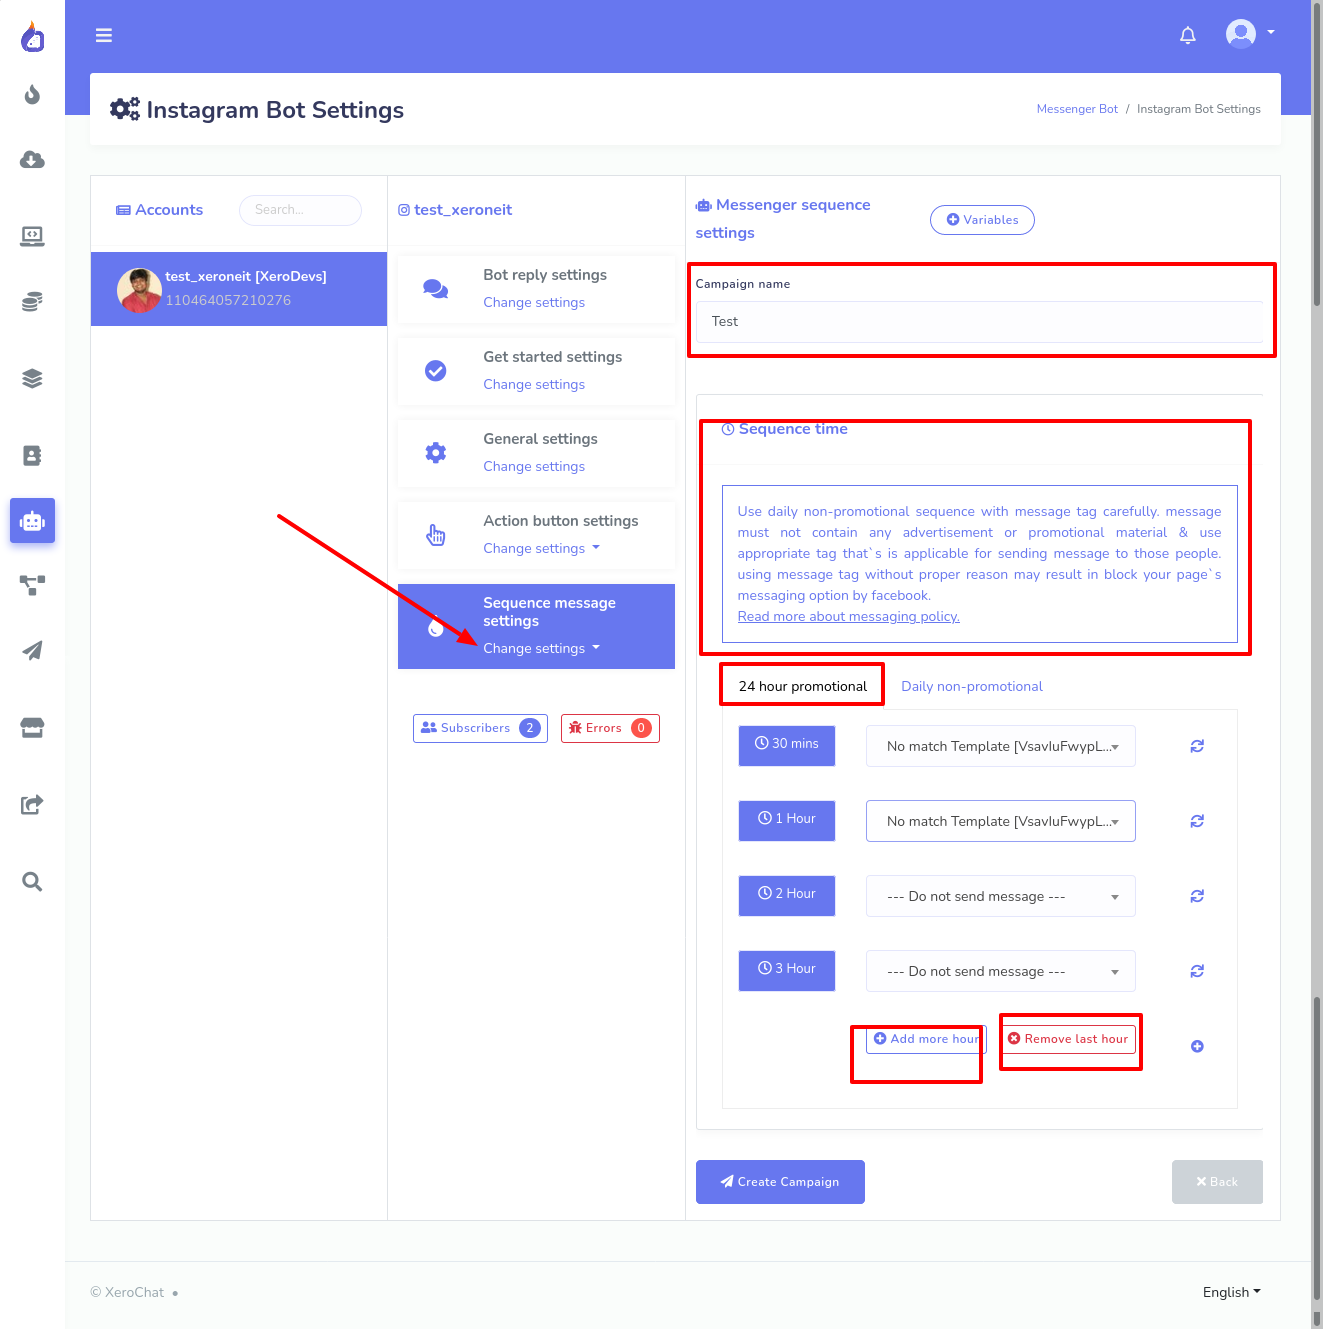
Sequence message
If you want to set Sequence message, click on the Sequence message settings option. Then click on the messenger sequence setting. Instantly, messenger sequence settings will appear. To add a sequence message, click on the add sequence button. Instantly, messenger sequence settings page will appear.
24-Hour Promotional
In the first field called campaign name, give your campaign a name. Note that the sequence message is divided into two parts-- 24- hour promotional and daily non-promotional. In the daily non-promotional, messages can not contain any advertisement or promotional material. And it is better if you read the instructions written in a box.
Well, to set 24 promotional messages, select the 24-hour promotional option. And if you select 24 hour promotional, you will see a time table in minutes and hours. To set message for a specific time, click on the beside field and instantly a drop-down menu of different post-back will appear. And if you want to add more time to the time table click on the add more hour button. And if you want to remove the last time from the time table click on the remove last hour button.
Daily Promotional
Well, now select daily non-promotional message, and a form to set daily non-promotional messages will appear. Besides providing the messages, you have to fill out some addition fields.
First, appear the Starting time fields. In this field, you have to set a time. And from the time of the day, the system will start processing the messages. Click on the tooltip button to know more about it.
Just as you click on the starting time field, a list of the different times will appear. Now select a time.
In the closing time field, you also have to set a time. And the processing of the message will be terminated at the time. That is, the message will be sent between the starting and closing hours.
Then you will see a time zone field. In this field, you have to select your time zone. Click on the time zone field and a list of different time zones will appear. And from the list, select your time zone, so that the system can detect your local time.
Then you will see a field called message tag. In this field, the human tag is already selected and it is the only option. Click on the tooltip button to learn about the option.
After that, you will see a time table of Day 1, Day 2, Day 3. And next to the days, you will see fields with Do not send message option selected. That is, no message is selected yet. Now you have to select the message you want to send. Now click on the field and a drop-down menu of different predefined post-back will appear. And you have to select a post-back that holds the message that you want to send.
If you want to add a day to the list, click on the add more day button. On the other hand, if you want to remove a day from the list and click on the red-colored remove last day button and the last day of the list will be removed.
Now click on the create campaign button, you will see a success message. That is, the sequence messages has been created.