Installation

Upload Add-on Zip Package


Login as admin and go to System > Add-on Manager menu


This page shows all available (activated/deactivated) add-ons that have been uploaded. Click Install add-on button to start installation process.


It's time to upload the add-on zip package. Click Upload button to browse and upload the zip package. After you upload add-on file you will be taken to add-on manager page, you need to active the add-on there.

SERVER SETUP

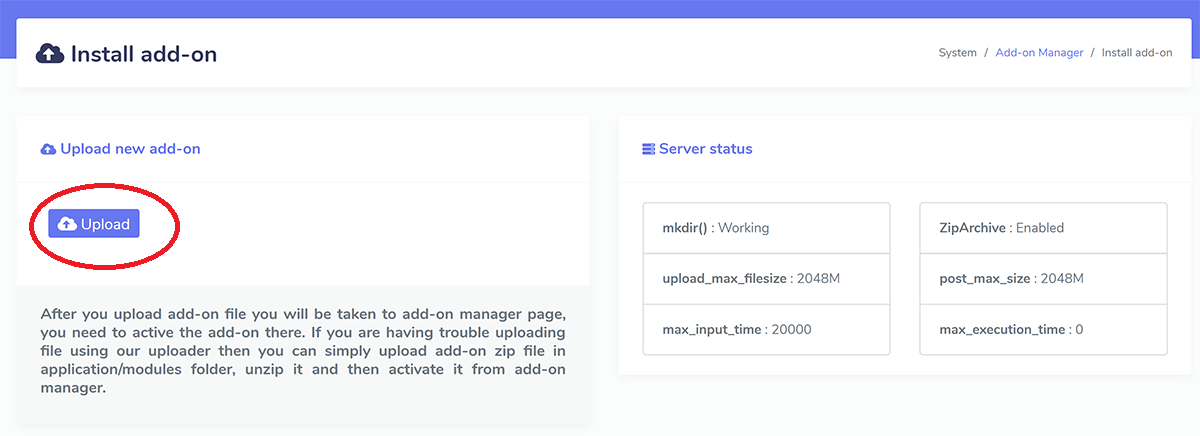
Before uploading file, make sure application/modules folder have write permission (755), mkdir + ZipArchive functions are enabled in your server and also make sure php settings for uploading files are large enough to upload the add-on zip file, otherwise it may generate errors. You can contact your hosting provider for help.

FFMPEG Installed

Make sure your server has FFMPEG installed exec() function is enabled.

If you are having trouble uploading using our uploader, then you can simply upload add-on zip file in application/modules folder manually using cpanel file manager & extract it there. Make sure you delete the zip file after extracting and also make sure there is no extra files in the application/modules folder except the add-on folders, otherwise it will generate errors.

Activate Add-on

Now you can see the add-on listed here but it has not been activated yet. The last step is to click the Activate button and put your purchase key to activate. You will get a success message after put your purchase code & submit. It's done, enjoy your new features.


Some common error while activating
Something went wrong. cURL is not working.
cURL extension is not installed or enabled in server. Please contact your hosting provider regarding this issue.
Purchase code is not valid or already used.
Not a valid purchase code entered or it's a valid purchase code but for another item or it's a valid purchase code & also for this add-on but has been already used in another domain. You can login to your Xerone IT customer panel (https://xeroneit.net/login) and can reset your purchase code from there if you get "already used" error.
Add-on controller has not been provided or Add-on controller not found.
The add-on file is corrupted or you uploaded a random zip file by mistake. Delete the corrupted or wrong file form application/modules folder manually using cpanel file manager or a ftp client and upload correctly again from System > Add-on manager menu.
Add-on is already active. Duplicate unique name found.
System found two add-on files of same add-on. Delete the last uploaded add-on from System > Add-on manager menu.
No error, it's loading forever
It can happen for base_url issue in ajax call. Try setting your website base url in application/config/config.php. Your base_url should look like https://example.com/ or https://example.com/something/ . Please remember that the ending / is a must. If setting base_url does not work then open browser inspector and see if there is any error there or contact our suport desk.
Set base_url in config.php
$config['base_url'] = "https://example.com/";


General Settings

Before Getting started with Facebook Live Streaming, set up your settings for Facebook Live streaming feature. So Go to System > Settings > General Settings menu and click on the Facebook live Streaming tab from right sidebar and you'll find the settings section. Details are given below :

screenshot
  • FFMPEG path : This addon needs FFMPEG to operate. You need to install it in your server or have to contact hosting provider to install it for you. In most the case FFMPEG path is ffmpeg, but it can be different in diferent server. Contact your hosting provider to know ffmpeg path. Also make sure exec() function is enabled in server.

  • Max Simulataneous live stream : how many live stream server will process at a time. It should be adjusted depending your server load. We have measured 20 simulataneous live stream without any problem in our test dedicated server.

  • Max length of live stream (hour): videos can be very long like 5/6 hours, set the highest limit in hour that server will process and rest of the part will be abandoned.

  • Max allowed video size : If you want to go live with 1GB of video set 1024MB here. Choose the highest limit as per your server processing power and storage.

  • You can also see the values of some useful php varibales your server currently have.

If you get JSON error while uploading long video then set php max_execution_time, max_input_time, post_max_size, upload_max_filesize to long limit possible.

For long video streaming set php max_execution_time, mysql connect_timeout & mysql wait_timeout to long limit possible, so that your server can process stream for long time.

You can also see the your current FFMPEG Status and Informations at General Settings > Server Status section.

screenshot


Changes

The add-on will affect the system in some places. Let's have a short tour about where the new features to be found.


New Section at "System > Settings > General Settings" section
screenshot


New Section added at "Social Posting" menu
screenshot