Wouldn’t it be amazing if there was a way to effortlessly share a digital form of your restaurant menu? With ChatPion’s QR Code digital menu generator you can create your digital menu for your restaurant. All you need to do is, create a store using ChatPion and then generate a QR code. Then this QR code digital menu can be accessed from Facebook Messenger and from outside of the Messenger using a browser.
This will give easy access to the digital menu of your restaurant to your clients. There are many benefits to creating your restaurant menu more digital-friendly. When you use QR codes to do so, it’s even better as the benefits can be experienced by you and your clients.
Now we will look into how to create a QR Code digital menu for a restaurant. You don’t need any ChatPion add-ons to create a QR code digital menu.
First, you need to create a store for your restaurant and add all the food items you want to put on the digital menu. You can create categories and add food items to your store from the “E-commerce store”. To know how to create an eCommerce store using ChatPion, please watch the below video or read the blog on “How To Create E-Commerce Store Inside Messenger With ChatPion”.
ChatPion can produce two types of QR codes for a digital menu. One is to use for Facebook Messenger and the other one for the outside of the Messenger, in any browser. ChatPion’s E-commerce store also has the options for a delivery point or pickup point. Let’s imagine you have created a store for your restaurant using ChatPion. Now you want to create a QR code menu for your restaurant. General QR code for the Messenger or the outside of the Messenger, could be used by your customers to order food. In this case, the customer would have to select the delivery points or serving points, in the case of a restaurant it could be the Tables in your restaurant. For example, if the customer is on table number 3, then they will have options to select Table number 3 as a delivery point.
When a customer is at the Table and making an order, it’s a hassle for the customer to select the delivery point as the customer is already inside the restaurant and sitting at the table, isn’t it? To solve this problem, ChatPion has the option to create a QR code table-wise. You can create different QR codes for a different table. Table wise QR code will automatically select the table number as the delivery point. So, your customer doesn’t need to know the table number where they are sitting and making the order.
You can create any number of the delivery point, and then create a QR code for the respective delivery point. Your restaurant may have a Lawn, poolside table, you can create delivery point-like; Lawn Table -1, Lawn Table-2, Poolside Table-1, etc. Then create a QR code for every delivery point and place the QR code accordingly.
Customers don’t need to think about where are they sitting, they will just order and will get the delivery at the right place.
Now let’s see how to create the QR code menu on ChatPion. When you are done with adding foods to your restaurant, first we will create delivery points and then will generate QR code for the respective delivery points, also we can create a General QR code, you remember?
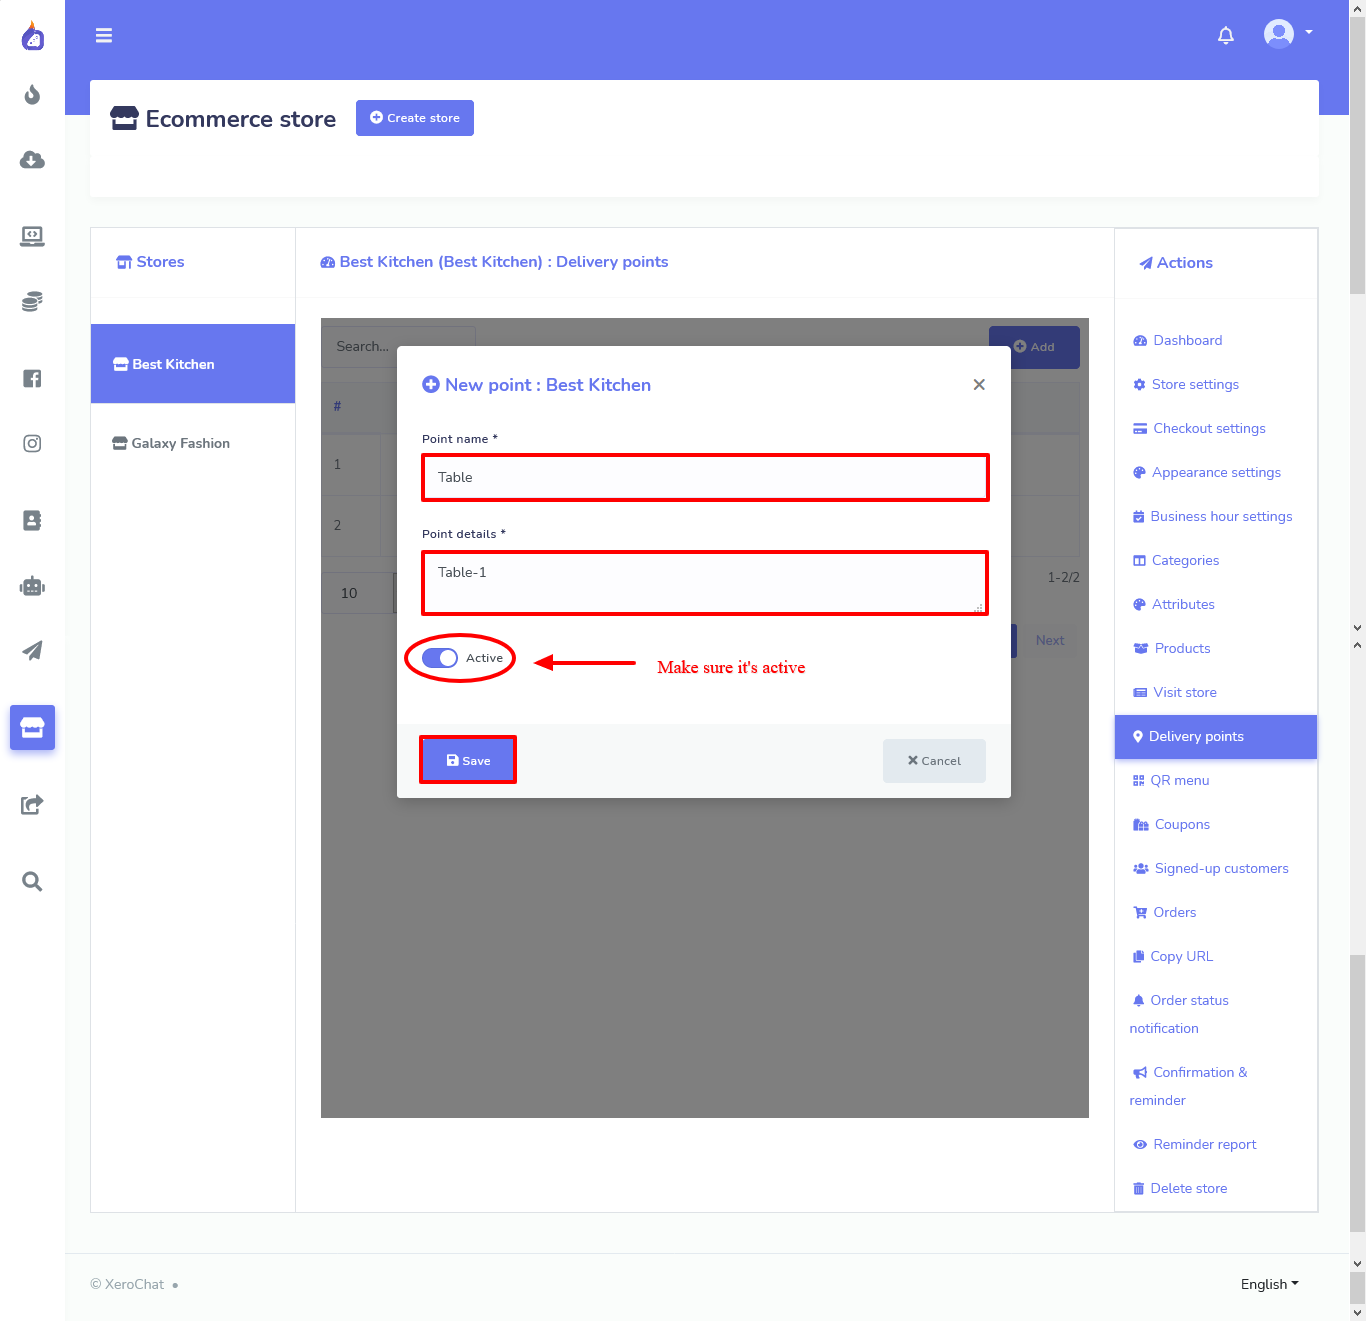
To create a delivery point, go to Ecommerce Store from the left navigation panel of ChatPion, select your store, you will see the Actions menu on the right side. Click on the Delivery points and then click on the add button to create a delivery point.
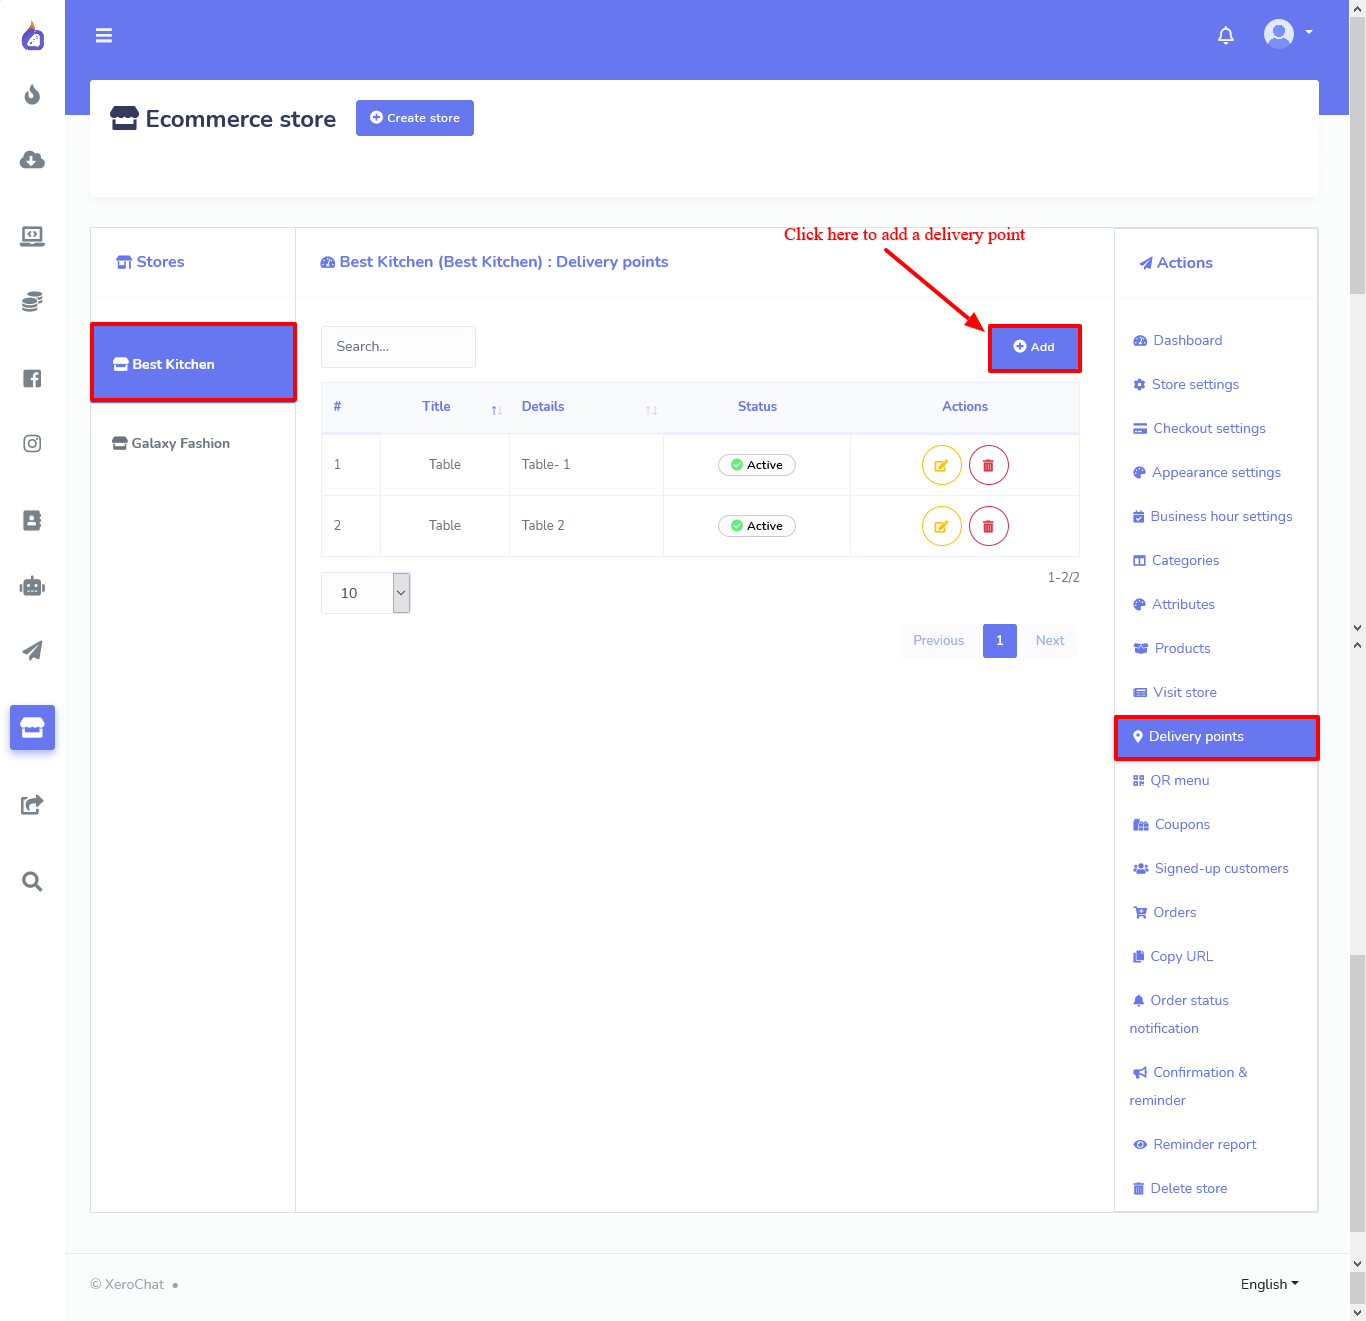
As soon as you click on the add button a form will pop up to create a delivery point. Give a point name and point details. And save the delivery points. For example, if the point name is “Table” or “Lawn Table” etc., then the point details would be “Table -1” or “Lawn Table-1” respectively.
You can create as many delivery points as you want. After that, we will create the QR code. We can create a general QR code or Table wise QR code. .
From the right-side Actions menu click on the QR Menu option to create a QR menu. When you click on the QR Menu option, the interface to create a QR menu will appear.
From here select your store for a general QR code menu for all and select a particular delivery point to create a QR code for a particular delivery point. Each type of QR code will have two different versions, one is to use on Facebook Messenger and the other one would be for the outside of the Messenger (Useable in any browser).
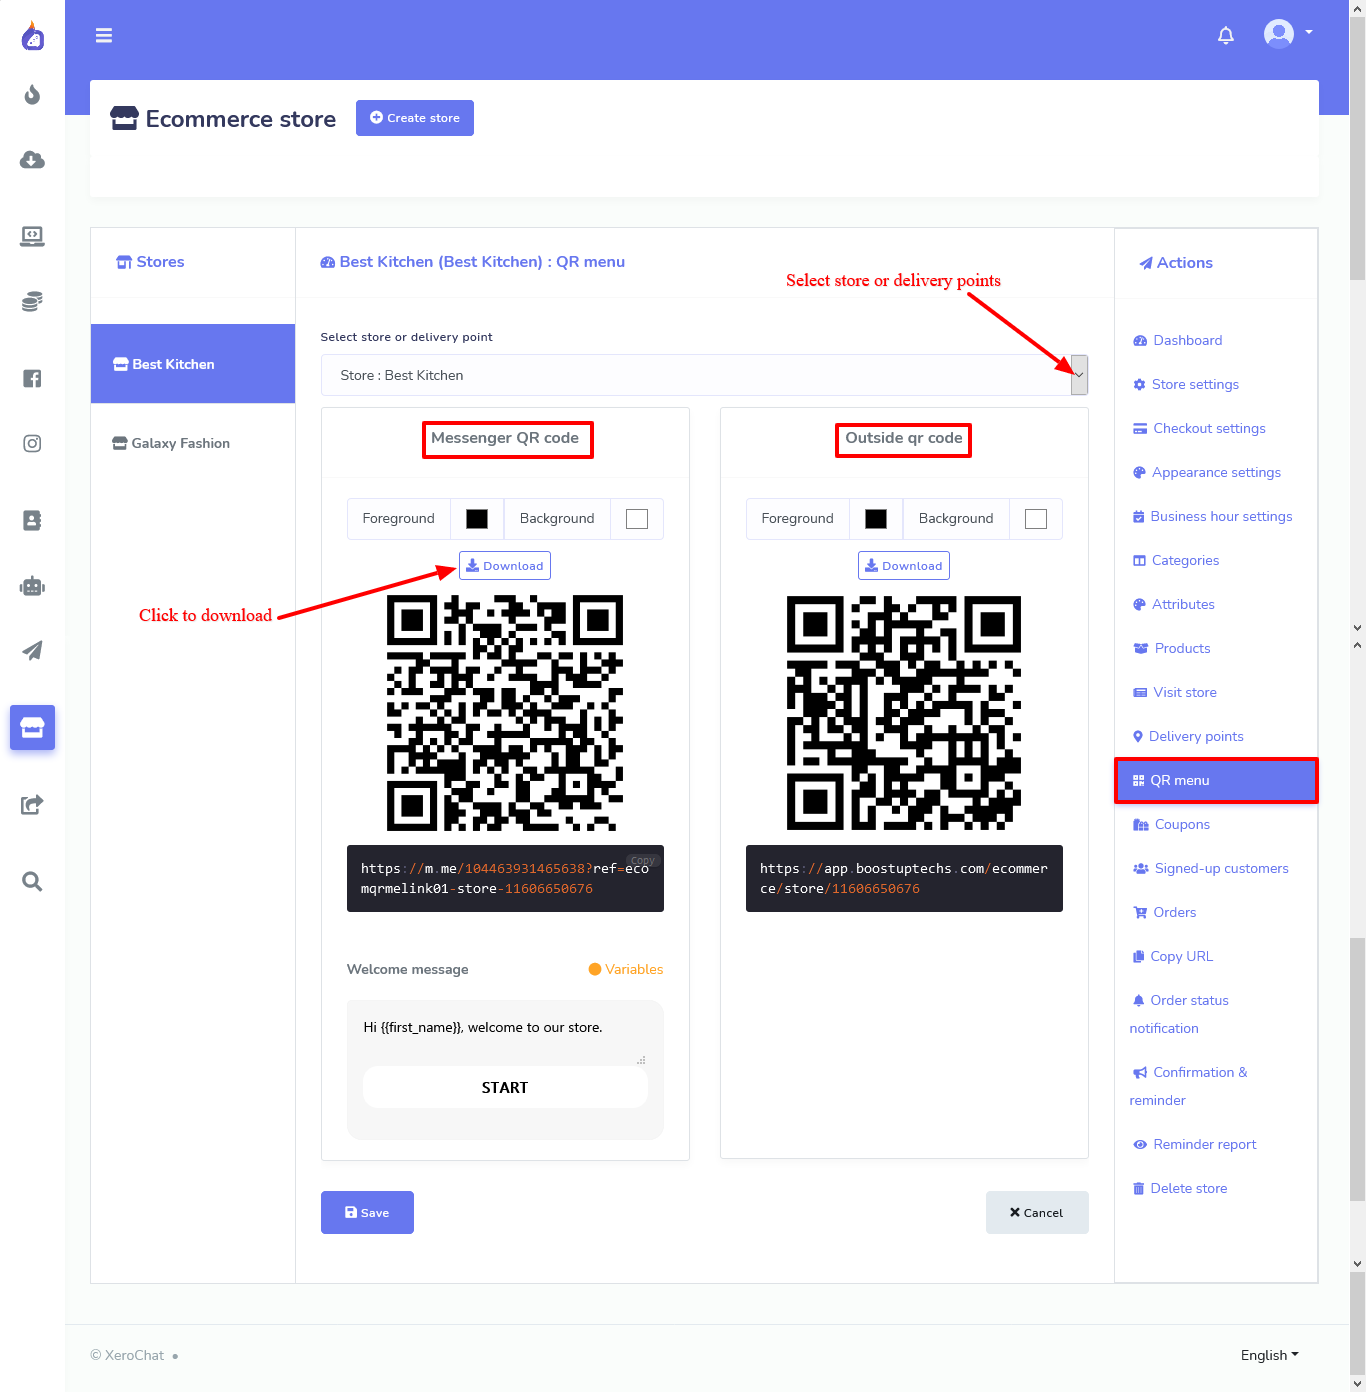
Download the QR code and print it to put on the Table of your Restaurant. Your guest can Scan the QR code to access the digital menu. Guest can select food, make a payment, and get the food on the table.
We also have a Video Tutorial on how to create a QR code digital menu for restaurant. You can watch the video given below.
Related Topics :
How to create E-commerce Store both inside and outside of Messenger with ChatPion
How to Recover Lost Sale With ChatPion Abandoned Cart Reminder
How to setup Ecommerce Payment Settings in ChatPion


0
9268
Social Media Management