
Gathering user data is general practice in modern websites and applications. For business, it is very important to collect the user’s data or leads. Collecting proper information and using it cleverly can give associations an edge over competitors and increase the impact of limited resources.
You can collect user's data or leads in 3 ways by using the ChatPion inside Facebook Messenger with Messenger bot. We will look into all the options we can use to collect user’s data using ChatPion.
Quick Reply:
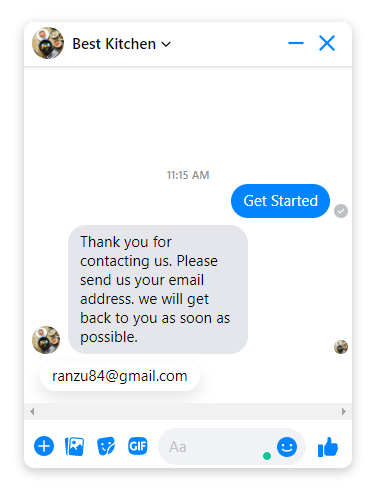
Quick replies are prior formatted answers you set up and then insert into a direct message to avoid having to type the same answer time and time again to different people. You can also use quick reply to collect users Email, phone. I will explain how you can do that by using ChatPion.
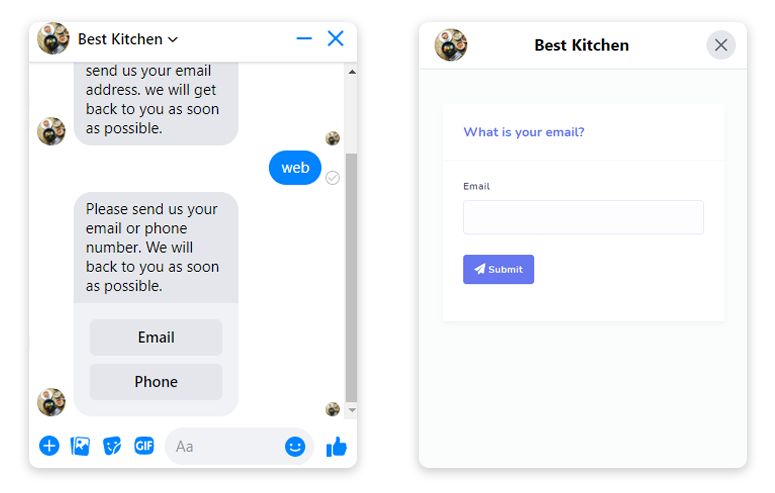
Quick Reply in Messenger, will just look like the below image:
From the dashboard of ChatPion go to Messenger Bot > Bot Settings
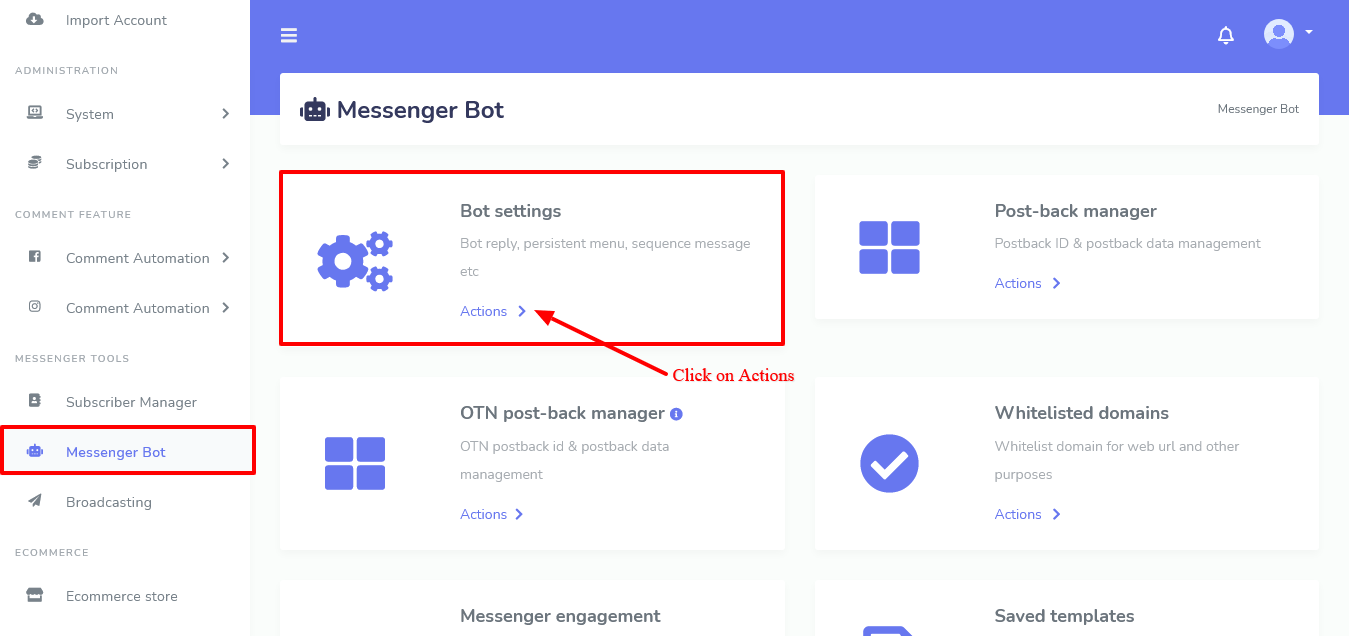
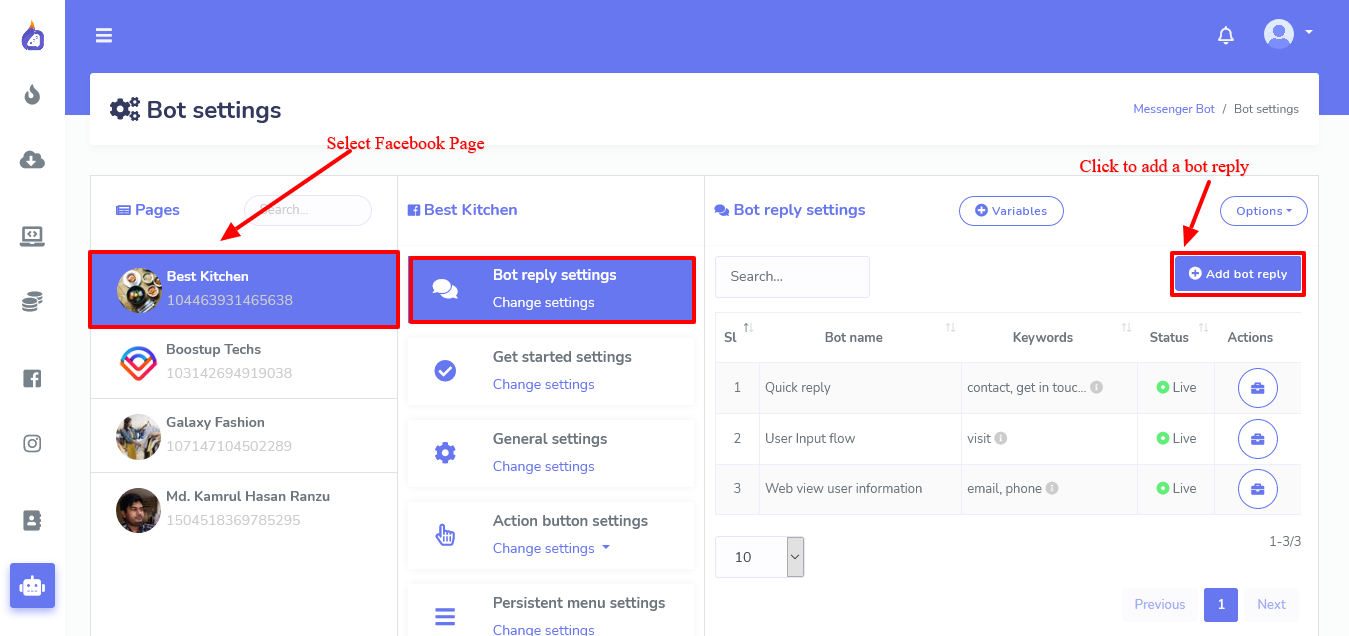
Now select your Facebook page for which you want to create a quick reply. By default, Bot Reply Settings is selected. Click on Add bot reply.
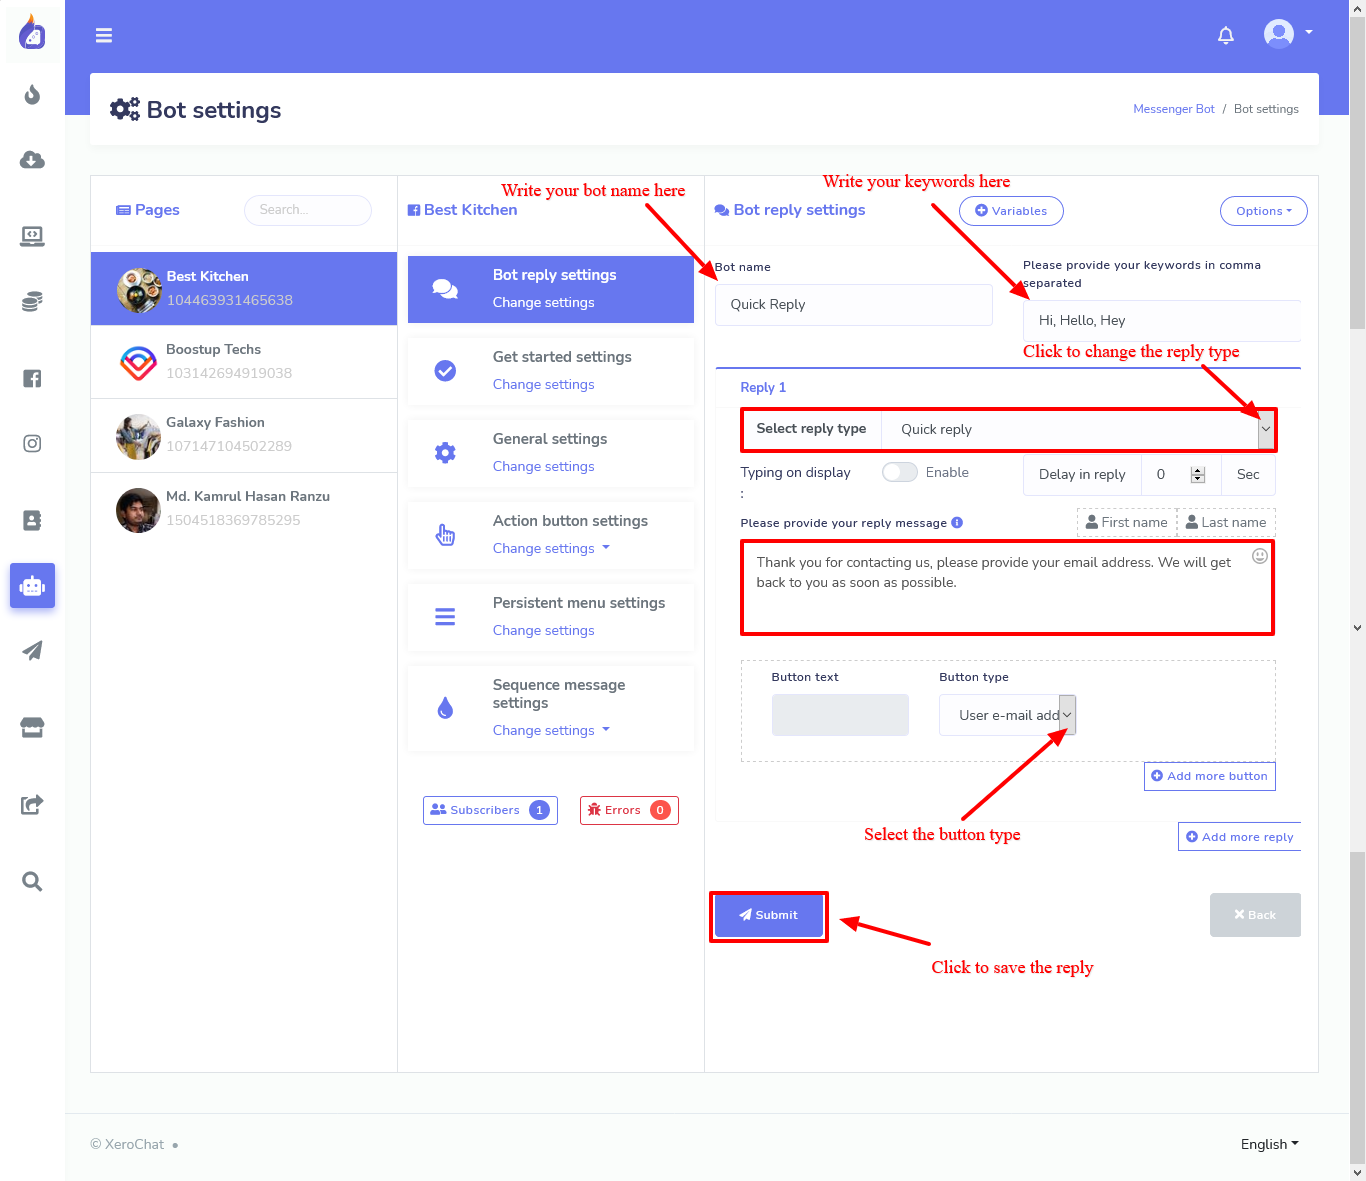
Give a bot name, write keywords for which this bot reply will trigger. Then select reply type to “Quick Reply” from the drop-down list. Write your message on the Message box, after that select the “Button Type” to User-email address, for email and user phone number to collect phone number. Don’t type anything on “Button Text”, it’s already disabled for Quick Reply. Then click Submit to save the reply.
Web View:
We can also collect user’s data like email or phone number using a web view form. Clients will see a web view form to enter their email or phone number.
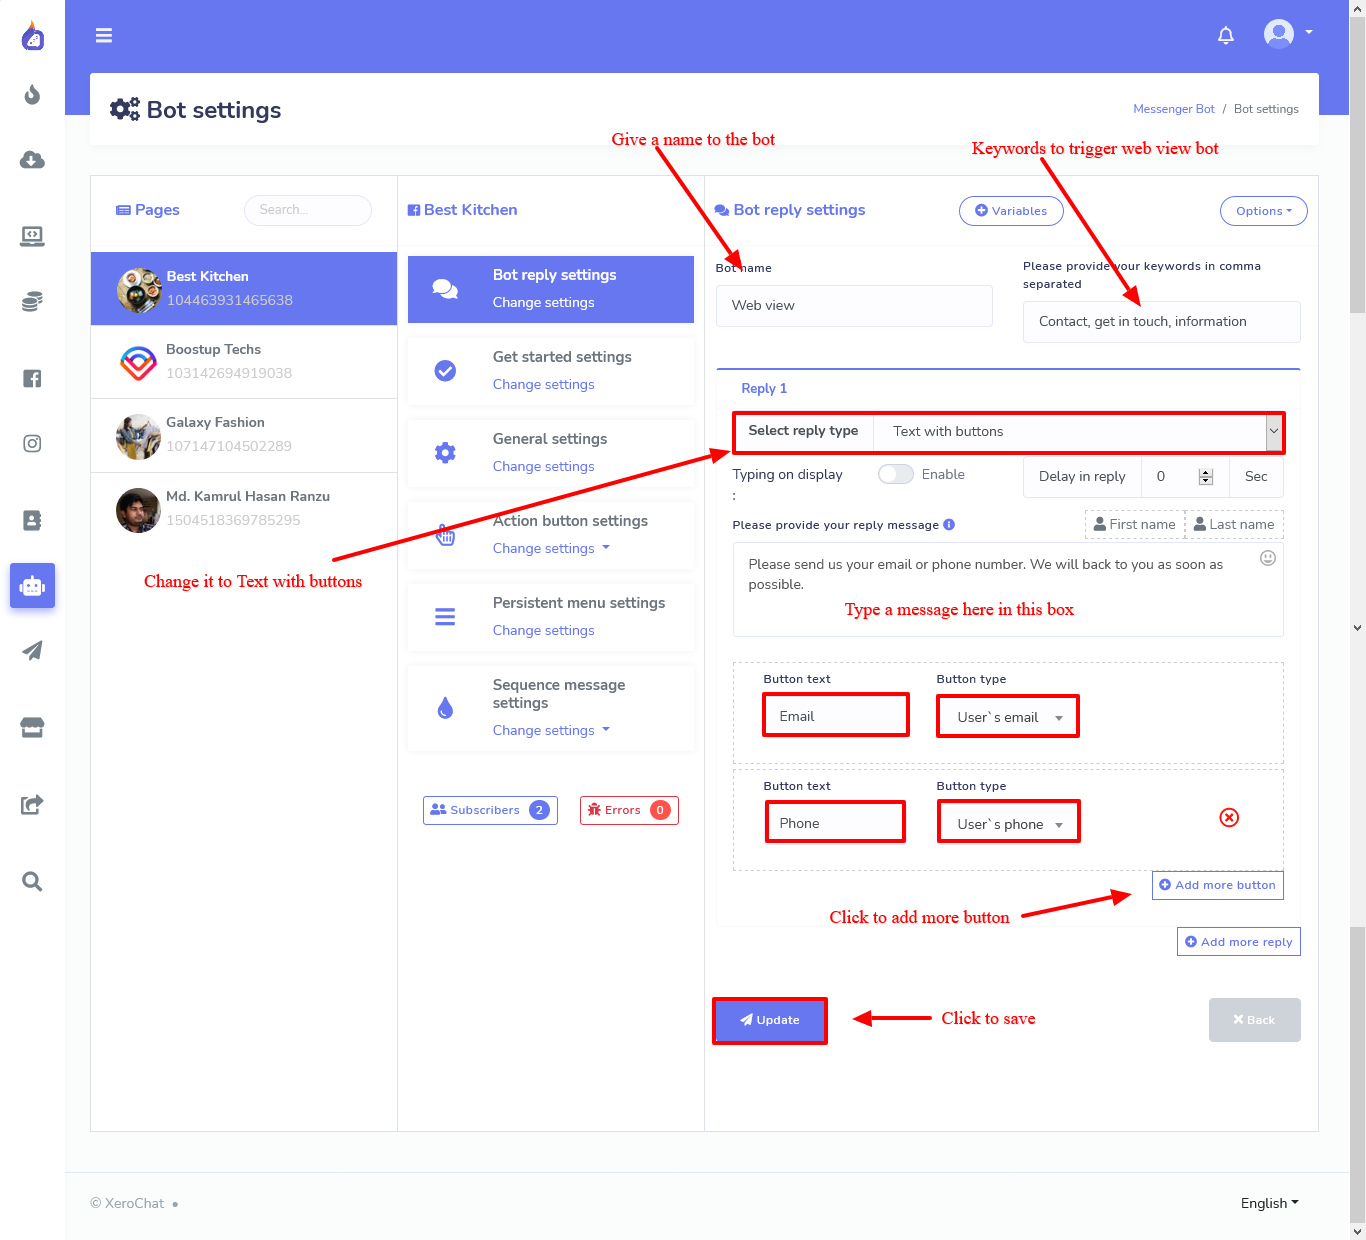
The process of creating a “web view form” for the user’s email or phone number is almost the same as the Quick reply, just change the “Select reply type” to Text with buttons instead of Quick reply. And then select the Button type to User’s email and give a name for the button on the Button Text field. You can also select User’s phone to collect a phone number and a user’s location by selecting the User’s location as the Button type. Click on Submit to save the Reply template.
You can also watch our Instructional video on how to create Quick reply and web view to collect users email or leads inside the Facebook Messenger.
User Input Flow and Custom Field:
(Needs User Input & Custom Fields : A ChatPion Add-on)Other than Quick Reply and web view there is a fantastic and powerful way to collect lead or user’s data, that is User Input Flow and Custom Field. It’s a special add-on of ChatPion to collect user’s data. Besides the user’s phone and email, it can collect any kind of user data in text, number, and date-time format. It can collect Full name, age, image, audio, video, and so on. We can also create Custom fields other than a system-defined field to collect user’s data and use them as a variable.
We can collect user’s data and use them in real-time, for example, collect user’s name and then call them by their name instantly. When you will use User Input Flow and Custom Field to collect data, users will feel like they are talking to a human while It’s nothing but a Bot.
Now, we will see how to create a User Input Flow and Custom Field. First, you need to get the add-on and install it with ChatPion.
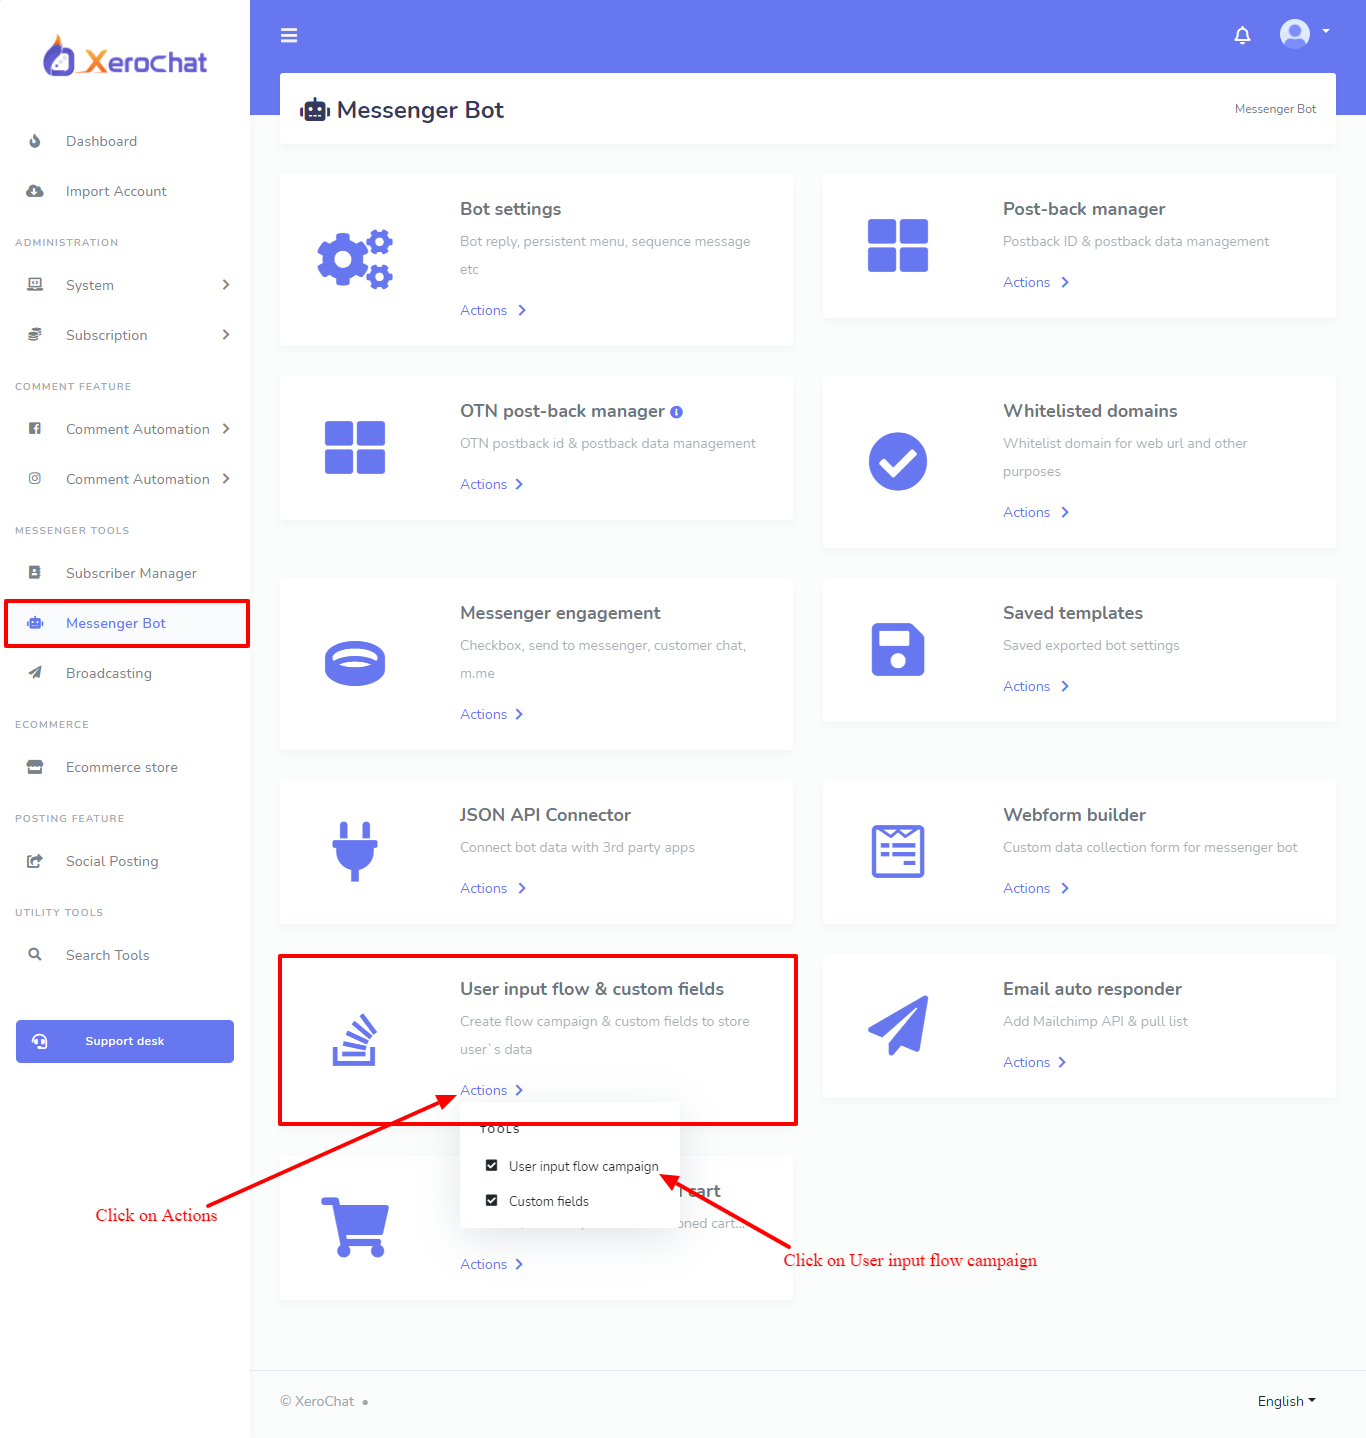
Now go to Messenger Bot > User Input Flow & Custom Field and click on Actions then Click on User input flow campaign
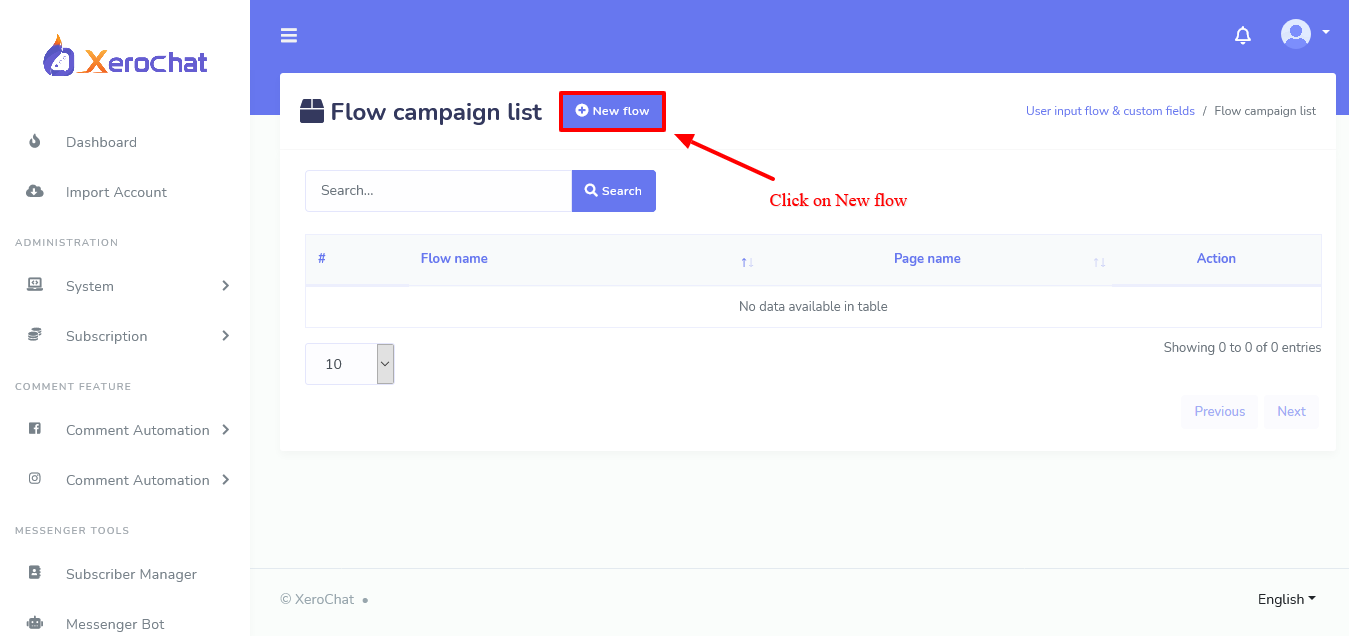
When you click on User input flow campaign, the Flow Campaign list interface will appear. At the top left corner, you can see a button named New Flow, click on this button to create a new User Input Flow. An interface to create a new user input flow will appear.
Give the campaign a name and choose the Facebook page for which you want to create the User Input Flow. We can create 2 types of user input flow, one is Free keyboard input, and the other one is Multiple choice. You can find these options on the right side of the interface. Under Free Keyboard input we have Email, Phone, Text, Number, Url, File, Image, Video, Date, Time, and Datetime. Just click on them to create your desired flow. You can add as many questions as you want.

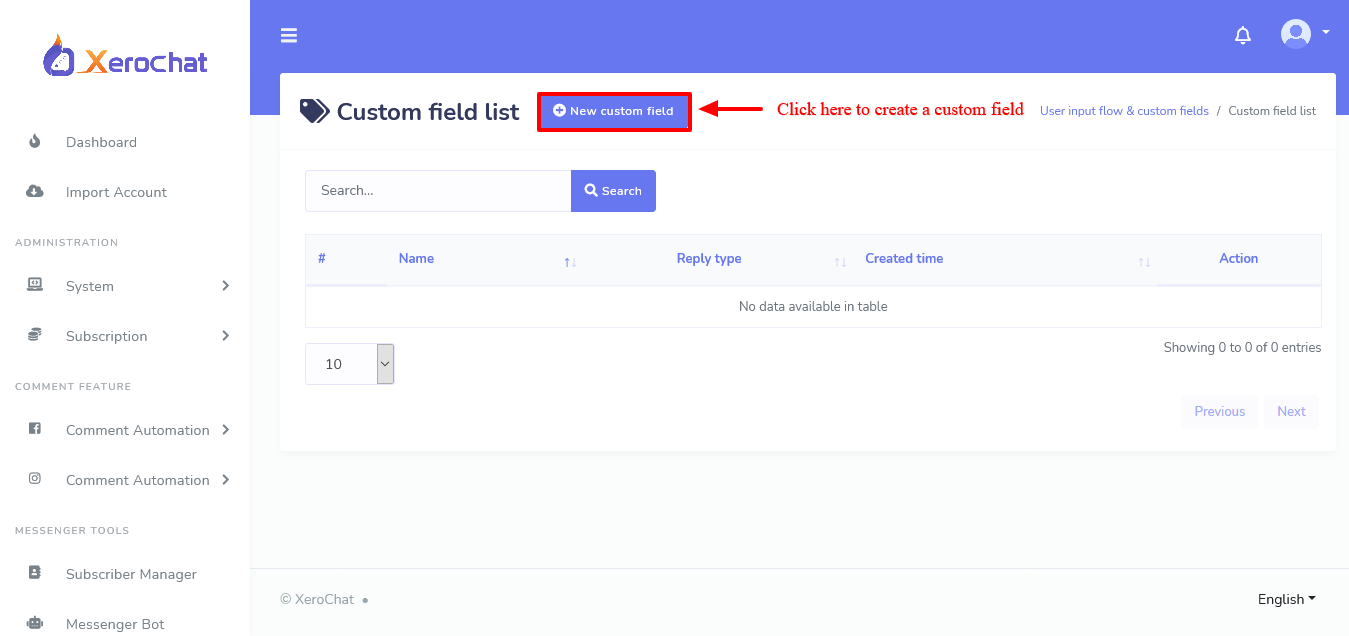
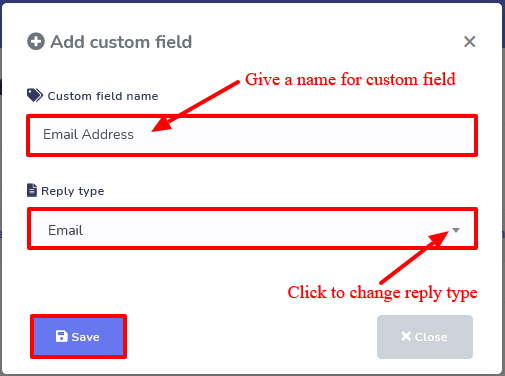
You can also create a cusom field to store user's data, but this is optional because to store Email; there is already a system defined field. To create custom fields, go to Messenger Bot > User Input Flow & Custom field > Actions >Custom field, an Interface to create Custom field will appear. Click on New Custom Filed to create a new custom field, a pop up form will appear, give a custom field name and select a reply type from drop down list. Then click the save button to save the New Custom Field.
Custom field creation:
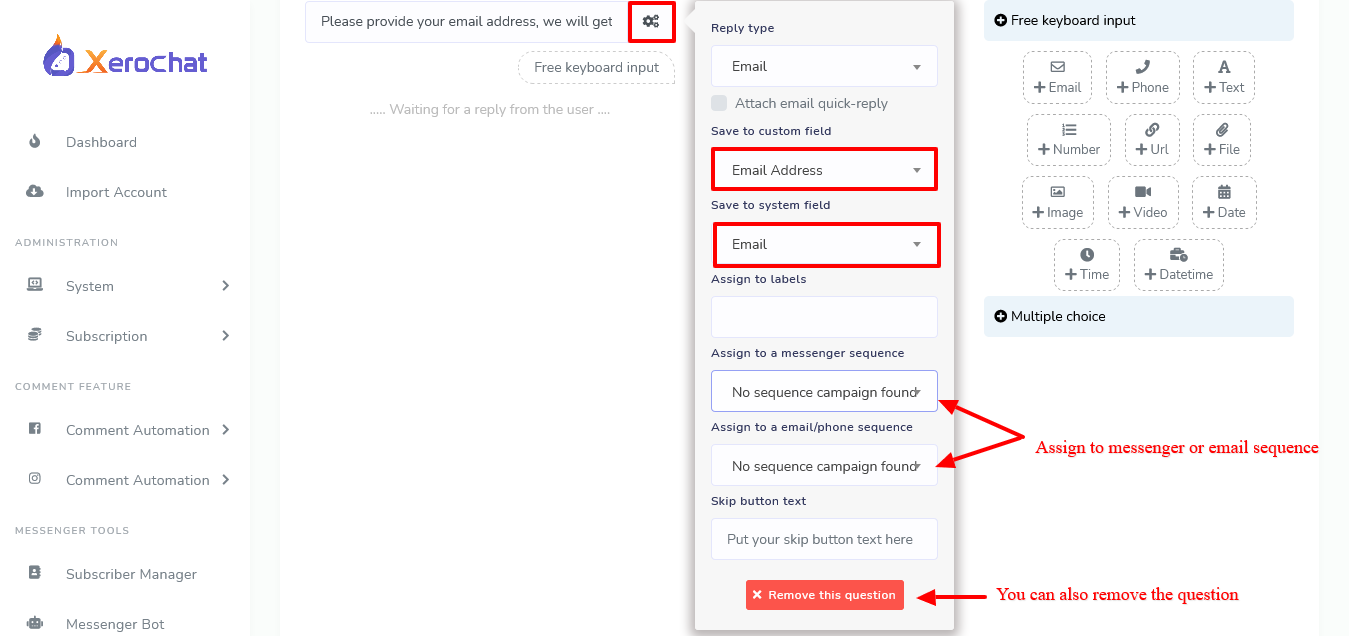
There is a settings button with every question you create for the flow, click on settings to define where the data should be saved. There are two options to save user’s data, one is System Field and the other one is Custom field. You can also assign to a messenger sequence or email/phone sequence. There is also a skip button to skip the question for your user. You can as well remove the questions from this setting.
Finally, select a final reply template when you are done with questions. You can create a new Final reply template by clicking on the Add button. When you are done with all the questions for your flow, click on the Submit button to save the campaign
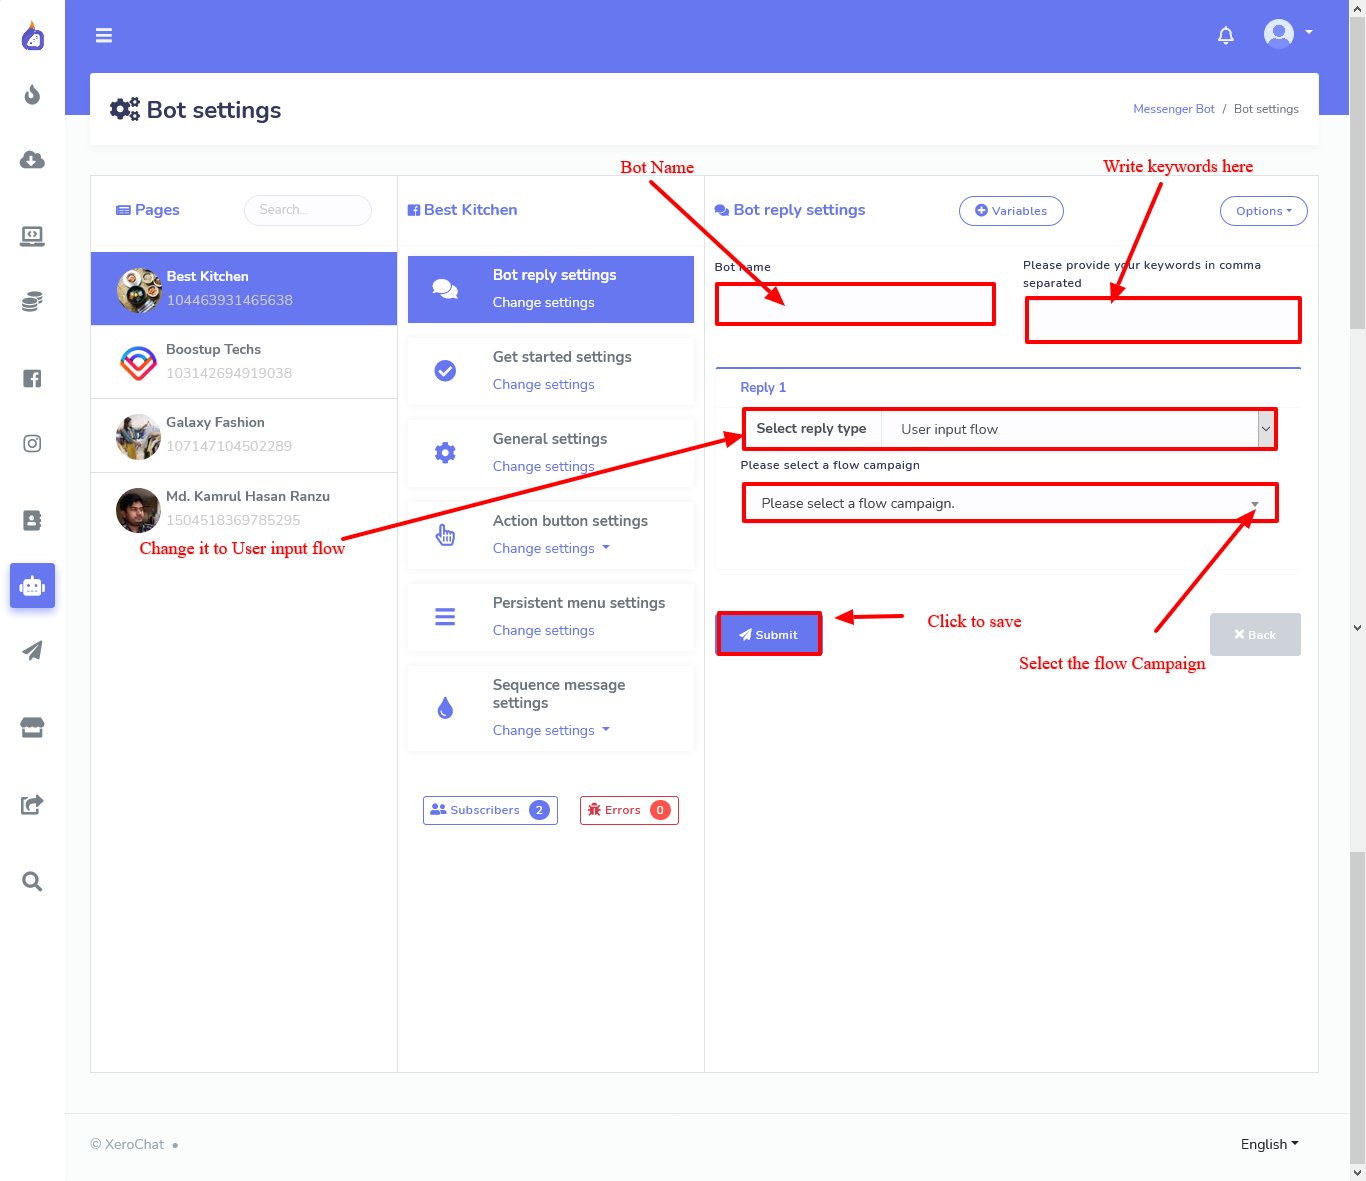
Now we need to Integrate this User Input Flow to a Messenger Bot. Go to Messenger Bot > Bot Settings. Select your Facebook page and add a bot reply. Give the bot a name, put keywords to trigger the bot. Then select the Reply type to “User Input Flow”, from the drop-down list and next select the Flow campaign you just created.
We also have an instructional video on "how to create a User Input Flow and Custom Field using ChatPion".
These are the 3 ways on ChatPion to collect user data or leads.
Related Topics :
How To Set Up Gmail SMTP With Xerochat
Setup Sendgrid SMTP & Integrate With ChatPion For Email Marketing
How To Integrate Amazon SES SMTP With ChatPion
How To Integrate Acelle With ChatPion
How To Integrate Mautic With ChatPion
How To Integrate ActiveCampaign With ChatPion
How To Integrate Sendinblue With ChatPion
Email Marketing With ChatPion & Email API Integration
How to collect Email address / Leads inside Facebook Messenger with ChatPion
How to setup system SMTP settings for ChatPion


0
6921
Social Media Management